
Hello! Welcome to the second module of your course.
In the first module, you learned how to structure content using HTML. Now, we'll shift our focus to the visual presentation of that content. As a designer, this is where you can start translating your visual ideas into the browser.
This lesson introduces Cascading Style Sheets (CSS), the language used to style web pages. Specifically, you will learn how to apply CSS styles to HTML elements using three different methods: inline, internal, and external stylesheets. We'll explore how each method works, and more importantly, discuss when and why you would choose one over the other, drawing parallels to concepts like local overrides and shared style libraries in design systems.
What is CSS?
Before we dive into the methods, let's quickly clarify what CSS is. HTML provides the structure and meaning of your content (e.g., "this is a heading," "this is a paragraph"). CSS, on the other hand, dictates the presentation (e.g., "make that heading blue and center-aligned," "use a specific font for that paragraph").
A basic CSS rule looks like this:
selector {
  property: value;
}
- Selector: The HTML element you want to style (e.g.,
h1,p). - Property: The visual characteristic you want to change (e.g.,
color,font-size). - Value: The new setting for that property (e.g.,
blue,16px).
Now, let's explore the three ways you can apply these rules.
1. Inline CSS: Styling a Single Element
Inline CSS is used to apply a unique style to a single HTML element. You do this by adding the style attribute directly inside the element's opening tag.
This method is like making a one-off manual adjustment to a single component instance in a design file. It's quick for a specific, isolated change, but it's not a scalable or maintainable approach.
To see this in action, watch the first part of the following video.
Get started with CSS in 8 minutes! 🎨
This video from Bro Code provides a clear, practical demonstration of applying inline styles.
Watch from the beginning until 1:46. The presenter will explain what CSS is and then demonstrate how to use the style attribute to change the background color of the page and the text color of a heading.
As you saw, the syntax is straightforward:
<h1 style="color: blue; text-align: center;">A Blue, Centered Heading</h1>
Pros:
- Quick Fixes: Useful for testing or applying a very specific style that won't be repeated.
Cons:
- Poor Maintainability: If you need to update a style, you have to find every element where it was applied.
- Mixes Structure and Presentation: It clutters your HTML, making it harder to read and manage.
- Highest Specificity: It overrides styles from internal and external stylesheets, which can be useful but often leads to unexpected styling conflicts. We'll discuss specificity in a future lesson.
The MDN Web Docs, a key resource for web developers, strongly advises against using inline styles for most situations.
2. Internal CSS: Styling a Single Page
An internal stylesheet (or embedded stylesheet) is used to define styles for a single HTML page. You place your CSS rules inside a <style> element, which goes within the <head> section of your HTML file.
This is analogous to creating a set of styles that are unique to a single artboard or screen in your design project, like a special campaign landing page that has a different look from the rest of the site.
Get started with CSS in 8 minutes! 🎨
Let's return to the Bro Code video to see how to implement an internal stylesheet.
Watch from 1:46 to 2:59. The video shows how to move the styles from the style attributes into a <style> block in the document's <head>.
Here's how it looks in code:
<!DOCTYPE html>
<html>
<head>
  <title>My Page</title>
  <style>
    body {
      background-color: #f0f0f0;
    }
    h1 {
      color: navy;
    }
  </style>
</head>
<body>
  <h1>This heading is navy.</h1>
</body>
</html>
Pros:
- Page-Specific Styles: Useful when a single page needs unique styling.
- Keeps Styles Together: All styles for the page are in one place, separate from the HTML content.
Cons:
- Not Reusable: The styles only apply to the page they are on. If you want to use the same styles on another page, you have to copy and paste the entire
<style>block. - Increases Page Load Time: The CSS is part of the HTML file, which must be downloaded every time the page is requested.
3. External CSS: Styling an Entire Website
An external stylesheet is the most common and recommended method. You write your CSS rules in a separate file with a .css extension (e.g., styles.css) and then link to it from your HTML document(s) using the <link> tag in the <head>.
This is the direct equivalent of a shared style library or design system. You define your styles—colors, typography, spacing—in one central location. Any page that links to this stylesheet will inherit its styles. This ensures consistency and makes maintenance incredibly efficient. If you want to change the color of all headings across your entire website, you only need to make the change in one file.
Get started with CSS in 8 minutes! 🎨
The final sections of the Bro Code video demonstrate the power of external stylesheets.
Watch from 2:59 to 4:32 to see how to create a separate style.css file and link it to your HTML. Then, watch from 6:30 to 7:36 to see how this single stylesheet can be applied to a second page, demonstrating its reusability.
Your HTML file would include this line in the <head>:
<link rel="stylesheet" href="styles.css">
And your styles.css file would contain the CSS rules:
/* styles.css */
body {
  font-family: Arial, sans-serif;
}

h1 {
  color: darkgreen;
}
Pros:
- Maintainability & Scalability: Change a style in one place, and it updates across your entire site.
- Separation of Concerns: Keeps your HTML (structure) and CSS (presentation) completely separate, leading to cleaner, more organized code.
- Performance: The browser can cache the
.cssfile. After the first page load, it doesn't need to be downloaded again for subsequent pages, making the site load faster.
Summary and Best Practices
The following image provides a great visual summary of where each type of CSS is placed.
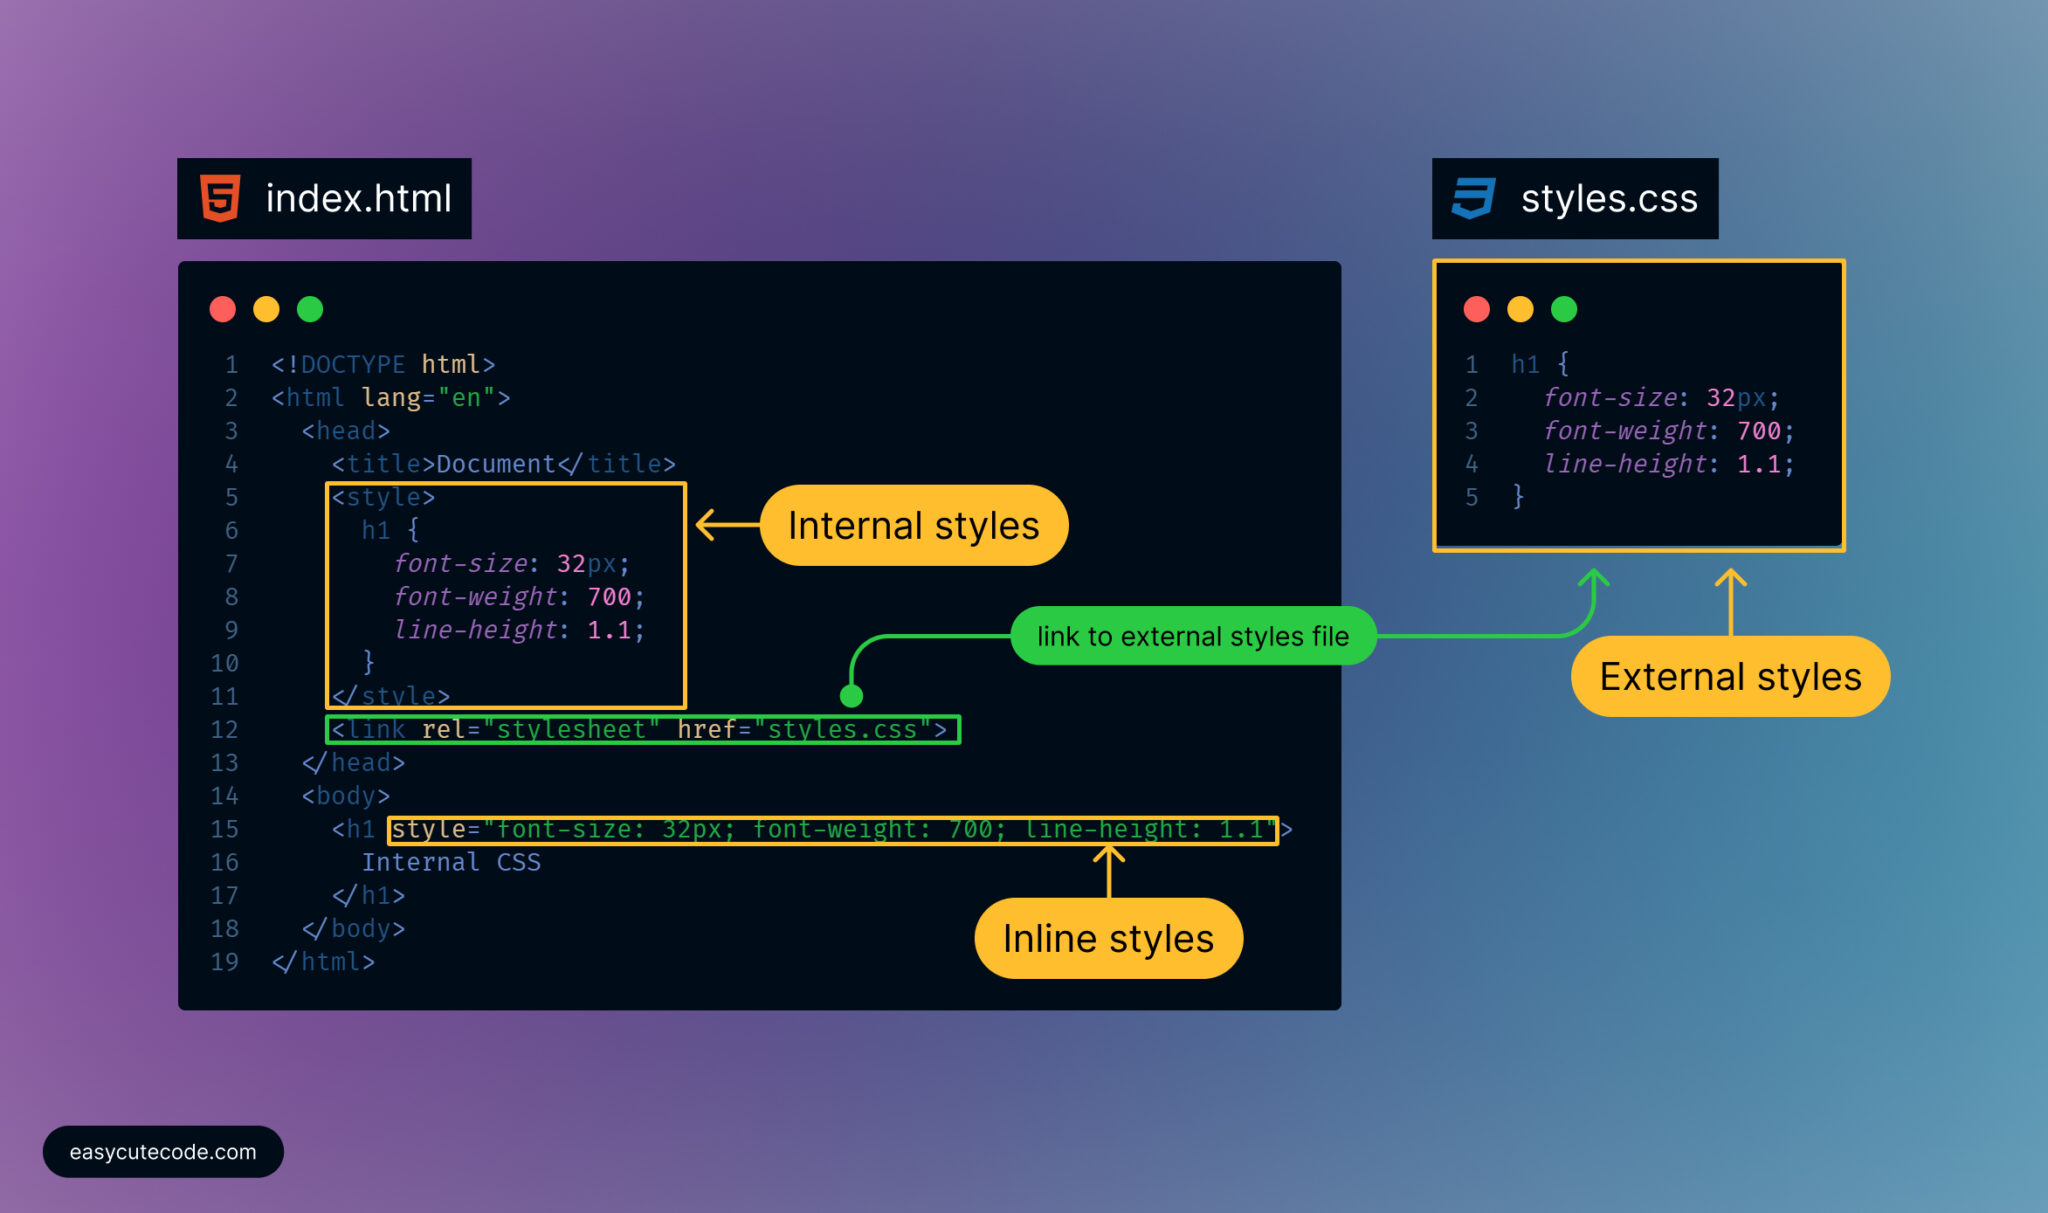
For a more detailed breakdown and a useful comparison table, please read the following article from MDN.
The MDN Web Docs provide the definitive guide on this topic. This article clearly explains all three methods and their use cases.
Read the section 'Adding CSS to our document', including the subsections on 'External stylesheets', 'Internal stylesheets', and 'Inline styles'. Focus on understanding the syntax for each method and the pros and cons discussed.
To summarize the key differences and when to use each:
| Feature | Inline CSS | Internal CSS | External CSS (Best Practice) |
|---|---|---|---|
| Location | Inside an HTML element's style attribute. | In a <style> tag within the HTML <head>. | In a separate .css file. |
| Scope | A single element. | A single HTML page. | An entire website (multiple pages). |
| Use Case | Quick tests, one-off overrides. | Styles for a unique, single page. | Consistent styling across a multi-page site. |
| Analogy | Manually tweaking one component instance. | A style guide for a single artboard. | A shared design system library. |
Conclusion
In this lesson, you've learned the three fundamental ways to apply CSS to your HTML.
Key Takeaways:
- Inline styles are for single-element, one-off changes but should be used sparingly.
- Internal stylesheets are for styling a single, unique page.
- External stylesheets are the best practice for most projects, promoting consistency, maintainability, and better performance, much like a centralized design system.
As you move forward, you should almost always default to using an external stylesheet.
In our next lesson, we will dive deeper into the first part of a CSS rule: the selector. You'll learn how to target specific elements on your page with much greater precision using type, class, and ID selectors, giving you fine-grained control over your designs.
Can't find a good explanation? Sign up and we'll make it for you
Sign up