
Hello! In our last session, you mastered the Android pre-release workflow, learning to promote builds through Google Play's internal, closed, and open testing tracks. This put you in a strong position to gather feedback and meet Google's mandatory testing requirements.
We now arrive at the final milestone for your iOS app. This lesson will guide you through the last steps of the journey: submitting your application for final review by Apple. We will cover the entire process, from creating a production-ready build in Xcode to navigating the App Store Connect portal and completing the submission. By the end of this lesson, your app will be in the hands of the App Store review team.
1. Archiving and Uploading Your Production Build
Before you can submit anything, you need a final, optimized, production-ready build of your app. In the world of Xcode, this is called an Archive. Archiving packages your entire application—your compiled native code and your synced web assets—into a single bundle (.ipa file) signed for distribution.
While we have built and run the app in Xcode before, the archiving process is specific to creating a release.
First, as always, ensure your web assets are built and synced:
# Assuming you are in your 'mobile' package directory
# Build your React SPA for production
bun run build

# Sync the web assets and native project configurations
bunx cap sync
With your project synced, open it in Xcode:
bunx cap open ios
Now, follow the specific steps to create and upload the archive. The video below from NDC provides an excellent visual walkthrough of this exact process.
App Store Submission Guide (2025): Publish Your iOS App to the Store (Xcode & App Store Connect)
This video guide clearly demonstrates the archiving and upload procedure within Xcode.
Watch the segment from All right, I'm in my app, which covers changing the build configuration to "Release," selecting a generic device target, creating the archive, and using the "Distribute App" function to upload it directly to App Store Connect.
To summarize the key steps shown in the video:
- In Xcode, go to Product > Scheme > Edit Scheme....
- In the "Run" section, set the Build Configuration to Release. This ensures all optimizations are enabled.
- Close the scheme editor. In the device selection dropdown at the top, choose Any iOS Device (arm64). You cannot archive for a simulator.
- Go to Product > Archive. Xcode will build the project.
- Once complete, the Organizer window will appear, showing your new archive.
- Select the archive and click Distribute App.
- Choose App Store Connect as the destination and Upload as the method.
- Follow the prompts. Xcode will validate the app and upload the binary to App Store Connect.
This upload can take several minutes. While it's processing in the background, we can move on to preparing the store listing.
2. Preparing Your App's Storefront in App Store Connect
With the build on its way, your focus now shifts to App Store Connect, Apple's web portal for managing your apps. You will have already created the app record in a previous lesson. Now, we must complete all the required metadata.
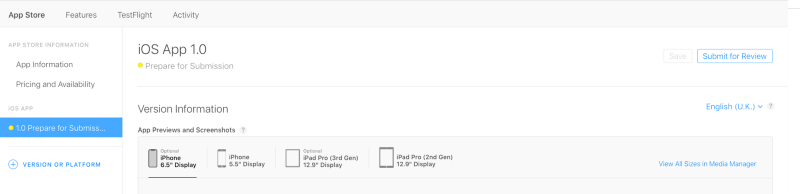
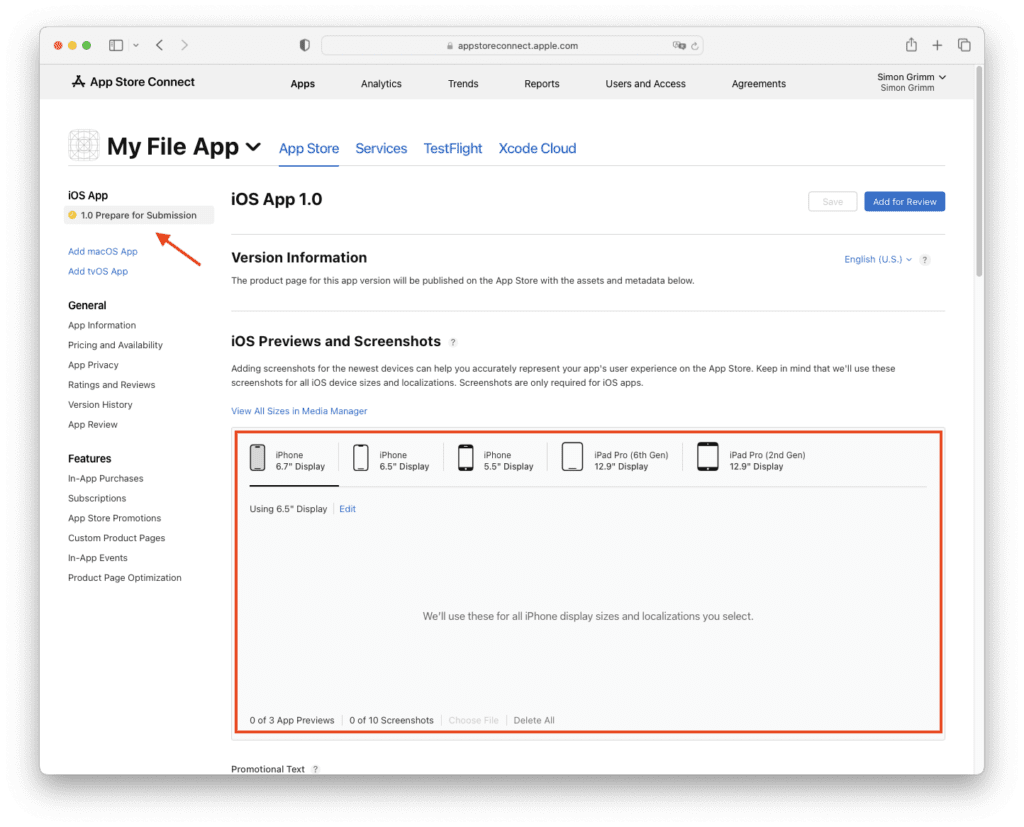
Navigate to your app in App Store Connect. You should see a version under the "App Store" tab with the status "Prepare for Submission." This is where you'll spend most of your time.
The Pre-Submission Checklist
Before diving into the forms, it's wise to have your assets ready. The LobeHub guide provides an excellent, concise checklist of what you'll need.
Capacitor App Store Publishing | Ski... · LobeHub
This guide contains practical checklists that are invaluable for ensuring you have all required materials before submission.
First, review the "Universal Requirements" list. Then, focus on the iOS Screenshot Sizes table. This will give you a clear inventory of the assets you need to prepare.
As the guide indicates, you must provide screenshots. The good news is you only need to provide them for the largest device sizes (6.7" and 5.5" for iPhone), and App Store Connect will automatically use them for smaller, similar devices.
Now, let's walk through the key sections you need to complete on this page. The video from NDC provides a great visual tour of filling out these fields.
App Store Submission Guide (2025): Publish Your iOS App to the Store (Xcode & App Store Connect)
This segment walks through each metadata field you need to complete for your app's listing.
Watch the portion from and we're going to be filling out. It covers the App Information (subtitle, category), Version Information (screenshots, promotional text, description, keywords, support URLs), and other details.
Key fields to complete include:
- Screenshots: Upload the images you prepared.
- Promotional Text: A short, 170-character teaser that can be updated without a new app version.
- Description: A detailed explanation of your app's features and value.
- Keywords: Comma-separated terms to improve search discovery.
- Support URL: A link to your app's support page.
- App Information: Set your app's categories and complete the age rating questionnaire.
- Pricing and Availability: Set the price (even if it's Free) and the countries where it will be available.
- App Privacy: You should have already completed this, but double-check that the privacy policy URL and data collection disclosures are accurate.
3. Finalizing the Submission
Once your build has finished processing, you can attach it to your submission and complete the final steps.
Attaching the Build and Handling Compliance
Scroll down the "Prepare for Submission" page to the "Build" section.
Building And Releasing Your Capacitor iOS App - Ionic Blog
This article from the Ionic Blog clearly explains the final steps of associating your build and handling a common compliance query.
Read the section titled "Submitting your iOS App". Pay close attention to how to add a build and how to address the "Missing Compliance" warning related to encryption.
As the article describes, you'll click "Add Build" (or a similar button) and select the version you uploaded from Xcode. You will likely see a yellow warning for "Missing Compliance". This refers to export laws regarding encryption.
You can resolve this by clicking "Manage" and answering the prompt. If your app only uses standard encryption (like HTTPS) provided by the operating system or Capacitor plugins, and you don't implement custom encryption algorithms, you can typically state that your app does not use non-exempt encryption.
A more proactive approach is to add this key to your ios/App/App/Info.plist file, which prevents the question from being asked on future uploads:
<key>ITSAppUsesNonExemptEncryption</key>
<false/>
App Review Information
This section is crucial for helping the Apple reviewer test your app effectively.
- Sign-In Information: If your app requires a login, you must provide a demo account (username and password). Without this, your app will be rejected.
- Notes: This is where you can explain complex features, point out specific user flows you want the reviewer to test, or provide any other context that would facilitate the review.
- Attachments: You can optionally attach a video demonstrating a feature that is hard to access or requires specific hardware.
4. Submitting and Waiting for Review
With all sections complete, a blue "Add for Review" button at the top right of the page will become active.
App Store Submission Guide (2025): Publish Your iOS App to the Store (Xcode & App Store Connect)
This final segment shows the submission itself and explains what happens next.
Watch from and click on add for review. The presenter clicks the submission button and discusses the review process, including potential rejections and how to handle them.
After clicking "Add for Review" and confirming, your app's status will change to "Waiting for Review". You will receive an email confirmation. The review process can take anywhere from 24 hours to several days.
Common Rejection Reasons:
Be prepared for the possibility of rejection. It's a normal part of the process. The LobeHub guide lists some common reasons.
Capacitor App Store Publishing | Ski... · LobeHub
Knowing what to avoid can save you a lot of time. This section lists frequent pitfalls.
Review the table under "iOS Rejections".
For Capacitor apps that wrap a web application, pay special attention to Guideline 4.2 - Minimum Functionality. Apple may reject apps that they perceive as simple web wrappers lacking native integration or app-like functionality. Your integration of push notifications and other native features will be key to demonstrating that your app provides more value than just a website.
Conclusion
Congratulations! You have now navigated the entire iOS submission process, from creating a final build to handing it off to Apple for review. This is a major achievement in the app development lifecycle.
Let's recap the key stages:
- You created a production Archive in Xcode and uploaded it to App Store Connect.
- You meticulously filled out all the required metadata in App Store Connect, including screenshots, descriptions, and privacy details.
- You attached your build to the submission, handled the encryption compliance question, and provided notes for the reviewer.
- Finally, you submitted the app for review.
In our next and final lesson, we will complete your journey by returning to the Google Play Console and submitting your Android application for its final production review.
Can't find a good explanation? Sign up and we'll make it for you
Sign up