Hello! Welcome to the final lesson in our module on Deep Neural Network Fundamentals.
Introduction
In our last lesson, we explored Dropout, a powerful regularization technique that works by altering the model's architecture during training. We saw how randomly deactivating neurons forces the network to learn more robust and less co-dependent features, thereby preventing overfitting.
Today, we shift our focus from regularizing the model's parameters to optimizing the training process itself. While a good architecture is crucial, how you navigate the loss landscape during training is equally important for achieving a great result. We will cover two essential strategies: Early Stopping and Learning Rate Scheduling.
Your learning outcome for this lesson is to implement early stopping and learning rate scheduling strategies. By the end, you will understand:
- The logic and implementation of Early Stopping to prevent overfitting and save computation.
- The purpose and benefits of Learning Rate Scheduling.
- How to use PyTorch's built-in schedulers for various decay policies.
- How to integrate both techniques into a standard training loop.
These techniques are mainstays in virtually all modern deep learning projects, helping to make training more efficient, stable, and effective.
1. Early Stopping: Knowing When to Quit
In training, more is not always better. As a model trains for many epochs, it can pass the point of optimal generalization and begin to overfit the training data. Early stopping is a simple yet highly effective method to prevent this.
The core idea is to monitor the model's performance on a validation set and stop the training process when this performance stops improving.

Let's watch a video that explains the concept and, more importantly for us, walks through a practical implementation of a custom early stopping class in PyTorch. Since you're a software engineer, you'll appreciate seeing how this logic is encapsulated in a reusable class.
Early Stopping in PyTorch to Prevent Overfitting (3.4)
The video 'Early Stopping in PyTorch to Prevent Overfitting' by Jeff Heaton provides an excellent, code-first explanation of this technique.
Please watch from the beginning to 04:53. The first part (to 01:20) explains the 'what' and 'why'. The second part (from 01:20 to 04:53) details a custom Python class for early stopping. Pay close attention to the parameters patience, min_delta, and the logic for tracking the best_loss and restoring the best model weights.
As you saw in the video, the implementation revolves around a few key ideas:
- Patience: How many epochs to wait for improvement before stopping. This prevents stopping prematurely due to small, random fluctuations in validation loss.
- Minimum Delta (
min_delta): The minimum change in the monitored metric to qualify as an improvement. This can be useful to avoid considering trivial improvements. - State Management: The class keeps track of the
best_lossseen so far and acounterfor epochs without improvement. - Restoring Best Weights: A crucial feature is saving the model's state (
state_dict) whenever a new best loss is found. When stopping, the best weights are restored, ensuring you end up with the model from its point of peak performance, not the overfitted one from several epochs later.
Here is the EarlyStopping class from the article "Using Learning Rate Scheduler and Early Stopping with PyTorch", which presents a similar logic. Notice the use of the __call__ dunder method, a common Python pattern to make a class instance callable like a function.
Using Learning Rate Scheduler and Early Stopping with PyTorch
This article from Debugger Cafe provides another clean implementation of an early stopping class. It's a great example to read through and compare with the one from the video.
First, read the section 'Early Stopping' for a concise conceptual overview. Then, review the code in 'The Early Stopping Class' section to see how the logic is implemented. Notice the similarities and differences with the video's implementation.
Test your understanding!
You are training a model with an EarlyStopping mechanism configured with patience=3 and min_delta=0. Your validation loss over several epochs is:[0.55, 0.48, 0.43, 0.44, 0.435, 0.438, 0.42, 0.43]
When does the counter increment, and at which epoch would training stop?
Show answer
- Epoch 1: Loss = 0.55 (Best loss = 0.55, Counter = 0)
- Epoch 2: Loss = 0.48 (Improvement! Best loss = 0.48, Counter reset to 0)
- Epoch 3: Loss = 0.43 (Improvement! Best loss = 0.43, Counter reset to 0)
- Epoch 4: Loss = 0.44 (No improvement. Counter = 1)
- Epoch 5: Loss = 0.435 (No improvement. Counter = 2)
- Epoch 6: Loss = 0.438 (No improvement. Counter = 3)
- Epoch 7: Loss = 0.42 (Improvement! Best loss = 0.42, Counter reset to 0)
- Epoch 8: Loss = 0.43 (No improvement. Counter = 1)
If the training had continued after epoch 6 without the improvement at epoch 7, the counter would have reached the patience limit of 3, and training would have stopped. The model weights from epoch 3 (when the loss was 0.43) would have been restored as the final model.
2. Learning Rate Scheduling
Choosing the right learning rate is critical. A fixed learning rate presents a dilemma:
- Too high, and the optimizer might overshoot the minimum, causing the loss to fluctuate or diverge.
- Too low, and training will be excessively slow, and you might get stuck in a poor local minimum.
Learning Rate Scheduling solves this by dynamically adjusting the learning rate during training. The most common strategy is to start with a relatively high learning rate to make quick progress and then gradually decrease it to allow for finer, more stable convergence as we approach a minimum.
There is a wide variety of scheduling strategies, or "policies."
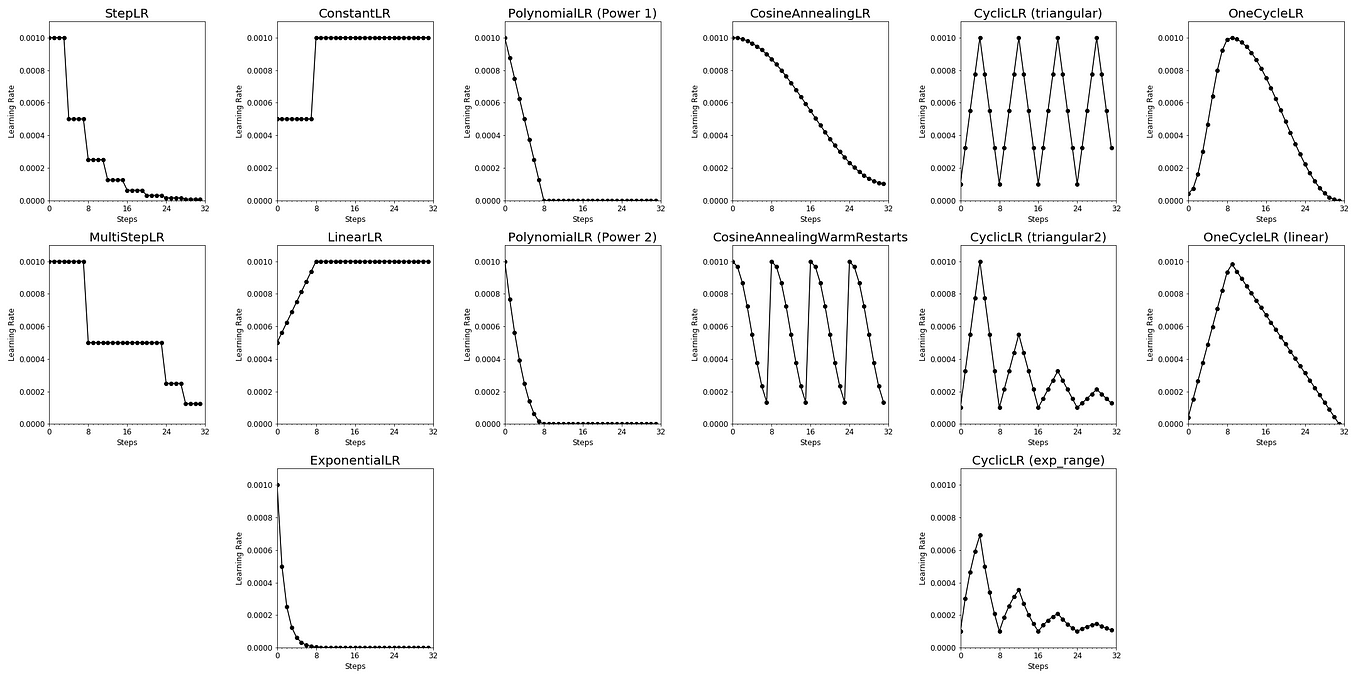
These policies can be broadly grouped into two categories:
- Pre-defined Schedules: The learning rate changes based on the current epoch or step number (e.g.,
StepLR,ExponentialLR,CosineAnnealingLR). - Adaptive Schedules: The learning rate changes based on a monitored metric, typically the validation loss (e.g.,
ReduceLROnPlateau).
PyTorch has a dedicated module, torch.optim.lr_scheduler, that makes using these policies straightforward. Let's watch a video that gives a tour of this module.
PyTorch LR Scheduler - Adjust The Learning Rate For Better Results
The video 'PyTorch LR Scheduler' by Patrick Loeber clearly demonstrates how to use several common schedulers. It's a great practical guide.
Watch the following three segments: General Usage (01:04 - 02:28): Understand the basic structure: you create a scheduler after your optimizer and call scheduler.step() in your training loop. StepLR (07:28 - 08:41): This is a very common pre-defined scheduler that decays the LR by a factor gamma every step_size epochs. ReduceLROnPlateau (09:39 - 12:27): This is a powerful adaptive scheduler that reduces the LR when the validation loss stops improving. It works very well in combination with early stopping.
Advanced Policies: Cosine Annealing and Warmup
While StepLR and ReduceLROnPlateau are excellent workhorses, many state-of-the-art models use more sophisticated schedules. Two particularly important concepts are Cosine Annealing and Warmup.
- Cosine Scheduler: This schedule smoothly decreases the learning rate following the shape of a cosine curve. It starts high, decays slowly, then more rapidly, and finally slows down again for fine-tuning at the end. It's empirically shown to work very well, especially in computer vision.
- Warmup: In the very beginning of training, when weights are random, large learning rates can lead to instability. A warmup phase addresses this by starting with a very small learning rate and linearly increasing it to the target initial rate over a few epochs. This allows the model to "settle in" before taking larger optimization steps.
The "Dive into Deep Learning" book provides an excellent overview of these policies.
12.11. Learning Rate Scheduling
The chapter 'Learning Rate Scheduling' from the 'Dive into Deep Learning' book provides clear explanations and visualizations of these more advanced policies.
Please read the sections 'Cosine Scheduler' and 'Warmup'. Focus on the intuition behind each strategy and look at the plots to understand how the learning rate changes over time.
3. Integrating into the Training Loop
Now, let's see how to use both Early Stopping and Learning Rate Scheduling together in a single training script. The logic is straightforward: at the end of each epoch, after calculating the validation loss, you pass this loss to both your early stopping and learning rate scheduler objects.
Let's return to the Debugger Cafe article, which provides a complete example.
Using Learning Rate Scheduler and Early Stopping with PyTorch
This article demonstrates how to cleanly integrate the LRScheduler (wrapping ReduceLROnPlateau) and EarlyStopping classes into a training loop.
Read the section 'The Training Loop' and examine the code. The key part is the if block at the end of the loop where lr_scheduler(val_epoch_loss) and early_stopping(val_epoch_loss) are called. Also, skim the final section 'Executing the train.py Script' to see the plots comparing runs with no helpers, with LR scheduling, and with early stopping. This clearly shows their practical impact.
The typical flow at the end of an epoch looks like this:
# --- Inside the training loop, after validation ---
for epoch in range(epochs):
    # ... training phase for one epoch ...
    train_epoch_loss, train_epoch_accuracy = fit(...)

    # ... validation phase for one epoch ...
    val_epoch_loss, val_epoch_accuracy = validate(...)

    print(f"Epoch {epoch+1}: Val Loss: {val_epoch_loss:.4f}")

    # For schedulers like ReduceLROnPlateau
    lr_scheduler.step(val_epoch_loss)

    # Check for early stopping
    early_stopping(val_epoch_loss)
    if early_stopping.early_stop:
        print("Early stopping triggered")
        break

# Load the best model weights found during training
model.load_state_dict(torch.load('best_model.pth'))
Note: The exact placement of scheduler.step() can vary. For epoch-based schedulers like StepLR or CosineAnnealingLR, it's called without an argument. For metric-based schedulers like ReduceLROnPlateau, it's called with the metric (e.g., validation loss). This is an important detail to remember from the framework's documentation.
Conclusion
Congratulations on completing the "Deep Neural Network Fundamentals" module! You've built a strong foundation, moving from the basic mechanics of MLPs and backpropagation to a sophisticated toolkit of techniques for training robust and high-performing models.
Key Takeaways:
- Early Stopping is a form of regularization that halts training when validation performance ceases to improve, saving computation and preventing overfitting. It is typically implemented as a custom callback or class that monitors validation loss.
- Learning Rate Scheduling dynamically adjusts the learning rate during training to improve convergence. Policies can be pre-defined (e.g.,
StepLR,CosineAnnealingLR) or adaptive (e.g.,ReduceLROnPlateau). - Implementation: PyTorch's
torch.optim.lr_schedulerprovides a rich set of built-in schedulers. Combining these with a custom early stopping mechanism is a standard and powerful practice. - Warmup is a common strategy used with schedulers to gently ramp up the learning rate at the start of training, promoting stability.
Preview of the next lesson:
So far, we have focused on fully-connected networks (MLPs) that process tabular or vector data. We are now ready to venture into a new and exciting domain: Computer Vision. In the next module, we will begin our study of Convolutional Neural Networks (CNNs). Our first lesson will go right to the core, where you will learn to implement the fundamental 2D convolution and pooling operations from scratch, the essential building blocks of all modern image recognition models.