Introduction
Welcome to the final implementation lesson of our capstone project. Over the past lessons, you have architected and built the sophisticated backend of a custom LLM inference engine. It now features a continuous batching scheduler, a paged KV cache manager, and supports both quantization and multi-GPU tensor parallelism. However, this powerful engine currently lacks a crucial component: a "front door" for users and applications.
In this lesson, we will build that front door. We will focus on the learning outcome: Implement request ingestion and response streaming layers for an end-to-end test. You will create an OpenAI-compatible API server using FastAPI to accept user requests and implement a streaming mechanism to send back generated tokens in real-time. This will transform your engine from a collection of backend components into a fully functional, end-to-end service.
This step is the culmination of your work, integrating all the pieces into a testable whole and setting the stage for the final lesson where we will benchmark our creation against a production-grade system.
1. Architecting the Engine's "Frontend"
Before writing code, let's visualize the architecture we're about to build. A production-grade inference server must handle two concurrent activities efficiently:
- Ingesting API requests: Listening for HTTP requests, validating them, and queueing them for processing.
- Running the model: Continuously pulling requests from the queue, batching them, and executing inference steps.
These two activities are often separated into different processes or threads to ensure that a slow model execution loop doesn't block the server from accepting new requests.
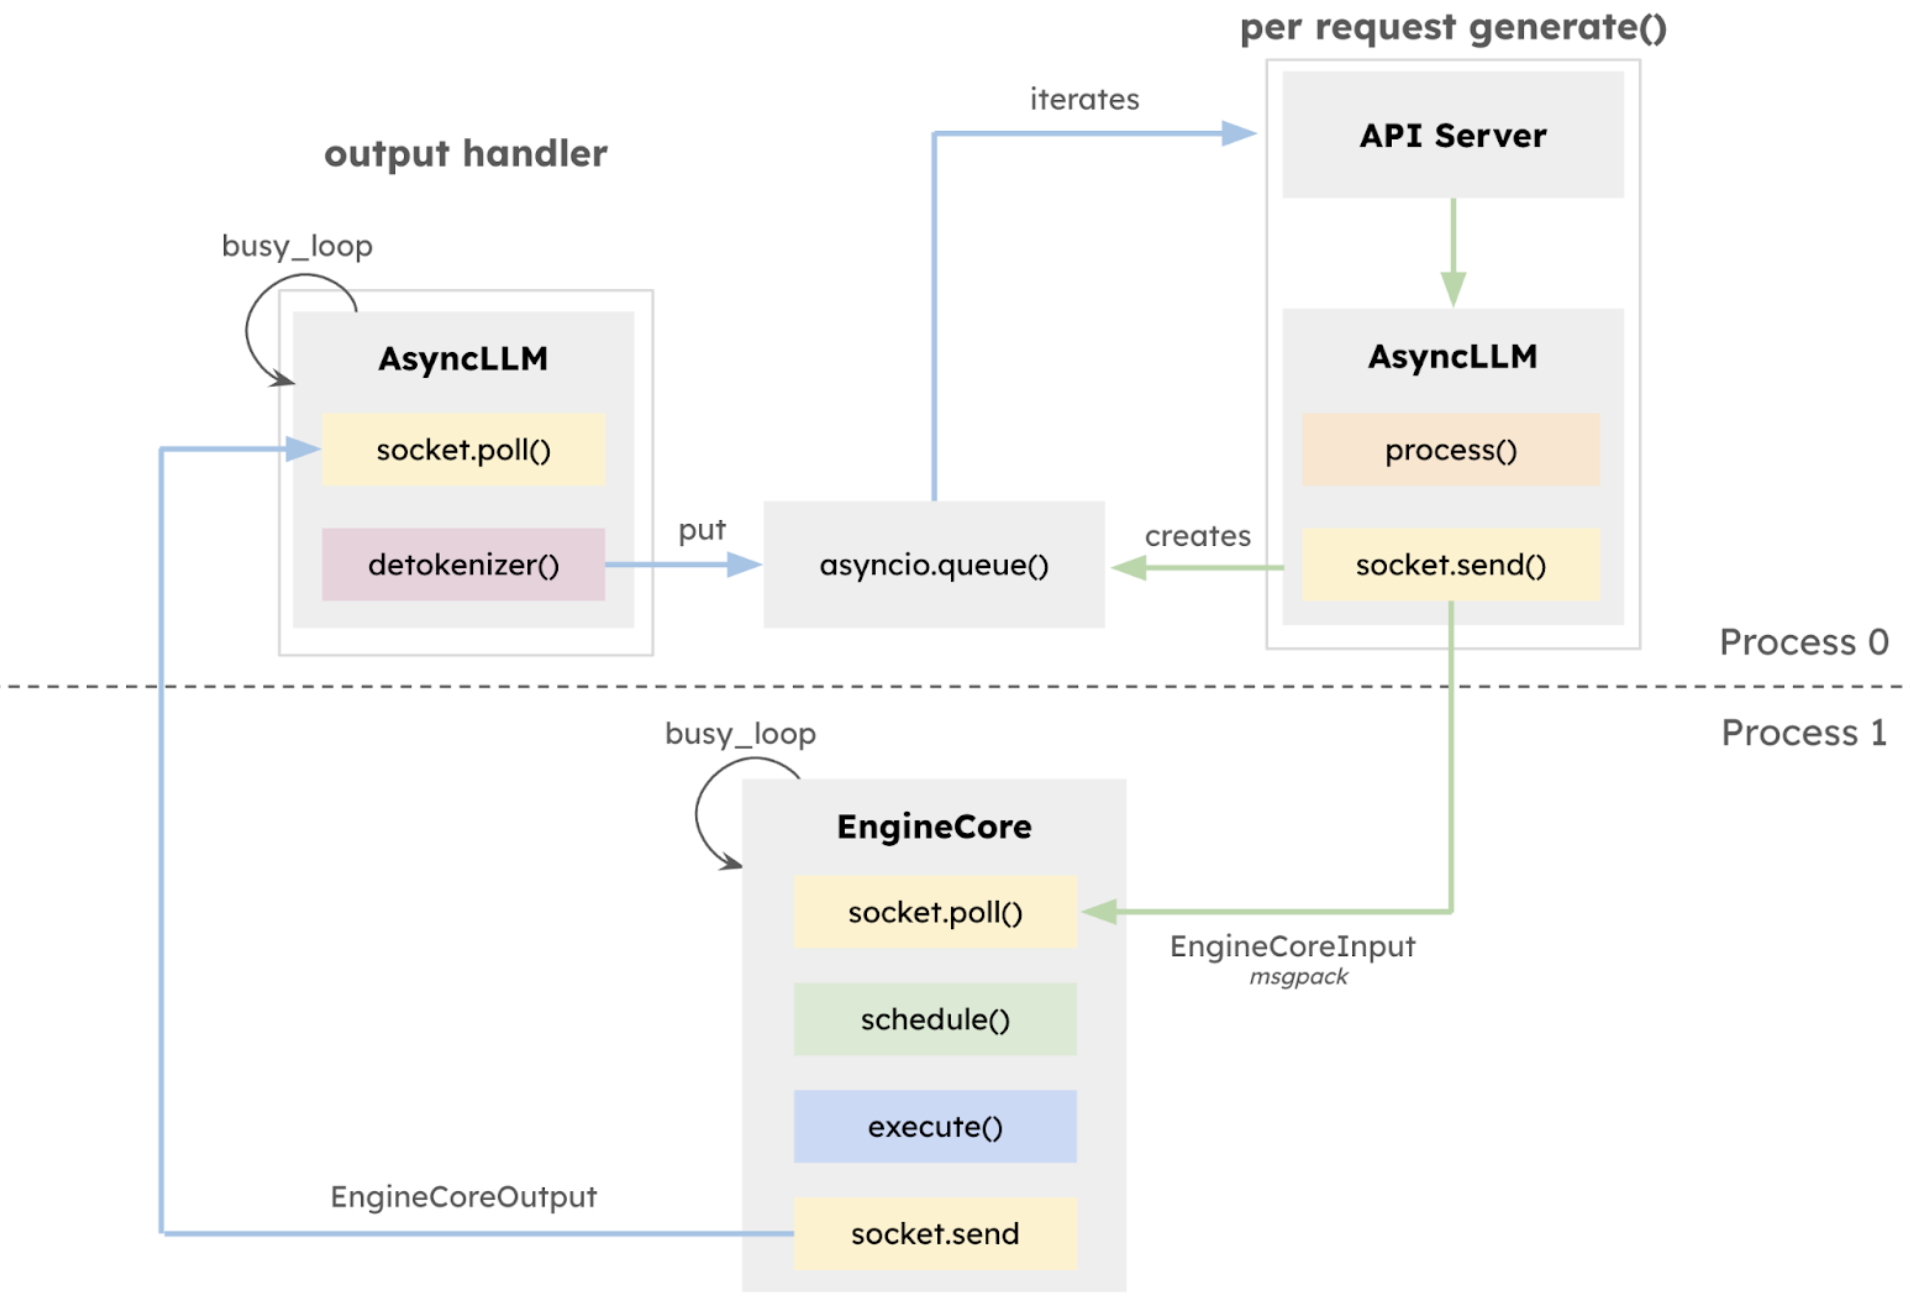
Our approach will use the producer-consumer pattern, a fundamental concept in concurrent programming.
- Producers: Our API endpoint handlers will act as producers. They will receive an HTTP request, create a request object, and place it into a shared work queue.
- Consumers: The engine's main processing loop, which you've already conceptualized, will act as the consumer. It will continuously pull requests from the work queue and pass them to the scheduler.
To understand this pattern in the context of asynchronous Python, let's review a short, clear explanation.
AsyncIO: Implementing a Producer-Consumer Model
This video from MathByte Academy provides an excellent overview of the producer-consumer model using asyncio. It explains how to use queues to manage work between asynchronous tasks, which is exactly the pattern we need to connect our API server to our engine's core.
Watch the first six minutes of this video (00:00 - 06:19). Focus on how the producer adds work to a work_queue and how worker tasks consume from it. This directly maps to how our FastAPI endpoint will produce requests and our engine will consume them.
2. Implementing the Request Ingestion Layer with FastAPI
We will use FastAPI to build our API server. Its asynchronous nature makes it a perfect match for our asyncio-based engine. To ensure broad compatibility with existing tools like LangChain or OpenAI's own client libraries, we will implement an OpenAI-compatible API.
This involves creating a /v1/chat/completions endpoint and using Pydantic models that mirror OpenAI's request and response structures.
vLLM-Style Fast Inference Engine: Building from Scratch on CPU
This article, 'vLLM-Style Fast Inference Engine', provides a practical guide to building an OpenAI-compatible API server on top of an inference engine. We will use it as a reference for our implementation.
Please read the section 'Building the OpenAI-Compatible Endpoints'. Pay close attention to: The Pydantic models: ChatMessage, ChatCompletionRequest, etc. The structure of the @app.post("/v1/chat/completions") endpoint function. This section provides the exact blueprint for the API layer we are about to build.
Let's start by creating a new file named api_server.py in your project. This file will house our FastAPI application.
1. Define Data Structures and Queues:
First, we need to define the data structures for managing requests and the shared queues for communication between the API server and the engine.
# api_server.py
import asyncio
import time
import uuid
from typing import List, Optional

from fastapi import FastAPI
from pydantic import BaseModel
from fastapi.responses import StreamingResponse


# --- Pydantic Models for OpenAI Compatibility ---

class ChatMessage(BaseModel):
    role: str
    content: str

class ChatCompletionRequest(BaseModel):
    model: str
    messages: List[ChatMessage]
    max_tokens: Optional[int] = 512
    temperature: Optional[float] = 0.7
    stream: Optional[bool] = False


# --- Engine Communication ---


# A queue to hold incoming requests for the engine
request_queue = asyncio.Queue()


# A dictionary to hold response queues for each request
# The API handler will wait on this queue for the engine to produce tokens
response_queues = {}

class EngineRequest:
    """A request object to be passed to the engine's core loop."""
    def __init__(self, request: ChatCompletionRequest):
        self.request_id = f"chatcmpl-{uuid.uuid4()}"
        self.prompt = self._convert_messages_to_prompt(request.messages)
        self.params = {
            "max_tokens": request.max_tokens,
            "temperature": request.temperature,
        }
        self.stream = request.stream

    def _convert_messages_to_prompt(self, messages: List[ChatMessage]) -> str:


        # A simple conversion logic. Production systems might use more complex template formats.
        # Note: You'll need to ensure your tokenizer adds the appropriate chat template tokens.
        prompt = ""
        for msg in messages:
            prompt += f"{msg.role}: {msg.content}\n"
        prompt += "assistant:"
        return prompt
2. Create the FastAPI App and Endpoint:
Now, create the FastAPI app and the /v1/chat/completions endpoint. This endpoint will be the "producer."
# api_server.py (continued)

app = FastAPI(title="Custom Inference Engine API")

@app.post("/v1/chat/completions")
async def create_chat_completion(request: ChatCompletionRequest):
    """OpenAI-compatible chat completions endpoint."""
    engine_request = EngineRequest(request)


    # Create a response queue for this specific request
    response_queues[engine_request.request_id] = asyncio.Queue()


    # Put the request into the main work queue for the engine
    await request_queue.put(engine_request)

    if request.stream:


        # For streaming, we return a StreamingResponse that wraps an async generator
        return StreamingResponse(
            stream_response_generator(engine_request.request_id),
            media_type="text/event-stream"
        )
    else:


        # For non-streaming, we wait for the final result and return it
        # (Implementation of this part will depend on the generator)
        pass # We will focus on the streaming path
3. Implementing the Response Streaming Layer
Simply accepting a request is not enough. For LLMs, streaming the response back token-by-token is critical for a good user experience. A user waiting 30 seconds for a blank screen is likely to assume the service is broken.
Streaming LLM Responses with FastAPI
To see a practical demonstration of why streaming is so important, watch the beginning of this video from Code with Irtiza. It clearly contrasts the user experience of a streaming versus a non-streaming LLM response.
Watch the first two minutes (00:00 - 01:57). Observe the dramatic difference in perceived latency.
FastAPI makes streaming easy with its StreamingResponse object, which takes an async generator. This generator's job is to yield data chunks that FastAPI then sends to the client. We will use the Server-Sent Events (SSE) format, which is a simple, standard way to stream data over HTTP.
Architecting Scalable FastAPI Systems for Large Language Model ...
This article, 'Architecting Scalable FastAPI Systems', provides a concise recommendation for using Server-Sent Events (SSE) with FastAPI's StreamingResponse for LLM applications.
Read the subsection 'Server-Sent Events (SSE)' under section 5.1. Note the code example showing how to format the data as f"data: {content}\n\n" and set the media_type to "text/event-stream".
Now, let's implement the stream_response_generator that we referenced in our FastAPI endpoint. This generator will listen to the request-specific response queue we created.
# api_server.py (continued)
import json


# This token indicates the end of the stream from the engine
STREAM_DONE_TOKEN = "[DONE]"

async def stream_response_generator(request_id: str):
    """
    Yields tokens from the response queue for a given request_id.
    Formats them as Server-Sent Events (SSE).
    """
    response_queue = response_queues[request_id]

    try:
        while True:


            # Wait for the next token from the engine
            token = await response_queue.get()

            if token == STREAM_DONE_TOKEN:


                # The engine signaled that this request is complete
                break


            # Create the OpenAI-compatible streaming chunk
            chunk = {
                "id": request_id,
                "object": "chat.completion.chunk",
                "created": int(time.time()),
                "model": "custom-engine-model", # Or your actual model name
                "choices": [{
                    "index": 0,
                    "delta": {"content": token},
                    "finish_reason": None
                }]
            }


            # Yield in SSE format
            yield f"data: {json.dumps(chunk)}\n\n"


        # Send the final DONE message in SSE format
        yield f"data: {STREAM_DONE_TOKEN}\n\n"

    finally:


        # Clean up the response queue for this request
        del response_queues[request_id]
4. Integrating with the Engine's Main Loop
We now have the "producer" (the API endpoint) and the logic to stream responses. The final step is to modify our engine's main processing loop to act as the "consumer" and to feed tokens back into the response queues.
Your main engine script (e.g., main_engine.py) will now be responsible for two concurrent tasks:
- Running the
uvicornserver for FastAPI. - Running the engine's core processing loop.
Here's how you can structure your main script:
# main_engine.py (example structure)
import asyncio
import uvicorn
from api_server import app, request_queue, response_queues, STREAM_DONE_TOKEN


# ... all your existing engine imports (Scheduler, Executor, etc.)

async def engine_loop():
    """
    The main loop of the inference engine.
    """


    # Initialize your scheduler, executor, cache manager, etc.
    scheduler = ...
    executor = ...

    while True:


        # 1. Check for new requests from the API server
        if not request_queue.empty():
            engine_request = await request_queue.get()


            # Add the request to the scheduler
            scheduler.add_request(
                prompt=engine_request.prompt,
                request_id=engine_request.request_id,
                params=engine_request.params
            )


        # 2. Run one step of the scheduler to get the next batch
        scheduled_requests = scheduler.schedule()
        if not scheduled_requests:
            await asyncio.sleep(0.01) # No work to do, yield control
            continue


        # 3. Execute the model for the batch
        # This will return a dictionary mapping request_id to the new token
        newly_generated_tokens = executor.execute_model(scheduled_requests)


        # 4. Push generated tokens to the response queues
        for request_id, token_info in newly_generated_tokens.items():
            token_text = token_info['text']
            is_done = token_info['is_done']


            # Get the correct response queue and push the new token
            if request_id in response_queues:
                await response_queues[request_id].put(token_text)

            if is_done:


                # The request has finished generating
                if request_id in response_queues:
                    await response_queues[request_id].put(STREAM_DONE_TOKEN)


                # Let the scheduler know this request is finished
                scheduler.free_request(request_id)

async def main():


    # Configure and run the uvicorn server in the background
    config = uvicorn.Config(app, host="0.0.0.0", port=8000)
    server = uvicorn.Server(config)


    # Run the uvicorn server and the engine loop concurrently
    await asyncio.gather(
        server.serve(),
        engine_loop()
    )

if __name__ == "__main__":
    asyncio.run(main())
5. The End-to-End Test
With all the pieces in place, it's time to test the entire system.
- Start the server: Run your main engine script:
python main_engine.py - Create a client: Create a new file
test_client.pyto send a request. Since our API is OpenAI-compatible, we can use their official library.
# test_client.py
from openai import OpenAI


# Point the client to your local server
client = OpenAI(
    base_url="http://localhost:8000/v1",
    api_key="not-needed" # The API key is not used in our simple server
)

stream = client.chat.completions.create(
    model="your-model-name",
    messages=[
        {"role": "user", "content": "Write a short haiku about Python programming."}
    ],
    stream=True
)

print("Streaming response:")
for chunk in stream:
    content = chunk.choices[0].delta.content
    if content:
        print(content, end="", flush=True)

print("\n")
- Run the client: In a separate terminal, run
python test_client.py.
If everything is connected correctly, you should see the words of the haiku appear one by one in your terminal, demonstrating that your end-to-end request ingestion and response streaming layers are fully operational.
Conclusion
Congratulations! You have successfully implemented the final pieces of the capstone project, turning your custom inference engine into a functional, stream-capable service.
Key Takeaways:
- Service Architecture: A robust inference server separates request ingestion (API) from model execution (engine loop), using a producer-consumer pattern with queues for communication.
- OpenAI Compatibility: Implementing an OpenAI-compatible API using FastAPI and Pydantic models allows your engine to be a drop-in replacement for a vast ecosystem of existing tools.
- Streaming with FastAPI: Using
StreamingResponsecombined with anasyncgenerator is an effective way to implement Server-Sent Events (SSE) for real-time token streaming, which is crucial for a good user experience. - End-to-End Integration: The
asynciolibrary is essential for concurrently running the API server and the engine's core processing loop, tying all the components together.
Preview of the next lesson:
Your custom engine is now architecturally complete. In the final lesson of the capstone module, we will put it to the test: Benchmark the custom engine against vLLM under a realistic traffic pattern and analyze its architectural strengths and weaknesses. This will provide critical insights into the performance of your design choices and highlight the trade-offs involved in building high-performance LLM systems.