
Hello! In our last lesson, we put together a strategic plan for the final phase of your migration: the decommissioning of React. We've moved from the technical "how-to" of coexistence to the strategic "what-and-when" of replacement.
This lesson marks the beginning of our penultimate module, Application Security. With the core migration patterns established, we must ensure that our new HTMX-driven application is not just functional but also secure. Your learning outcome for this session is to implement CSRF protection for HTMX requests in an Express app and configure HTMX to send the token automatically.
We'll start with a quick conceptual refresher on Cross-Site Request Forgery (CSRF), then dive into the practical implementation. You'll learn how to use modern Express middleware to generate and validate security tokens and, critically, how to configure HTMX to seamlessly include these tokens in its requests, whether they come from a form or any other element.
What is Cross-Site Request Forgery (CSRF)?
As an experienced developer, you are undoubtedly familiar with the concept of CSRF. However, a focused refresher is always valuable, especially to see a live demonstration of the vulnerability we aim to prevent. CSRF attacks exploit the fact that browsers automatically include authentication cookies with any request to a given domain, regardless of where the request was initiated. A malicious site can trick an authenticated user's browser into sending a forged, state-changing request to your application without the user's knowledge.
The following video provides an excellent and concise demonstration of this attack and introduces the fundamental solution.
Your App Is NOT Secure If You Don’t Use CSRF Tokens
This video from Web Dev Simplified clearly demonstrates how a CSRF attack works against a standard session-based application and outlines the token-based defense.
Watch the segment from the beginning to the explanation of the vulnerability. Pay close attention to how a simple form on a different origin (evil.html) can successfully execute a delete action because the browser automatically sends the session cookie. This is the exact problem we need to solve.
The core takeaway is that session cookies alone are not enough to verify the intent of a request. We need proof that the request originated from our own application, not from a malicious third-party site.
The Defense: The Synchronizer Token Pattern
The most common and effective defense against CSRF is the Synchronizer Token Pattern. The server generates a unique, secret token, stores it in the user's session, and also sends it to the client. The client must then include this token in every subsequent state-changing request.
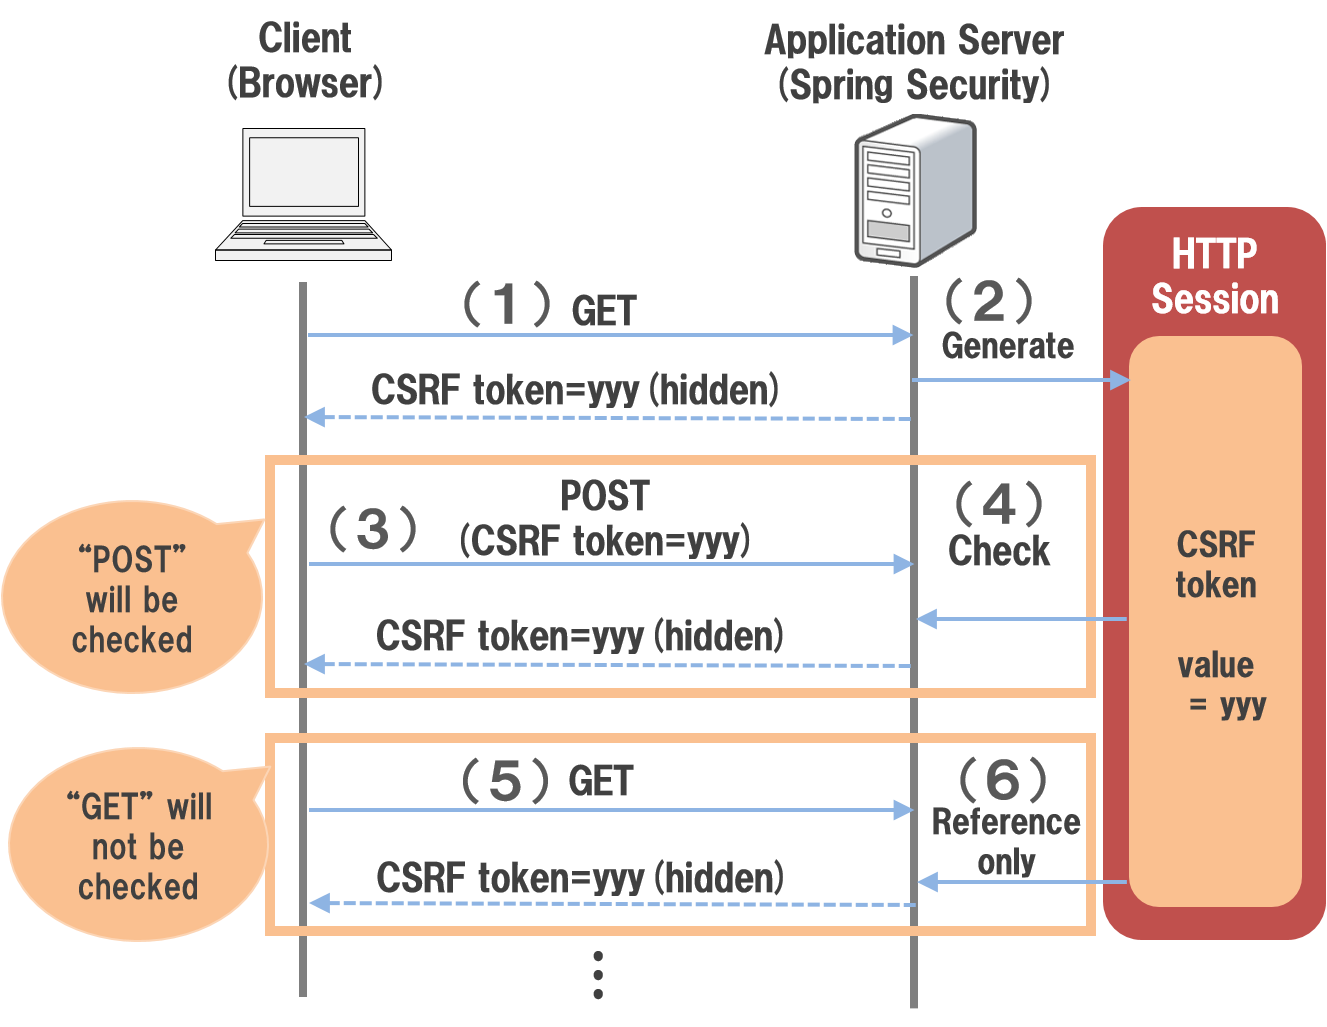
An attacker's forged request from a malicious site will fail because it won't have access to this secret token, which was only delivered to your application's frontend.
Part 1: Server-Side Implementation in Express
Let's implement this pattern in our Express application. The popular csurf middleware is now deprecated, so we will use a modern and recommended alternative, csrf-csrf.
The following article provides a clear guide to setting this up. We will walk through the key steps together.
Express CSRF Protection | Compile N Run
This guide details how to implement CSRF protection in Express using the csrf-csrf library. We'll focus on the installation and middleware setup.
First, read the brief introduction to get acquainted with the library. Then, focus on the implementation steps. Read the sections <tf start="Step 1: Install the necessary packages" end="res.locals.csrfToken = generateToken(req); next(); });>detailing the installation and middleware setup</tf>. Finally, review the <span data-type="resource_reading_textrange" data-resource-subitem-id="6a18d854" data-range-start="Complete Example" data-range-end="index.ejs file:">complete example code</span> to see how all the pieces fit together in an app.js` file.
Let's break down the server-side setup from the article into three key actions:
-
Install Dependencies:
You'll needexpress-session,cookie-parser, and the CSRF library itself.npm install express-session cookie-parser csrf-csrf -
Configure the Middleware Stack:
The order of middleware is important. You must initialize sessions before applying CSRF protection, as the library needs the session to store the secret token.const express = require('express'); const cookieParser = require('cookie-parser'); const session = require('express-session'); const { csrfSync } = require('csrf-csrf'); const app = express(); // Standard middleware for parsing bodies and cookies app.use(express.urlencoded({ extended: true })); app.use(cookieParser('your-secret-key')); // Use a secret for signed cookies // Session middleware app.use(session({ secret: 'your-session-secret', // A strong secret for the session resave: false, saveUninitialized: true, cookie: { secure: process.env.NODE_ENV === 'production' } // Use secure cookies in production })); // CSRF protection setup const { generateToken, csrfSynchronisedProtection } = csrfSync({ getTokenFromRequest: (req) => req.body._csrf || req.headers['x-csrf-token'], }); // Apply the protection middleware to all routes app.use(csrfSynchronisedProtection); // Middleware to make the token available in our views app.use((req, res, next) => { res.locals.csrfToken = generateToken(req); next(); });The
getTokenFromRequestconfiguration is vital. It tells the middleware where to look for the token on incoming requests: first in the request body (as a field named_csrf) and then in a request header (x-csrf-token). This flexibility is perfect for HTMX. -
Handle CSRF Errors:
The middleware will throw an error with the codeEBADCSRFTOKENif validation fails. You should add a custom error handler to catch this and return a403 Forbiddenstatus.app.use((err, req, res, next) => { if (err.code === 'EBADCSRFTOKEN') { res.status(403).send('CSRF token is invalid or missing.'); } else { next(err); } });
With this server-side code in place, your application is now protected. Any state-changing request arriving without a valid token will be rejected. Now, we need to configure our HTMX frontend to provide that token.
Part 2: Client-Side Integration with HTMX
HTMX, being an extension of HTML, has natural and elegant ways to handle this. We need to ensure the csrfToken made available in res.locals is included in our requests.
The HTMX documentation provides a clear guide on this.
htmx • alonso-skills • Registry • Tessl
This section of the HTMX documentation covers CSRF protection specifically, providing two excellent patterns for including the token in requests.
Please read the section titled CSRF Protection. Pay attention to the two distinct methods presented: including the token via hx-headers and via the htmx:configRequest event.
Let's discuss the two main scenarios for HTMX requests and how to apply these patterns.
Scenario 1: Requests from <form> Elements
For any HTMX request originating from a <form>, the simplest method is to include the token as a hidden input field. This aligns with the req.body._csrf part of our server middleware configuration.
In your EJS template, you would do this:
<form hx-post="/update-profile">
  <!-- This hidden input is crucial -->
  <input type="hidden" name="_csrf" value="<%= csrfToken %>">

  <label>Name: <input type="text" name="name"></label>
  <button type="submit">Update</button>
</form>
When this form is submitted, HTMX automatically includes the _csrf field in the request payload, and the server middleware will find and validate it.
Scenario 2: Requests from Non-<form> Elements
What about actions that don't use a form, like a delete button?
<button hx-delete="/items/123" hx-target="#item-123" hx-swap="outerHTML">
  Delete Item
</button>
This request won't have a form body, so we must use the second method our middleware supports: sending the token in a header. HTMX makes this straightforward. The most robust "set-and-forget" approach is to declare the header on a parent element, typically <body>, so all child HTMX elements inherit it.
In your main layout or template, add the hx-headers attribute to the body tag, using your templating engine to inject the token:
<!-- Inside your main .ejs file -->
<body hx-headers='{"x-csrf-token": "<%= csrfToken %>"}'>

  <!-- The rest of your application content -->

  <!-- Now, this button will automatically send the CSRF token in its headers -->
  <button hx-delete="/items/123">Delete</button>

</body>
This single attribute on the <body> tag ensures that every HTMX request triggered within the page will automatically include the x-csrf-token header. The server middleware will pick it up, and your non-form actions will be validated correctly. This declarative approach is highly idiomatic to the HTMX philosophy.
Conclusion
You have now secured your application against Cross-Site Request Forgery by implementing the Synchronizer Token Pattern. This is a non-negotiable step for any production web application that manages user sessions and performs state-changing actions.
Key Takeaways:
- CSRF exploits browser behavior: It leverages the automatic sending of session cookies to forge requests from malicious sites.
- The Synchronizer Token Pattern is the solution: The server generates a secret token tied to the user's session, and the client must send it back with every state-changing request to prove its origin.
- Express setup is middleware-driven: Using
cookie-parser,express-session, andcsrf-csrf, you can create a robust server-side protection layer. - HTMX integration is declarative:
- For
<form>submissions, include a<input type="hidden" name="_csrf">. - For all other HTMX requests, add a global
hx-headersattribute to the<body>tag to send the token automatically.
- For
In our next lesson, we will continue our journey through application security by tackling another critical vulnerability: Cross-Site Scripting (XSS). You will learn how to properly sanitize user-generated content before rendering it as HTML to prevent malicious scripts from executing in your users' browsers.
Can't find a good explanation? Sign up and we'll make it for you
Sign up