
Hello, and welcome to the first lesson of your Python course. This first module establishes the practical workflow you will use throughout: writing short pieces of Python, running them, inspecting what happened, and changing your code confidently.
Google Colab is a notebook environment: a browser-based document made of editable cells. Some cells contain explanations; code cells contain Python instructions and show results directly underneath. By the end of this lesson, you will be able to create or open a Colab notebook, run and edit code cells, and distinguish code from its output.
Your workspace: a Colab notebook
Colab lets you write and execute Python in a web browser, without installing Python locally. A notebook is stored in Google Drive and is composed of separate cells. This structure is useful for coding because you can test a small idea, revise it, and rerun only that part rather than running an entire program every time.
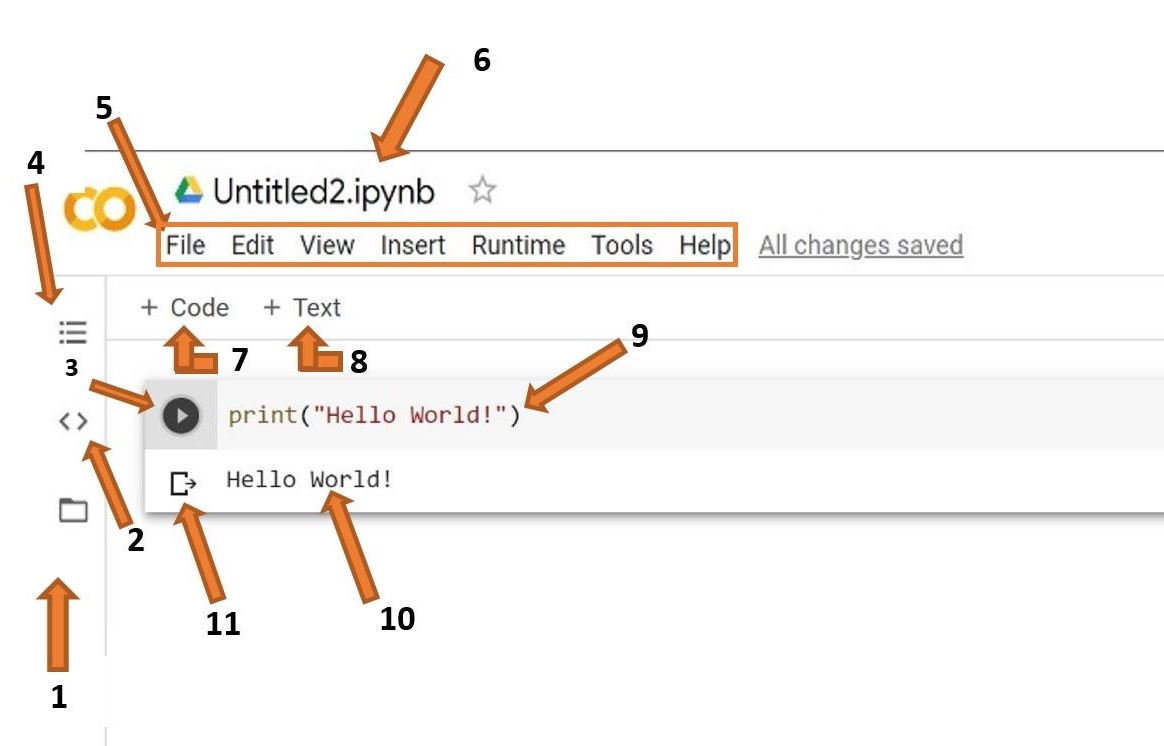
The most important parts for now are:
- Code cell: the editable area where you write Python, such as
2 + 2orprint("Hello"). - Run button: the triangular Play icon at the left of a code cell.
- Output area: the space directly below a code cell, where Colab displays a result, printed text, or an error.
- + Code: adds a fresh code cell.
- + Text: adds a text cell for notes, headings, or explanations.
- Runtime connection: Colab needs a running Python environment before it can execute code. The first run can take a little longer while it connects.
Open Colab and create a notebook using File, then New notebook. You can rename it by clicking its title near the upper-left area. A sensible name for this course is python_foundations.ipynb.
The official Colab notebook gives a concise interactive introduction to this exact workflow.
Welcome To Colab - Colab - Google Colab
Read Google Colab’s official “Welcome to Colab” notebook to see the environment described from within an actual notebook.
First, read the short “What is Colab?” section for the browser-based overview. Then, in the “Getting started” section, read from the notebook introduction. Locate the example beginning with seconds_in_a_day=24*60*60; observe the code, the output underneath, and the instruction to run and edit the cell. Briefly inspect the following example that uses the earlier value in a new cell, but do not worry about variables in depth yet.
Running your first code cell
In your new notebook, click inside the initial code cell and enter:
print("Hello, Python!")
Run it by clicking the Play button to the left of the cell. Colab should display this underneath:
Hello, Python!
Read the screen in three layers:
- The line in the cell is code: an instruction you wrote for Python.
- Clicking Play tells Colab to execute that instruction.
- The line beneath is output: Python’s visible response.
The quotation marks are part of the code. They tell Python that Hello, Python! is text to display, rather than a Python command.
You can also run the selected cell with keyboard shortcuts:
| Shortcut | What happens |
|---|---|
| Ctrl+Enter on Windows/Linux, or Cmd+Enter on macOS | Runs the current cell and keeps focus there |
| Shift+Enter | Runs the current cell and moves to the next cell |
| Alt+Enter | Runs the current cell and creates a new code cell underneath |
For early experimentation, Shift+Enter is usually convenient: write a small piece of code, run it, then continue in a fresh cell.
This short video visually demonstrates creating a notebook, writing a first command, adding cells, and interpreting the output.
Google Colab for Python Beginners - Visually Explained
Watch “Google Colab for Python Beginners – Visually Explained” from Visually Explained for a quick walk-through of the interface and the distinction between code and output.
Watch create a notebook to see the initial setup. Continue with the first cell, focusing on where code is typed, how the Play icon runs it, and where the output appears. Then watch automatic output to see why a final expression can display without print(). Finish with adding cells, noting that cells can be edited and rerun independently.
Editing means you must run again
Now replace the code in your cell with:
print("Welcome to my notebook")
Run the cell again. The earlier output is replaced by:
Welcome to my notebook
A crucial rule: editing code does not execute it. When you change text in a code cell, the displayed output may still reflect the previous version of the code until you run the cell again.
For example, imagine a cell currently contains:
print("first version")
and its output says:
first version
If you edit the code to:
print("second version")
but do not run it, the output can still show first version. At that moment, the code and output do not match. Run the cell to update the output.
This is one of the most common sources of confusion in notebooks. Before trusting a result, ask:
- Did I run this cell after making my latest change?
- Does the output beneath the cell match what this code should do?
- Did Colab show an error instead of a normal output?
A code cell can produce several kinds of visible results:
| What you see below the cell | Meaning |
|---|---|
| A number, text, table, or chart | Python executed the code and produced a result |
Text displayed by print(...) | Python executed a request to show text or values |
| A red error message | Python could not complete the instruction |
| A cell that remains busy/running | Python is still working, or the code has not finished |
For now, an error is not a failure of the notebook; it is output that tells you Python could not follow an instruction. Later lessons will teach you to interpret and correct common errors.
Two ways Colab displays results
Colab has a helpful notebook behavior: it automatically displays the value of the last expression in a code cell. Try this:
5 + 3
Run it. Colab displays:
8
There is no print() here. Colab shows the value of the final expression automatically.
Now change the cell to:
2 + 3
5 + 3
Run it again. You will see only:
8
Both calculations happen, but Colab automatically displays only the final expression’s value. If you want both results visibly displayed, explicitly print both:
print(2 + 3)
print(5 + 3)
The output is now:
5
8
This distinction will matter often:
- Use a bare final expression when quickly inspecting one result.
- Use
print(...)when you want to deliberately display one or more values, especially inside larger code cells.
Keep each early experiment small. A notebook makes it easy to add a cell, test one idea, inspect the result, and revise without disturbing successful cells above it.
A short Colab workflow to adopt
Use the following routine whenever you write code in this course:
- Add or select a code cell.
- Type a small, specific Python instruction.
- Run it with the Play button or a keyboard shortcut.
- Read the output directly beneath that same cell.
- Edit the code if necessary.
- Run it again before interpreting the new result.
For a final quick hands-on pass, create three separate code cells with the following contents, running each one after you enter it:
print("I can run Python in Colab")
10 * 4
print("The result is:")
print(10 * 4)
You should identify the outputs as follows:
- The first cell displays your sentence.
- The second displays
40automatically because the arithmetic expression is the final line. - The third displays two lines: the explanatory text and then
40.
Notice that breaking these into cells is a choice for readability. Later, cells will build on earlier ones, so their run order can matter. For now, focus on the reliable habit of running a cell after every meaningful edit.
Key takeaways
A Colab notebook is an interactive document made of cells. Code cells hold Python instructions; their output area shows what happened when the cell was last run. Run a cell with its Play button, Ctrl/Cmd+Enter, Shift+Enter, or Alt+Enter; edit by clicking directly into the cell.
Most importantly, output is not automatically refreshed when you edit code. Rerun the cell, then inspect the result. Colab can show a final expression automatically, while print(...) explicitly displays whatever you place inside it.
Next, you will begin writing Python values into variables and learn to distinguish integers, decimals, text strings, and Boolean values.
Can't find a good explanation? Sign up and we'll make it for you
Sign up