Hello and welcome to the next stage of your journey into generative AI!
In our last lesson, we put the final piece of the puzzle in place for understanding text-to-image models: Classifier-Free Guidance. You now have a complete conceptual map of how a model like Stable Diffusion takes a text prompt and steers a random noise pattern into a coherent image.
So far, we've treated the model as a pre-trained, fixed entity. But the real power and creativity come from teaching it new things. This is where fine-tuning comes in, and the foundation of any successful fine-tuning project is a high-quality dataset.
This lesson directly addresses the learning outcome: Prepare a custom dataset for fine-tuning a diffusion model. This is arguably the most critical and labor-intensive part of the process, where your choices will have the greatest impact on the final result.
We will cover the essential steps to build a dataset for techniques like DreamBooth and LoRA:
- Gathering and Curating Training Images: Selecting the right source material.
- Captioning: Writing the text descriptions that guide the learning process.
- Regularization: Using additional images to prevent the model from overfitting.
- Structuring the Dataset: Organizing the files correctly for training tools.
By the end of this lesson, you will know exactly how to create a dataset to teach a diffusion model a new character, object, or artistic style.
1. The Core Components of a Fine-Tuning Dataset
Before we dive into the "how," let's clarify the "what." When we fine-tune a diffusion model, we are trying to associate a unique, new concept with a special trigger word. The dataset has three main components that work together to achieve this.
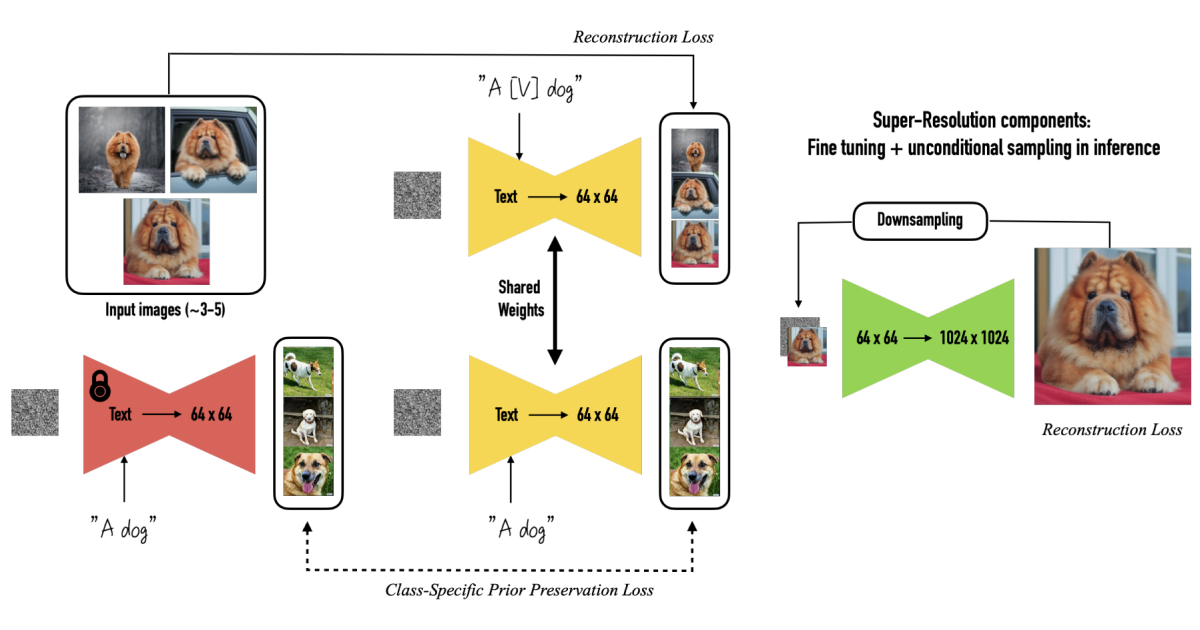
- Training Images: A small collection (usually 5-25) of high-quality images of your target concept (e.g., a specific person, a particular anime character's style).
- Captions & Trigger Words: Each training image is paired with a text file. The caption describes the image and includes a unique trigger word (or "instance prompt") that you will use to summon your concept later. The model learns to associate everything in the images that isn't described by the rest of the caption with this trigger word.
- Regularization Images: An optional but highly recommended larger set of images belonging to the same broad class as your subject (e.g., if you're training a specific person, the class is "woman" or "man"). These images prevent the model from "forgetting" how to draw the general class and help prevent the new concept from "leaking" and taking over the entire class.
2. Step 1: Gathering and Curating Training Images
The quality of your training images is the single most important factor for success. The principle is quality and variety over quantity.
Quantity
The number of images you need depends on what you're training:
- Subject/Character/Object: 5 to 25 images are often sufficient.
- Artistic Style: You'll need more examples to capture the nuances, typically 20 to 100+, sometimes more.
Quality and Variety
Your goal is to provide a diverse and representative sample of your concept.
Training LoRA with Kohya (theory included!)
Let's watch a segment from Laura Carnevali's guide on LoRA training. It provides excellent practical advice on selecting training images for a person.
Watch from 02:03 to 04:28. Pay close attention to the emphasis on: Image Quality: Using high-resolution images. Variety: The importance of different facial expressions, viewing angles (looking left, right, up, down), different clothing, and varied backgrounds.
As the video explains, if all your training images are of a person smiling and facing the camera, the model will struggle to generate that person in any other pose. The more variety you provide, the more flexible and versatile your final model will be.
Advanced Curation: Style and Data-Driven Insights
When training a style, consistency is key. If you mix works from an artist's early and late career, the model will learn an "average" style that resembles neither. This is sometimes called "style shift."
RFKTR's in-depth guide to Training high quality models
The article 'RFKTR's in-depth guide to Training high quality models' offers some advanced techniques for style training and dataset curation that will appeal to your engineering mindset.
Please read the section 'STYLE TRAINING [precision method]'. Focus on: The explanation of 'style shift' using the H.R. Giger example. The clever technique of creating a highly consistent style dataset by cutting a single, very high-resolution image into smaller sectors.
This guide also introduces a more technical concept for dataset curation called Dataset Saturation Balance (DSB). The idea, borrowed from photography's "white balance," is to analyze the overall brightness/darkness balance of your dataset. A dataset that is heavily skewed towards very dark or very bright images can negatively impact training. The author suggests aiming for a balance around 60% ± 5% in one direction (e.g., 60% black, 40% white) and removing outlier images to achieve this. While not strictly necessary for a first attempt, this demonstrates the level of detail that goes into creating state-of-the-art models.
Automating Image Gathering
Since you have a strong interest in anime, it's worth knowing about pipelines built specifically for this. Manually screenshotting an entire series is tedious. A more programmatic approach involves using tools to automate this process.
For instance, the anime_screenshot_pipeline on GitHub is a collection of scripts that automates many steps:
- Frame Extraction: Uses
ffmpegto extract frames from video files, intelligently skipping consecutive similar frames (mpdecimatefilter). - Similar Image Removal: Uses computer vision libraries like
fiftyoneto programmatically find and remove near-duplicate images from the extracted frames, further culling the dataset to unique, informative shots.
You can explore its documentation to see a full, automated workflow.
anime_screenshot_pipeline/scripts_v1/README.md at main
To get a sense of how a full, automated pipeline is structured, take a look at the README for the anime_screenshot_pipeline.
Skim through the sections 'Frame Extraction' and 'Similar Image Removal'. You don't need to understand every detail, but appreciate how this automates the laborious task of gathering source images from video.
3. Step 2: Captioning Your Images
Captioning is where you tell the model what it's seeing. This is crucial because the model learns to associate the trigger word with whatever is in the image that is not described by the caption.
Example:
- Image: A photo of your subject, "John Doe," wearing a red shirt, standing in a park.
- Trigger Word:
sks_man - Good Caption:
a photo of sks_man, wearing a red shirt, in a park- The model learns that
sks_manrefers to the specific person's facial features and body, as everything else (red shirt,park) is already explained.
- The model learns that
- Bad Caption:
a photo of sks_man- The model will associate
sks_manwith John Doe's face, the red shirt, and the park. It will be very difficult to generatesks_manwearing a blue shirt or standing on a beach.
- The model will associate
Automatic Captioning Tools
Manually captioning every image is time-consuming. Tools like Kohya_ss integrate automatic captioners to do the heavy lifting. You can then review and refine them.
Training LoRA with Kohya (theory included!)
Let's return to Laura Carnevali's video to see how automatic captioning works in practice using Kohya_ss.
Watch from 04:28 to 08:25. Note the following: The use of the 'Utilities' tab for captioning. The BLIP captioner, which generates natural language sentences. The importance of manually correcting the captions. The AI thought she was looking at a cell phone when her eyes were closed—a perfect example of why human review is essential. The strategic choice of what to include or omit in a caption to control the final model's flexibility (e.g., adding brunette to the caption if you want to be able to change hair color later).
For anime and illustrative styles, another popular option is the WD14 Tagger. Instead of sentences, it generates "danbooru-style" tags (e.g., 1girl, solo, blue_hair, long_hair, smile). This is often more precise for controlling specific attributes in anime models. Many artists prefer this method.
Trigger Words and Prompts
When preparing the dataset, you'll define two key prompts:
- Instance Prompt: The unique trigger for your concept. This should be a rare or made-up word (e.g.,
ohwx,sks) followed by the class word. Example:ohwx woman. - Class Prompt: The general category. Example:
woman.
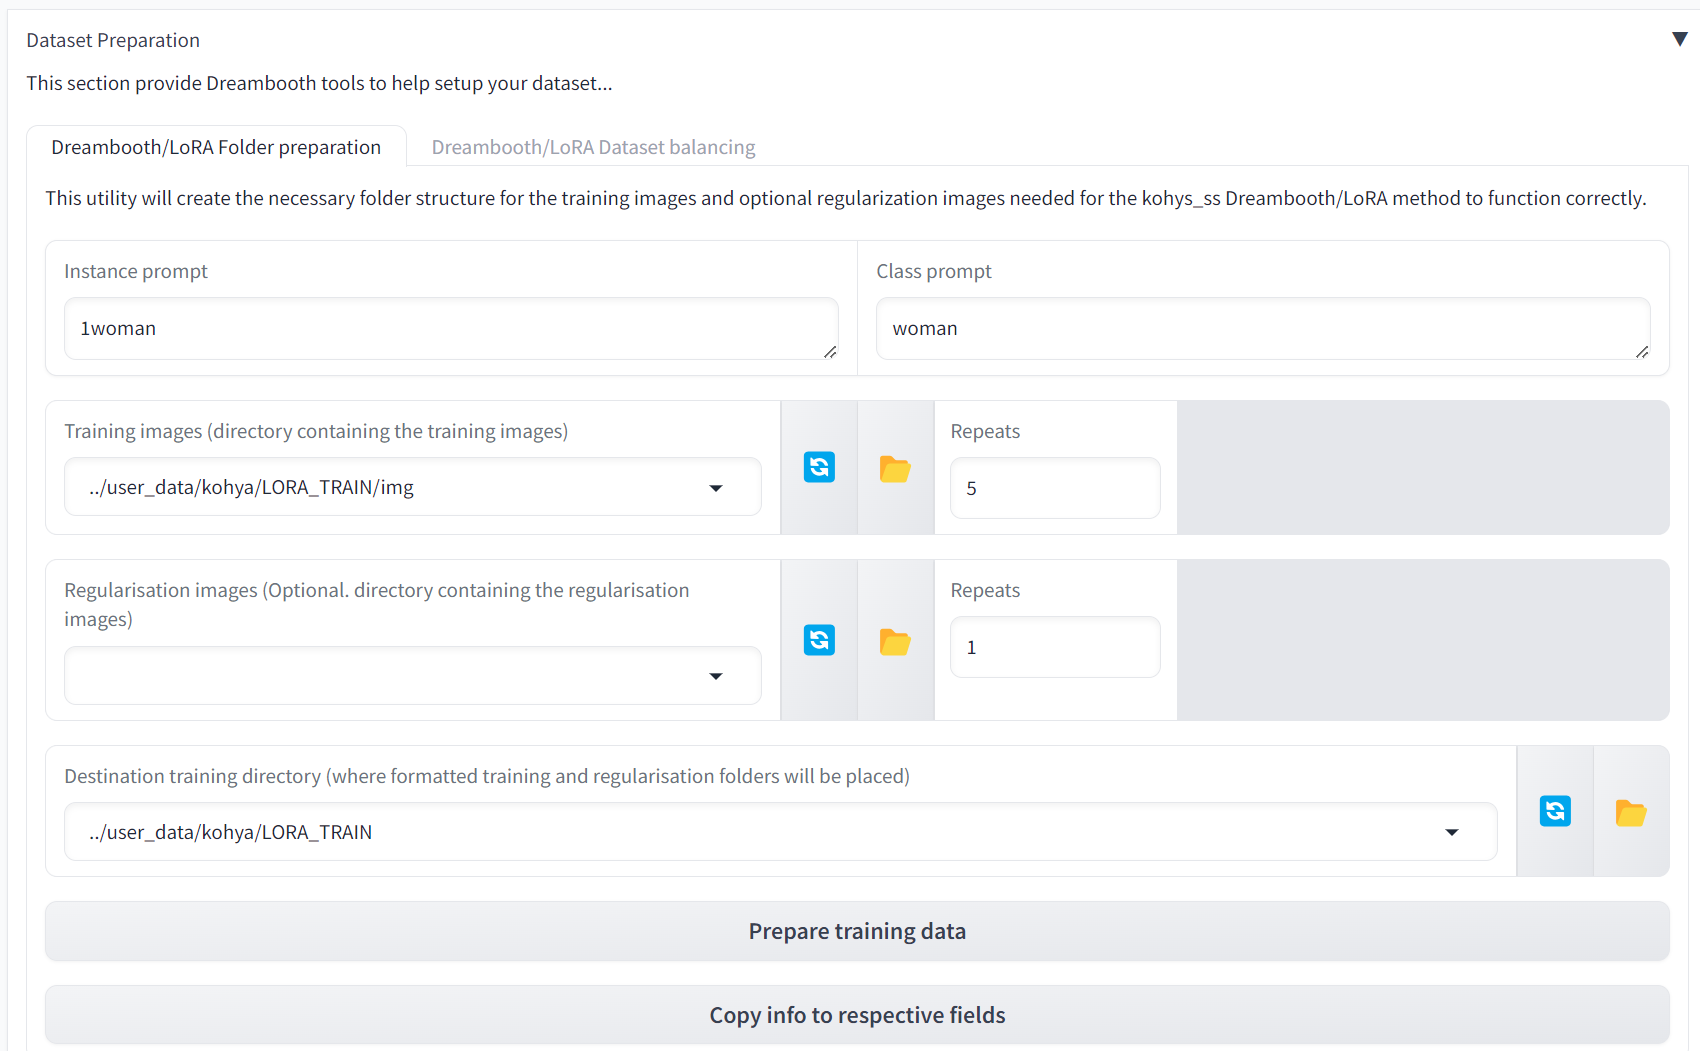
This setup allows the training script to understand that it's learning a specific instance (ohwx woman) while using the class (woman) for regularization.
4. Step 3: Generating Regularization Images
Regularization images are crucial for preventing two problems:
- Overfitting: The model becomes so focused on your subject that it can only generate that one thing, losing quality and flexibility.
- Language Drift: The model's understanding of the general class prompt (e.g.,
woman) gets "polluted" by your specific subject. After training, prompting fora womanmight produce images that look like your subject.
Regularization images, which are not captioned with your trigger word, anchor the model's understanding of the general class.
How many do you need?
You need a lot. A common rule of thumb is to have a total number of regularization images roughly equal to the number of training images multiplied by their "repeats" (a training parameter we'll discuss later). For 25 training images with 100 repeats, you'd want around 2,500 regularization images.
How do you get them?
Generating them is far easier than collecting them. You use the base model you plan to fine-tune on to generate a large batch of images using just the class prompt.
Training LoRA with Kohya (theory included!)
The process of generating regularization images is simple but powerful. Laura Carnevali's video demonstrates an efficient trick to do this.
Watch from 08:25 to 12:57. Focus on: The logic behind why regularization images are needed. The calculation for how many images to generate. The practical trick: using the base model in a tool like AUTOMATIC1111's web UI, setting the prompt to your class (e.g., 'woman'), and using the 'generate forever' feature to create a large, diverse set of class images.
5. Step 4: Structuring the Dataset for Training
Once you have your training images, captions, and regularization images, you need to organize them into a specific folder structure that the training software expects. Tools like Kohya_ss automate this final step.
The standard structure for LoRA training looks like this:
/path/to/training_project/
├── image/
│   └── 100_ohwx_woman/  <-- {repeats}_{instance_prompt}
│       ├── image01.png
│       ├── image01.txt
│       ├── image02.png
│       ├── image02.txt
│       └── ...
├── reg/
│   └── 1_woman/         <-- {repeats}_{class_prompt}
│       ├── reg_image0001.png
│       ├── reg_image0002.png
│       └── ...
├── model/  (for saved model files)
└── log/    (for training logs)
repeats: The number of times each image in the folder is shown to the model per epoch. Higher repeats for training images help the model learn the concept faster.
Fortunately, you don't need to create this by hand.
Training LoRA with Kohya (theory included!)
Finally, let's see how to use Kohya_ss to take our separate folders of images and automatically create the required structured dataset.
Watch from 15:55 to 20:31. Observe how the user: Specifies the source folders for training and regularization images. Defines the instance and class prompts. Sets the number of repeats. Clicks 'Prepare training data', which automatically creates the structured folders shown above.
Test your understanding!
You want to train a LoRA for a specific anime character, "Kirara Hoshi," who has pink hair and star-shaped pupils. You want the final LoRA to be able to generate Kirara with different hair colors if you prompt for it.
What should you put in your captions for an image of her with her default pink hair?
A) a picture of kirara_hoshi_character
B) a picture of kirara_hoshi_character, pink hair, star pupils
C) a picture of a girl, pink hair, star pupils
Show answer
The best answer is B) a picture of kirara_hoshi_character, pink hair, star pupils.
Here's why:
- You must include the trigger word (
kirara_hoshi_character) to associate it with her face/identity. - By explicitly captioning
pink hair, you are telling the model that "pink hair" is a descriptive tag, not an intrinsic part of thekirara_hoshi_characterconcept. This allows you to later prompt forkirara_hoshi_character, blue hair. - Similarly, captioning
star pupilsmakes that feature controllable. If you wanted the star pupils to be a permanent, unchangeable part of the concept, you would omitstar pupilsfrom the caption and let the trigger word absorb it.
Conclusion
You now have a comprehensive understanding of the most fundamental part of model customization. Building a good dataset is a mix of art and science, requiring careful curation, thoughtful captioning, and an understanding of how the model learns.
Key Takeaways:
- A fine-tuning dataset consists of training images, their corresponding captions, and optional but recommended regularization images.
- For training images, prioritize quality and variety over sheer quantity to ensure your model is flexible.
- Captioning strategy is key: What you describe in the caption remains controllable via text prompts; what you omit gets "baked into" the trigger word.
- Regularization images prevent the model from overfitting to your subject and forgetting the general class.
- Tools like Kohya_ss can automate the tedious parts of the process, such as captioning and final folder structuring.
Preview of the next lesson:
With your dataset prepared and ready, it's time to start training. In the next lesson, "Implement Parameter-Efficient Fine-Tuning (PEFT) for diffusion models using LoRA," we will take the dataset you've just learned how to build and use it to train your first LoRA. We'll dive into the practical steps and key hyperparameters within the Kohya_ss environment.