Hello! Welcome back.
In our previous lesson, we meticulously prepared a custom dataset, covering everything from image gathering and curation to captioning and structuring the files for training. With that essential groundwork complete, we're ready to move from preparation to implementation.
This lesson directly addresses the learning outcome: Implement Parameter-Efficient Fine-Tuning (PEFT) for diffusion models using LoRA. We will take the type of dataset we just learned how to build and use it to actually train a model. We'll explore the theory behind LoRA's efficiency, understand its core mathematical principles, and then dive into the practical steps of running a training script and configuring its key parameters.
By the end of this lesson, you'll understand how to fine-tune a massive diffusion model on your own hardware, creating a small, shareable file that injects a new style or concept into the base model.
1. The Challenge of Fine-Tuning and the PEFT Solution
As you know from your background in AI/ML, fine-tuning large models has traditionally been a resource-intensive task. Training all 1 billion+ parameters of a model like Stable Diffusion requires immense VRAM, time, and produces a new model file that is just as large as the original (several gigabytes).
Parameter-Efficient Fine-Tuning (PEFT) techniques were developed to solve this problem. Instead of training all the weights, they freeze the vast majority of the model and only train a small, targeted subset of new parameters.
LoRA explained (and a bit about precision and quantization)
There are several PEFT methods, but one has become dominant in the diffusion model community. Let's watch a brief overview to set the context.
Watch the segment from 05:19 to 07:15. This will introduce several PEFT techniques like adapter layers and prefix tuning, culminating in the introduction of LoRA, which will be our focus.
As the video explains, LoRA (Low-Rank Adaptation) has emerged as the most popular and effective PEFT method for diffusion models due to its efficiency and high-quality results.
2. The Core Idea Behind LoRA: Low-Rank Adaptation
The central insight of the LoRA paper is that the change in weights during fine-tuning () has a low "intrinsic rank." In simpler terms, you don't need a massive, complex matrix to represent the new information; a much simpler, lower-dimensional representation will suffice.
Instead of learning a huge matrix directly, LoRA approximates it by training two much smaller, "low-rank" matrices, and .
The fine-tuning process can be expressed as:
where are the original frozen weights. LoRA decomposes the weight update as:
Here, if is a matrix, we can use a low rank . Then, matrix will have dimensions and matrix will have dimensions .
Let's make this concrete. Suppose we are adapting a weight matrix of size , which has over 16 million parameters. If we choose a rank :
- Matrix is .
- Matrix is .
The total number of parameters we train is , a reduction of over 99.5% compared to training the full matrix!
This decomposition is injected into specific layers of the diffusion model, typically the attention layers of the UNet, which are critical for relating the text prompt to the image generation process.
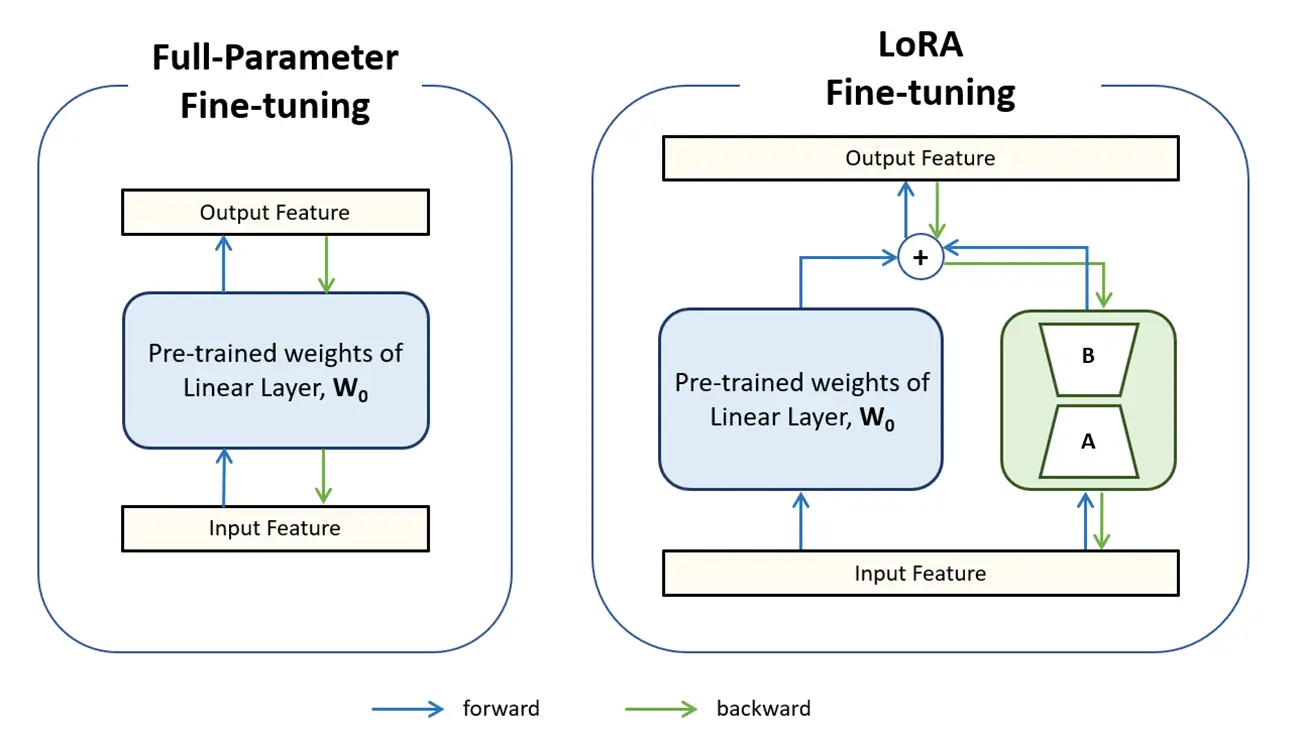
3. Understanding the LoRA Architecture and Math
Now that you have the high-level concept, let's look closer at the mechanics.
LoRA explained (and a bit about precision and quantization)
The video 'LoRA explained' by DeepFindr provides an excellent mathematical and conceptual breakdown of how LoRA works.
Watch from 07:15 to 11:48. This covers: Motivation: The concept of 'intrinsic dimensionality' and why large models can be tuned with few parameters. Rank Decomposition: A clear explanation of how the weight update matrix \Delta W is constructed from the low-rank matrices A and B and integrated into the forward pass.
As the video details, the forward pass for a LoRA-adapted layer becomes:
where is the input to the layer and is the output. The original weights are frozen, and only and are updated during training. This is why the process is so efficient.
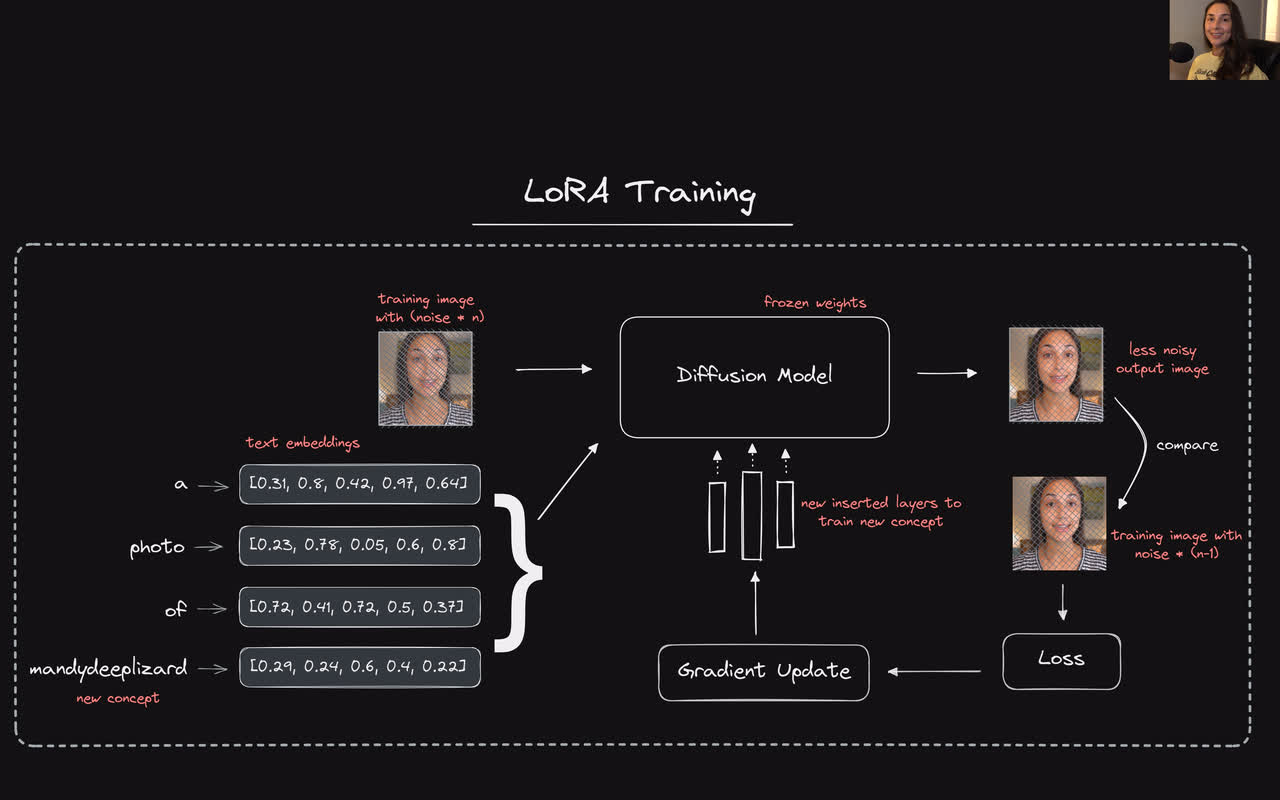
4. LoRA Hyperparameters: rank and alpha
When implementing LoRA, two key hyperparameters control its behavior: rank and alpha.
LoRA explained (and a bit about precision and quantization)
Understanding how to set these parameters is crucial for successful training. Let's continue with the 'LoRA explained' video.
Watch from 11:48 to 14:40. Focus on the explanation of the rank and alpha hyperparameters and the practical advice on how to choose them.
Rank (r)
- What it is: The rank of the decomposition, which determines the size (and number of parameters) of your LoRA matrices A and B. It essentially defines the "capacity" of your LoRA.
- Typical values: Common values range from 4 to 128.
- Trade-offs:
- A higher rank allows the LoRA to capture more complex details and make stronger changes to the base model. This might be necessary for a very intricate style or a subject that is very different from the base model's training data. However, it leads to a larger file size and can be more prone to overfitting.
- A lower rank results in a smaller file and faster training, but may not have enough capacity to learn the desired concept fully.
- Practical advice: Starting with a rank of 8, 16, or 32 is often a good baseline. Experiments from the LoRA paper show that performance often plateaus, and a very high rank isn't always better.
Alpha (α)
- What it is: A scaling factor that controls the magnitude of the LoRA's impact during inference. The final adapted weight is calculated as .
- Role in training: During training,
alphais often set equal to therank. This convention helps stabilize training when you experiment with different ranks, as it normalizes the weight updates. - Role in inference: This is where
alphabecomes a powerful tool. When you apply your trained LoRA, you can set analphavalue.alpha=1: Applies the LoRA with its trained strength.alpha=0.5: Reduces the LoRA's effect, blending it more with the base model. This is useful if the LoRA is over-trained or its style is too strong.alpha>1: Amplifies the LoRA's effect.
Test your understanding!
You are training a LoRA to capture the art style of a specific, obscure manga artist. This style is highly detailed and unique, differing significantly from the general anime style of the base model. When configuring your training, would you be more inclined to start with a rank of 4 or 64? Why?
Show answer
You would be more inclined to start with a higher rank, such as 64.
Reasoning: The rank determines the capacity of the LoRA to learn new information. A complex and unique style has more intricate details and nuances to capture. A low rank like 4 might not have enough parameters to learn these details effectively, resulting in a model that fails to reproduce the style accurately. A higher rank of 64 provides more "space" for the model to learn the complex patterns, making it more likely to succeed. You could always reduce the rank later if you find it's overfitting or the file size is a concern.
5. Implementing LoRA with Hugging Face diffusers
Now, let's get practical. The Hugging Face diffusers library provides official example scripts for training LoRAs, which have become a standard in the community.
Make YOUR OWN Images With Stable Diffusion - Finetuning Walkthrough
The video 'Make YOUR OWN Images With Stable Diffusion' provides a fantastic end-to-end walkthrough of this process, from explaining the scripts to running them on a cloud GPU.
This is a longer but highly practical segment. We'll watch from 11:53 to 51:27. Here's what to focus on: (11:53 - 18:10) An excellent conceptual recap of LoRA and how it plugs into the attention layers. (29:22 - 44:05) A detailed breakdown of the diffusers training script and its many command-line arguments. This is the core of the 'implementation' step. Pay attention to how hyperparameters like learning_rate, train_batch_size, and resolution are set. (44:05 - 51:27) A live demonstration of setting up the environment (cloning the repo, installing dependencies, configuring accelerate) and launching the training script. This shows you exactly what the process looks like in a real terminal.
Breakdown of a LoRA Training Command
Let's dissect a typical training command you might use with the diffusers script, based on the video and the official documentation.
export MODEL_NAME="stabilityai/stable-diffusion-xl-base-1.0"
export DATASET_NAME="your-hf-account/your-dataset"
export OUTPUT_DIR="sdxl-lora-my-character"

accelerate launch train_text_to_image_lora_sdxl.py \
  --pretrained_model_name_or_path=$MODEL_NAME \
  --dataset_name=$DATASET_NAME \
  --resolution=1024 \
  --train_batch_size=1 \
  --gradient_accumulation_steps=4 \
  --learning_rate=1e-4 \
  --rank=32 \
  --lr_scheduler="constant" \
  --lr_warmup_steps=0 \
  --max_train_steps=1000 \
  --output_dir=$OUTPUT_DIR \
  --push_to_hub
Key Arguments:
--pretrained_model_name_or_path: The base model you are fine-tuning (e.g., SDXL 1.0, Stable Diffusion 1.5).--dataset_name: The dataset you prepared and uploaded to the Hugging Face Hub.--resolution: The training resolution. Must match what the base model expects (e.g., 1024 for SDXL, 512 for SD 1.5).--train_batch_size: How many images are processed at once. Keep this low (e.g., 1) to conserve VRAM.--gradient_accumulation_steps: Simulates a larger batch size by accumulating gradients over several steps. A batch size of 1 with 4 accumulation steps effectively simulates a batch size of 4.--learning_rate: Crucially, LoRA can handle much higher learning rates than full fine-tuning. Values like1e-4or3e-4are common starting points, whereas full fine-tuning often uses1e-6.--rank: The LoRA rank, as discussed above.--max_train_steps: The total number of training steps to run.--output_dir: Where to save the resulting LoRA file.
The accelerate launch command is part of the Hugging Face accelerate library, which handles the complexities of running PyTorch code on different hardware setups (single GPU, multiple GPUs, mixed precision).
LoRA - Hugging Face Diffusers Documentation
For a more technical look under the hood, the Hugging Face documentation shows how these script arguments translate into code.
Read the section 'Training script'. You don't need to memorize the code, but notice how the script uses LoraConfig from the peft library to define the rank and which modules to target (e.g., to_k, to_q, to_v), and how the optimizer is then created using only the lora_layers. This connects the command-line arguments to the underlying implementation.
6. Using Your Trained LoRA
Once training is complete, you'll have a small file (e.g., pytorch_lora_weights.safetensors). Using it for inference is straightforward.
from diffusers import AutoPipelineForText2Image
import torch

# 1. Load the base model pipeline
pipeline = AutoPipelineForText2Image.from_pretrained(
    "stabilityai/stable-diffusion-xl-base-1.0",
    torch_dtype=torch.float16
).to("cuda")

# 2. Load the LoRA weights into the pipeline
# The weight_name might vary, but this is a common default.
pipeline.load_lora_weights("path/to/your/lora/output", weight_name="pytorch_lora_weights.safetensors")

# 3. Generate an image!
# You can control the LoRA's strength with `cross_attention_kwargs`
image = pipeline(
    "A photo of ohwx woman in a cinematic shot",
    cross_attention_kwargs={"scale": 0.8} # This is like adjusting alpha
).images[0]

image.save("my-character.png")
The scale parameter in cross_attention_kwargs allows you to dynamically adjust the strength of the LoRA during inference, which is incredibly powerful for achieving the exact look you want.
Conclusion
Congratulations! You have now covered the entire workflow from theoretical understanding to practical implementation of LoRA, one of the most impactful techniques in modern generative AI. You've seen how a clever mathematical trick—low-rank decomposition—solves a massive engineering problem, enabling individuals to customize state-of-the-art models efficiently.
Key Takeaways:
- LoRA is a PEFT technique that freezes the base model and trains only small, supplementary weight matrices ( and ).
- It works by approximating the weight change () with a low-rank matrix decomposition ().
- This drastically reduces the number of trainable parameters, leading to faster training, lower memory requirements, and very small final model files (typically 1-200 MB).
- The key hyperparameters are
rank(controlling capacity) andalpha(controlling strength). - Implementation is streamlined using standard tools like Hugging Face
diffusersandaccelerate, which provide scripts that can be configured with command-line arguments.
Preview of the next lesson:
While LoRA is fantastic for adapting styles and concepts, another popular technique, DreamBooth, excels at teaching a model a new subject with extremely high fidelity. In the next lesson, "Implement DreamBooth for personalizing models with specific subjects or styles," we will explore this alternative method, compare its trade-offs with LoRA, and learn how to implement it.