
Hello. In the previous lesson, you learned how atomic particles are counted from atomic number, mass number, and ionic charge. We now move into Physics, where the central habit is equally important: a scientific measurement is not just a number. It is a number with a suitable unit and a precision justified by the instrument.
This begins the Physics part of the course on motion, forces, and energy. By the end of this lesson, you should be able to choose an appropriate instrument for a measurement, state its suitable unit, read its scale sensibly, and record the result in an exam-ready form.
A measurement has three parts
A physical quantity is something measurable, such as length, mass, time, temperature, electric current, or volume. A complete measurement needs:
- a numerical value
- a unit
- a precision that matches the instrument used
For example:
Writing only “12.4” is incomplete: it could be centimetres, metres, or millimetres. Writing “12.437892 cm” from a ruler with millimetre markings is also poor science, because the ruler cannot justify all those digits.
Watch this short introduction from Cognito Academy before continuing. It establishes the basic quantities and SI units, then connects instrument choice with precision.
Physical Quantities and Units (Crash Course) | Measurement | Physics | GCE O-Level
Watch “Physical Quantities and Units (Crash Course) | Measurement | Physics | GCE O-Level” by Cognito Academy. It gives a concise overview of physical quantities, units, common measuring instruments, and reliable scale reading.
Watch quantities and units to review the idea that every physical quantity needs a value and a unit. Then watch length instruments for the relative precision of rulers, vernier calipers, and micrometers. Finish with timing and parallax; focus on why timing many oscillations and viewing a scale straight on improve a measurement.
For this stage of O Level Physics, the most useful units are:
| Quantity | Common suitable unit | Example |
|---|---|---|
| Length | , , | wire diameter in |
| Mass | , | mass of a block in |
| Time | pendulum time in | |
| Temperature | or | water temperature in |
| Volume | , | volume of water in |
| Current | , | current in |
| Potential difference | battery voltage in |
A key equivalence for practical work is:
For instance, of water occupies .
The Cambridge syllabus expects you to know standard symbols and units, particularly those shown in practical tables and graph axes. It also sets out the rule that readings should match the precision of the apparatus.
[PDF] Syllabus - Cambridge O Level Physics 5054
Read these extracts from the Cambridge O Level Physics 5054 syllabus. They are especially useful because they state the exact conventions expected when recording measurements in practical and Alternative to Practical questions.
First, find the section “Symbols and units for physical quantities” and scan the units table. Focus on length, mass, time, volume, temperature, current, and potential difference. Then find “Presentation of data”, under “Taking readings”, and read the scale-reading rule, followed by the recording rules. Notice in particular how table headings use a solidus, such as time / s.
Choose an instrument that fits the job
The best instrument is not always the one with the finest scale. It must be suitable for:
- the quantity being measured;
- the size and shape of the object;
- the range required;
- the precision needed.
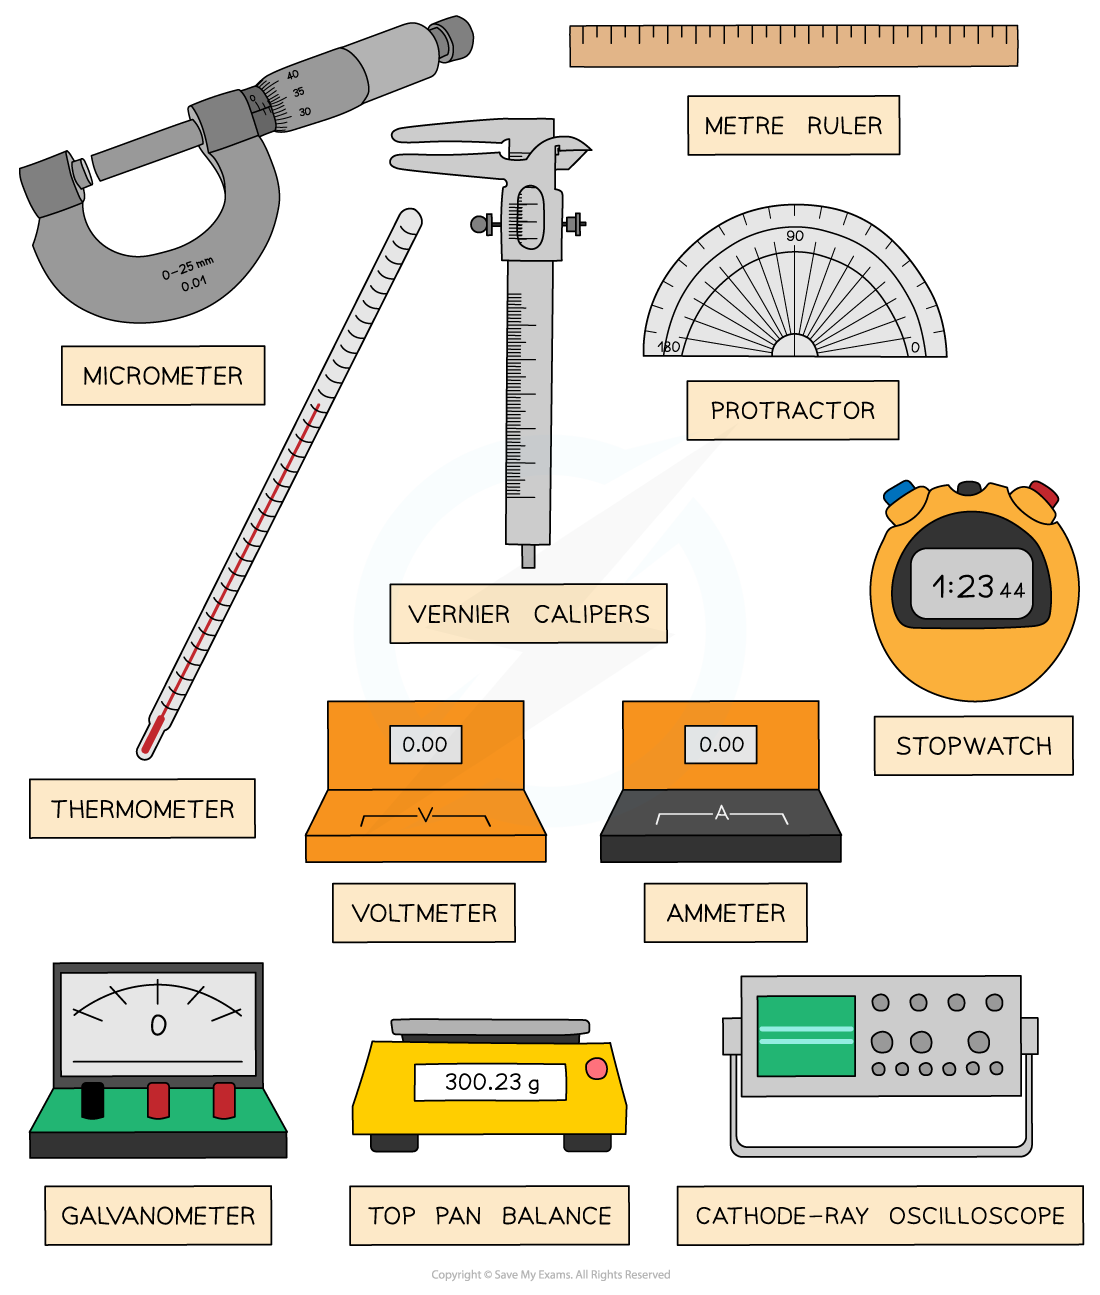
Measuring length
A tape, ruler, vernier calipers, and micrometer all measure length, but each is suited to a different situation.
| Measurement task | Suitable instrument | Reason |
|---|---|---|
| Length of a classroom or running track | Tape measure | Long range and flexible |
| Length of a book, wooden block, or pendulum | Ruler or metre rule | Convenient for lengths from centimetres to around a metre |
| External diameter of a marble or test tube | Vernier calipers | Greater precision than a ruler |
| Internal diameter of a tube | Vernier calipers | Inner jaws fit inside the tube |
| Depth of a narrow hole | Vernier calipers | Depth probe can be used |
| Diameter of a thin wire | Micrometer screw gauge | Very fine precision for very small diameters |
| Thickness of paper or a thin sheet | Micrometer screw gauge | Suitable for small thicknesses |
Typical scale resolutions are:
| Instrument | Typical smallest scale division |
|---|---|
| Metre rule or ruler | |
| Vernier calipers | |
| Micrometer screw gauge |
A micrometer has better resolution than a ruler, but it is not suitable for measuring the length of a pendulum. Its range is too small. Conversely, using a metre rule for a wire’s diameter would be far too imprecise.
The syllabus explicitly requires you to select tapes, rulers, and micrometers for lengths, as well as measuring cylinders and timers for other quantities.
[PDF] Syllabus - Cambridge O Level Physics 5054
Read the Cambridge requirements for measurement techniques and the practical apparatus list. This will help you recognise the equipment named in examination questions.
In Section 1.1, “Physical quantities and measurement techniques” on p. 13, read the measurement requirements. Focus on the different tools for length, volume, and time. Then, in the “Apparatus” list, read the general and mechanics equipment. Note the stated precision of the electronic balance and stopwatch; afterwards, scan the Thermal physics and Electricity lists for the measuring cylinder, thermometer, ammeter, and voltmeter.
Measuring other quantities
For common practical questions, match quantity to instrument directly:
| Quantity | Suitable instrument | Important distinction |
|---|---|---|
| Mass | Top-pan balance | Measures mass, not weight |
| Time interval | Stopwatch or digital timer | Use seconds, normally |
| Temperature | Thermometer or temperature sensor | Read at eye level |
| Liquid volume | Measuring cylinder | More suitable than a beaker for measuring volume |
| Volume of an irregular solid | Measuring cylinder and water displacement | Find the increase in water volume |
| Electric current | Ammeter | Unit: ampere, |
| Potential difference | Voltmeter | Unit: volt, |
| Angle | Protractor | Unit: degree, |
For an irregular solid that sinks in water, record the initial water volume and the final volume after complete submersion. The solid’s volume is the difference:
If water rises from to , then:
Ensure the object is fully submerged, contains no trapped air bubbles, and does not absorb water significantly.
Scale divisions, precision, and sensible digits
The smallest division of an analogue scale is the gap between adjacent marked values. On a standard ruler, the smallest division is normally .
Cambridge requires you to estimate readings to the nearest half of the smallest division where appropriate. Therefore, on a ruler marked every , you can estimate to about .
Suppose the end of an object lies halfway between the and marks. A suitable record is:
Do not report:
Those extra digits are invented rather than measured.
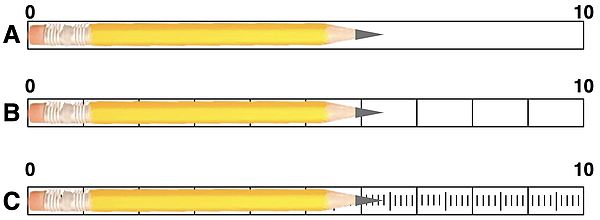
The three rulers illustrate an important principle: precision belongs to the measurement process, not to the object. The pencil has one actual length, but instrument A cannot provide as detailed a reading as instrument C.
Analogue and digital instruments
For an analogue instrument, such as a ruler, thermometer, analogue ammeter, or measuring cylinder:
- Identify the smallest division.
- Read the whole marked value just below or before the pointer, liquid level, or object edge.
- Estimate between markings to the nearest half division if possible.
- Record the value with the correct unit.
For a digital instrument, such as an electronic balance:
- Record all digits displayed.
- Do not add extra digits.
- Include the displayed unit or convert it correctly if required.
If a digital balance reads , a suitable record is:
If it displays only , you must not write . The extra zero would falsely imply that the balance measured to .
Accuracy and precision are not identical
These terms are related but different:
- Precision concerns how finely a measurement is given and, in repeated measurements, how closely the readings agree.
- Accuracy concerns closeness to the true value.
A micrometer may give a very precise reading, but it can still be inaccurate if it has a zero error. Before measuring, close the jaws of a vernier caliper or micrometer gently. It should read zero; if it does not, a correction may be needed.
A reading can also be inaccurate through parallax error. This happens when you view a scale from an angle instead of directly in front of it. To avoid it, place your eye perpendicular to the scale. This is especially important when reading liquid levels in a measuring cylinder or thermometer.
Measuring reliably: reduce avoidable error
Good practical work uses a suitable instrument and a sound method.
Measure lengths from two marks when possible
The zero end of a ruler can become worn or chipped. Rather than placing the object at the zero mark, align one end at a clear mark such as , read the other end, and subtract.
For example, if a wire begins at and ends at :
This method also makes it easier to measure the extension of a spring: subtract its initial length from its final length.
Measure multiples for very short intervals or small lengths
Human reaction time makes timing a single pendulum swing unreliable. Instead, time many oscillations.
For example, if oscillations take , the period is:
Timing twenty oscillations makes the total time much larger than the reaction-time uncertainty, so the calculated period is more reliable.
The same idea works for small lengths. To find the thickness of one sheet of paper, measure a stack of, say, sheets with a micrometer and divide by . A single sheet may be too thin to measure reliably by itself.
Repeat and average where appropriate
A single reading can be affected by random variation. Take repeat readings and calculate the mean, especially when measuring:
- the period of a pendulum;
- a time interval measured with a stopwatch;
- the diameter of a wire at several positions;
- a length that is difficult to align exactly.
Repeats do not correct a systematic error such as a mis-zeroed instrument, but they reduce the effect of random variation.
Recording measurements in tables
A well-presented table helps examiners see exactly what was measured. Use the quantity and unit in the heading, not repeatedly inside the table.
Correct:
| Length / cm | Time / s |
|---|---|
| 10.0 | 1.4 |
| 20.0 | 2.8 |
| 30.0 | 4.1 |
Not recommended:
| Length | Time |
|---|---|
| 10.0 cm | 1.4 s |
| 20.0 cm | 2.8 s |
The first table makes units clear once and keeps the data clean. It also follows the Cambridge convention of separating quantity and unit using a solidus:
Keep the decimal places consistent within a column when the same instrument has been used. For example, if a measuring cylinder is read to , values such as , , and are consistently recorded.
Before accepting a measurement, use this quick check:
- Have I measured the correct physical quantity?
- Is my instrument suitable for the object’s size and the needed precision?
- Have I used an appropriate unit?
- Have I read the scale at eye level?
- Does the number of decimal places match the instrument?
- If this is a table, is the unit in the heading only?
Key takeaways
A reliable measurement is a justified statement, not just a number.
- Select an instrument based on the quantity, object size, range, and precision required.
- Use a tape or metre rule for larger lengths, vernier calipers for diameters, depths, and internal widths, and a micrometer for very thin objects such as wires.
- Use a balance for mass, a measuring cylinder for volume, a stopwatch for time, a thermometer for temperature, an ammeter for current, and a voltmeter for potential difference.
- Always include a suitable unit.
- Read analogue scales to the nearest half of the smallest division where appropriate.
- Record only the digits your instrument can support.
- Avoid parallax, check for zero error, repeat measurements when useful, and measure multiples for very small distances or short times.
- In tables, write headings such as time / s and do not repeat units in every data cell.
Next, you will use measured distance and time to calculate speed, including interpreting distance–time graphs.
Can't find a good explanation? Sign up and we'll make it for you
Sign up