
Hello! Welcome back to our module on paid acquisition.
In our last lesson, you did the critical groundwork of creating custom audiences from your website traffic. You now have a "warm" audience of all your website visitors and a crucial exclusion audience of users who have already signed up.
Today, we put those audiences into action. Our goal is to launch a basic Facebook Ads retargeting campaign to re-engage landing page visitors. This is a fundamental tactic in any SaaS playbook, allowing you to efficiently turn initial interest into new user sign-ups and maximize your return on ad spend. We'll walk through the entire process in Meta Ads Manager, from campaign setup to crafting compelling ad copy for this specific audience.
The Anatomy of a Facebook Ad Campaign
Before we start clicking buttons, let's understand the structure we're about to build. A Facebook ad campaign has three levels:
- Campaign: This is the top level where you set your advertising objective. For a SaaS business aiming for sign-ups, this will typically be a Sales objective, optimized for a conversion event like a completed registration.
- Ad Set: Here, you define who you want to target (your audience), where you want to show your ads (placements), and how much you want to spend (budget and schedule). This is where we'll use the custom audiences you created.
- Ad: This is the actual creative—the image, video, and text—that your audience sees.
With this framework in mind, let's build your campaign.
Part 1: Setting Up Your Retargeting Campaign and Ad Set
We'll use the Meta Ads Manager to create your campaign. The process involves setting the objective at the campaign level, then configuring the audience and budget at the ad set level.
The following video provides an excellent walkthrough of this process. We'll use its guidance to launch a campaign specifically for your SaaS.
Facebook Ads Retargeting - A Complete Guide for Small Businesses
This HubSpot Marketing video offers a clear, step-by-step guide to setting up a retargeting campaign. We will follow its structure, adapting it for a SaaS use case.
Please watch two key sections of this video: Campaign & Ad Set Setup (06:35 - 07:45): Focus on how to create a new campaign, select the 'Sales' objective, and configure the ad set's conversion location and event. You can ignore the e-commerce specific 'Add to cart' event and mentally substitute it with your SaaS sign-up event. Excluding Converted Users (11:36 - 12:53): Pay close attention to how an audience of purchasers is created and then applied as an exclusion. This is a critical step to ensure ad spend efficiency.
Let's walk through the key steps together.
Step 1: Create the Campaign
- In Meta Ads Manager, click the green + Create button.
- You'll be asked to choose a campaign objective. Select Sales and click Continue.
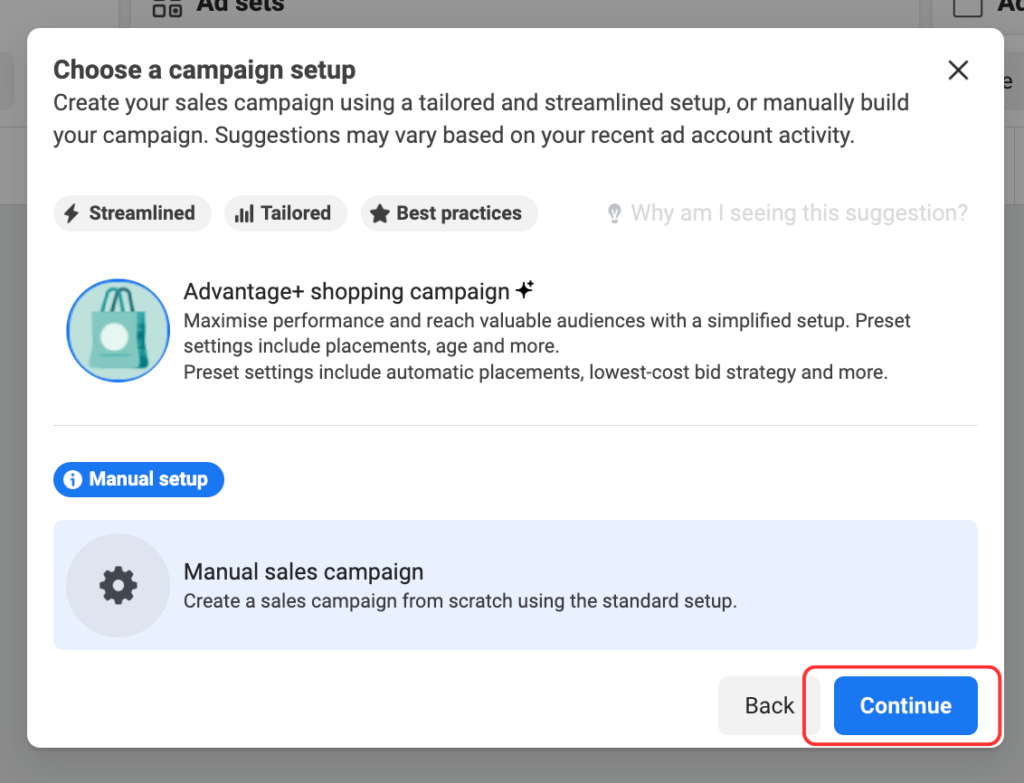
- You will then see a choice between an 'Advantage+ campaign' and a 'Manual campaign'. For learning purposes and greater control, select Manual sales campaign.
- Give your campaign a clear name, such as
[Your SaaS Name] - Retargeting - Signups. You can leave the other settings at their default for now. Click Next.
Step 2: Configure the Ad Set
You are now at the Ad Set level. This is where the magic of retargeting happens.
- Name your Ad Set: Use a descriptive name like
Website Visitors - 180d (Excl. Signups). - Conversion:
- Set the conversion event location to Website.
- Under Performance Goal, ensure it is set to
Maximize number of conversions. - For the Pixel, select the Meta Pixel you installed.
- For the Conversion event, choose the custom or standard event you created for a successful sign-up (e.g.,
CompleteRegistrationorLead).
- Budget & Schedule: As recommended in the HubSpot video, start with a small daily budget, like $10-$20. This allows you to test the campaign without a large financial commitment.
- Audience: This is the most important step.
- Under
Audience, find the Custom Audiences field. Search for and select theWV - All - 180daudience you created in the last lesson. - Next, click the Exclude link just below the first box. Search for and select your
Converted - Signups - 180daudience.
- Under
This configuration tells Meta: "Show my ads to people who visited my website in the last 180 days, but do not show them to people who have already signed up." As the article from JJSC IT Solutions emphasizes, excluding converters is a must to improve your Return On Ad Spend (ROAS) and avoid wasting money.
Test your understanding!
You want to run a special "Welcome Back" offer only for users who visited your site more than 30 days ago but within the last 90 days. You have two audiences: WV - All - 30d and WV - All - 90d. How would you set up the Include/Exclude fields in the ad set?
Show answer
You would:
- Include:
WV - All - 90d - Exclude:
WV - All - 30d
This logic targets the group of people who are in the 90-day audience but not in the more recent 30-day audience, effectively isolating visitors from 31-90 days ago.
- Placements: Leave this set to Advantage+ Placements. This allows Meta to automatically show your ads across its platforms (Facebook, Instagram, Messenger, etc.) where they are most likely to perform well.
Click Next to move on to creating the ad itself.
Part 2: Crafting Your Retargeting Ad
An ad for a warm, retargeted audience should be different from an ad for a cold audience. These users already know you exist; they just need a nudge. Your goal is to reinforce your value and remove any friction holding them back from signing up.
The article "Facebook Retargeting Ads for B2B SaaS" provides several powerful strategies for this.
Facebook Retargeting Ads for B2B SaaS in 2025
This article from Aimers.io is packed with B2B SaaS-specific strategies for retargeting ad copy. It moves beyond generic advice and offers frameworks you can immediately apply.
Read the section titled 'Facebook Retargeting Strategies That Actually Drive SaaS Conversions'. Focus on understanding the four distinct strategies presented: Problem-Agitation-Solution, Social Proof Bombing, Feature Deep-Dive, and The Objection Handler.
Let's apply one of these strategies, "Social Proof Bombing," to create your ad.
Step 3: Build the Ad
- Ad Name: Give your ad a descriptive name, like
Social Proof - Testimonial 1. - Identity: Select your business's Facebook Page and Instagram Account.
- Ad Setup: Choose Manual upload and select Single image or video.
- Ad Creative:
- Upload an image or video. This could be a professional graphic you created in Canva, a short demo video, or even a simple image with a customer testimonial.
- Ad Copy:
- Primary Text: This is your main message. Acknowledge their previous visit and provide a compelling reason to return. Example using the "Social Proof" strategy:
"Spotted you checking out [Your SaaS Name]! Did you know that founders like you are using our tool to save 10+ hours a week on [the problem you solve]? Join over 500 satisfied customers and get your free account today."
- Headline: Make it short and benefit-driven. Example:
Save 10 Hours a Week. - Description: Add extra context or urgency. Example:
Free account setup in 2 minutes.
- Primary Text: This is your main message. Acknowledge their previous visit and provide a compelling reason to return. Example using the "Social Proof" strategy:
- Call to Action (CTA): Choose the most relevant CTA button. For a SaaS sign-up, this is typically Sign Up or Learn More.
- Destination: Enter the URL of your landing page.
Review all your settings using the ad preview on the right. Once you're satisfied, click the green Publish button.
Congratulations! Your first retargeting campaign is now under review and will go live shortly.
Part 3: Two Different Philosophies on Audience Building
For this first campaign, we targeted a single, broad custom audience of website visitors. This is a great starting point. However, as you gain experience, it's worth knowing about different strategic approaches.
This video from Ben Heath advocates for an even broader approach, which can be very effective and simple to manage.
The ONLY Facebook Ads Retargeting Strategy You Need
This video presents a compelling argument for creating a single, large retargeting audience by combining all your warm sources. It's a slightly different philosophy than the segmented approach but is powerful in its simplicity.
Watch two key sections: Building a Broad Audience (00:51 - 02:40): Understand the logic behind combining website visitors, email lists, and social media engagers into one ad set. Advantage+ vs. Original Audiences (07:08 - 08:38): This is a crucial concept. Learn the difference between letting Meta find users beyond your custom audience (Advantage+) and enforcing a strict boundary (Original). For our pure retargeting campaign, we used the 'Original' audience logic by simply adding our custom audience without enabling any expansion.
The key takeaway is that you can either create highly specific, segmented ad sets (e.g., one for pricing page visitors, another for blog readers) or group all your warm leads together and trust Meta's algorithm to find the people most likely to convert within that large pool. For your goal of rapidly launching and scaling, the broad approach is often more efficient to start with.
Conclusion
You have successfully launched your first Facebook retargeting campaign. This is a cornerstone of paid user acquisition for any SaaS company. By re-engaging users who have already shown interest, you create a highly efficient system for converting traffic into customers.
Key Takeaways:
- A basic retargeting campaign uses the Sales objective, targeting a Custom Audience of website visitors.
- Always exclude your audience of converted users to prevent wasted ad spend and ensure a good user experience.
- Start with a small daily budget ($10-$20) to test and gather data.
- Craft your ad copy specifically for a warm audience. Remind them of the value you offer and use social proof or address potential objections to encourage them to complete the sign-up.
Preview of the Next Lesson:
Your campaign is now live, but the work of a performance marketer is never done. How do you know if your ad is as effective as it could be? In our next lesson, we will explore how to apply a basic A/B testing framework to test ad copy or creative variations in a campaign, allowing you to systematically improve your results over time.