Hello and welcome to a new module in your Laravel mastery course!
In the previous module, we focused on background processing, culminating in a lesson on how to handle massive data imports using queues and job batching. That was all about decoupling slow or heavy tasks from the main web request to improve performance and reliability.
Today, we're starting Module 10, "Real-Time Applications with Events & Broadcasting," by exploring a related but broader concept: Laravel's event system. While queues are about what to do later, events are about announcing that something significant has happened. This allows different, unrelated parts of your application to react to that occurrence without being tightly coupled together.
This lesson directly addresses the learning outcome: Create and dispatch application events with corresponding listeners. By the end of our session, you'll understand the "why" behind events and be able to implement the full event-listener cycle in your Laravel projects.
1. The "Why": Decoupling Your Application Logic
Imagine you're building a feature where a new user registers. In your RegisteredUserController, you might need to:
- Create the user record in the database.
- Send a welcome email.
- Assign a default role.
- Log the registration event for analytics.
- Notify an admin via Slack.
If you put all of this logic directly into your controller, it quickly becomes bloated, hard to read, and difficult to maintain. What if you need to add a sixth step later? You'd have to modify the controller again. This is called tight coupling.
Laravel's event system provides an elegant solution using the Observer design pattern. Instead of your controller doing everything, it simply "announces" an event, like UserRegistered. Other parts of your application, called listeners, can subscribe to this event and perform their specific tasks.

This approach has several key benefits:
- Decoupling: Your
RegisteredUserControlleronly needs to know about creating a user and dispatching an event. It doesn't need to know anything about sending emails or Slack messages. - Extensibility: Need to add a new action when a user registers? Just create a new listener. You don't have to touch the original controller code.
- Readability: Your code becomes cleaner and more focused on a single responsibility.
The core idea is explained well in the official documentation.
Let's start with the official Laravel documentation to get a high-level overview of the concept.
Read the 'Introduction' section. Focus on the example provided: instead of coupling order processing code with Slack notification code, you raise an OrderShipped event.
2. The Core Mechanics: The Event-Listener Lifecycle
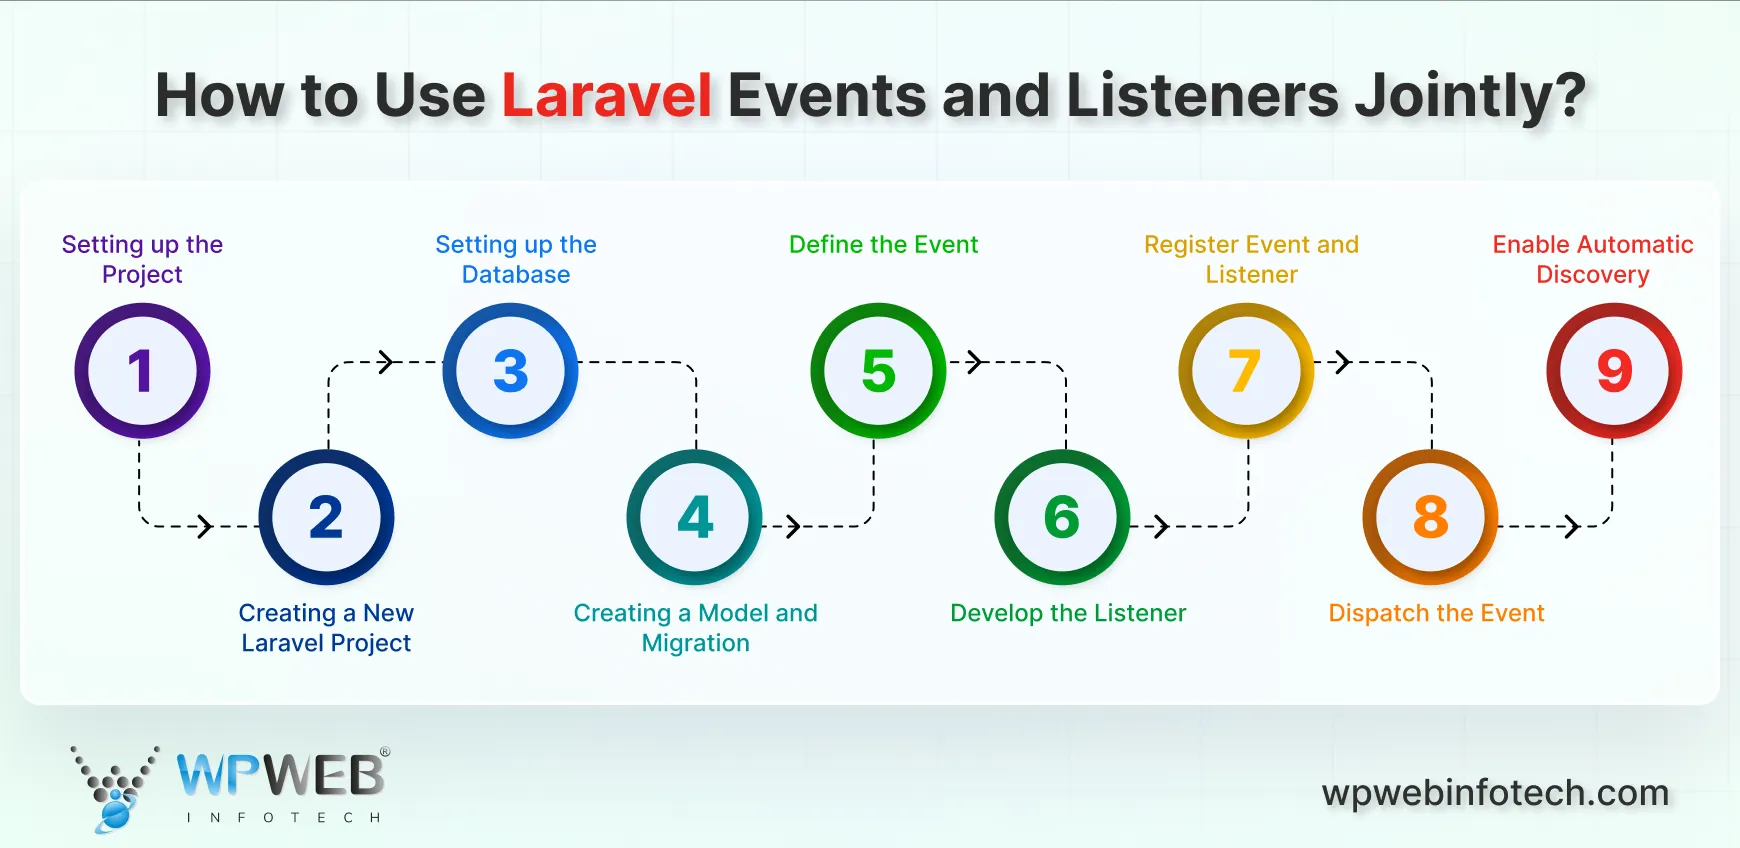
Implementing this pattern in Laravel involves a clear, repeatable workflow. Let's break it down step-by-step.
Step 1: Generate the Classes
Laravel provides Artisan commands to create the necessary files for you. These files will be placed in the app/Events and app/Listeners directories.
# Create an event class
php artisan make:event UserRegistered


# Create a listener class for that event
php artisan make:listener SendWelcomeEmail --event=UserRegistered
Step 2: Define the Event
An event class is primarily a data container. Its job is to hold any relevant information about what happened. You pass this data through the event's constructor. Since you're familiar with PHP, you'll find constructor property promotion makes this very concise.
// app/Events/UserRegistered.php

namespace App\Events;

use App\Models\User;
use Illuminate\Foundation\Events\Dispatchable;
use Illuminate\Queue\SerializesModels;

class UserRegistered
{
    use Dispatchable, SerializesModels;

    /**
     * Create a new event instance.
     */
    public function __construct(
        public User $user
    ) {}
}
Here, the UserRegistered event holds the User model that was just created. The SerializesModels trait is important—it ensures that if your event is queued, the Eloquent model is serialized and re-hydrated efficiently.
Step 3: Define the Listener
The listener is where the actual work gets done. Its handle method receives the event object, giving it access to the data it contains.
// app/Listeners/SendWelcomeEmail.php

namespace App\Listeners;

use App\Events\UserRegistered;
use Illuminate\Support\Facades\Mail;
use App\Mail\WelcomeEmail;

class SendWelcomeEmail
{
    /**
     * Create the event listener.
     */
    public function __construct() {}

    /**
     * Handle the event.
     */
    public function handle(UserRegistered $event): void
    {
        // Access the user from the event object
        $user = $event->user;

        // Perform the action
        Mail::to($user->email)->send(new WelcomeEmail($user));
    }
}
Step 4: Register the Listener
How does Laravel know that SendWelcomeEmail should run when UserRegistered is dispatched? There are two ways:
-
Automatic Discovery (Recommended): By default, Laravel automatically scans your
app/Listenersdirectory. It looks at thehandlemethod of each listener and uses the type-hinted event (UserRegisteredin our example) to figure out which event it listens for. This is the modern, zero-configuration approach. -
Manual Registration: For older versions of Laravel or more complex use cases, you can explicitly map events to their listeners in the
app/Providers/EventServiceProvider.phpfile.
// app/Providers/EventServiceProvider.php
protected $listen = [
    'App\Events\UserRegistered' => [
        'App\Listeners\SendWelcomeEmail',
        'App\Listeners\NotifyAdminOfNewUser', // You can have multiple listeners!
    ],
];
Even if you use automatic discovery, the event:list Artisan command is useful to see all registered event-listener pairs.
Step 5: Dispatch the Event
Finally, from your controller (or anywhere else in your code), you can dispatch the event. You can use the dispatch static method on the event class or the global event() helper function. Any arguments you pass will be sent to the event's constructor.
// In a controller, after creating a user...
use App\Events\UserRegistered;

// ...

$user = User::create([...]);

// Dispatch the event and pass the new user model
UserRegistered::dispatch($user);

// Or using the helper
// event(new UserRegistered($user));

return response()->json(['message' => 'User registered successfully!']);
3. A Practical Walkthrough
Now let's see all these pieces come together in a practical demonstration. The official Laravel "Bootcamp" series has a short video that perfectly walks through this entire process.
This video from the official Laravel channel will guide you through building a simple event-listener system from scratch.
Watch the video from start to finish (00:00 - 06:10). As you watch, identify each of the 5 steps we just discussed: Generating files (01:19) Defining the event with an $order property (03:52) Defining the listener and its handle method (02:23) Registering the listener manually in EventServiceProvider (04:42) Dispatching the event from the route closure (04:22)
4. Events vs. Model Observers
As someone with some Laravel experience, you might be wondering: "How is this different from a Model Observer?" That's an excellent question.
- Events are a general-purpose system. You can dispatch them from anywhere: controllers, jobs, services, or even other listeners. They represent any significant action in your application, not just database changes.
- Model Observers are a specific implementation of the event system that are tied directly to the Eloquent model lifecycle. They listen for events like
creating,created,updating,updated,deleting, anddeleted.
This blog post from Honeybadger has a great, concise summary.
A guide to Laravel events and listeners - Honeybadger.io
To clarify the difference, let's read a short section from a Honeybadger blog post.
Read the section titled 'Laravel observers vs. Laravel events'. The key takeaway is that observers are for things that only occur in Eloquent Models, while events are general-purpose and can be used anywhere.
In short, think of Observers as a convenient shortcut for dispatching model-related events. We will cover Observers in detail in our next lesson.
To solidify your understanding, here is a helpful flowchart summarizing the entire process we've covered today.
Conclusion
You have now learned the fundamentals of creating and dispatching application events in Laravel. This is a core architectural concept that enables you to build cleaner, more maintainable, and scalable applications.
Key Takeaways:
- Events and listeners implement the Observer pattern to decouple application components.
- The lifecycle is straightforward: generate classes, define the event as a data container, implement logic in the listener's
handlemethod, register the pairing (usually automatically), and dispatch the event. - A single event can have multiple listeners, allowing you to orchestrate complex workflows without cluttering your controllers.
- Events are a general-purpose system, whereas Model Observers (which we'll see next) are a specialized convenience for Eloquent model lifecycle hooks.
Up Next:
Now that you understand the general event system, we'll dive into that specialized use case. In the next lesson, you will learn to use Eloquent observers to automatically dispatch events on model lifecycle hooks. This will allow you to effortlessly hook into actions like created or updated on your models, further cleaning up your code and centralizing your business logic.