Hello! Welcome back to the course.
In our last lesson, we explored Laravel's general-purpose event system. You learned how to create, dispatch, and listen for application-wide events, a powerful technique for decoupling different parts of your application. We briefly touched on the idea that Model Observers are a specialized tool for a similar purpose.
Today, we'll dive deep into that concept. This lesson is designed to help you master the learning outcome: Use Eloquent observers to automatically dispatch events on model lifecycle hooks. We'll see how observers can clean up your code by centralizing logic that needs to run whenever a model is created, updated, or deleted. This is a common and elegant pattern in modern Laravel applications.

1. What are Observers and Model Lifecycle Hooks?
In the previous lesson, you dispatched events manually from a controller, like UserRegistered::dispatch($user). But what if you want to perform an action every single time a model is saved, regardless of whether it's done through a controller, a Tinker session, or an Artisan command? This is where observers shine.
An Eloquent Observer is a class that groups all the event listeners for a single model. It allows you to "observe" a model and automatically trigger methods when certain events happen in its lifecycle. This aligns with the Observer design pattern, where a central "subject" (the model) notifies its "observers" of any state changes.
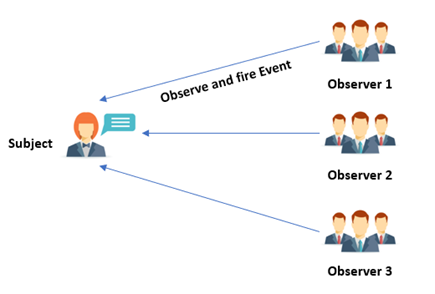
Eloquent models fire several lifecycle events. Understanding these is key to using observers effectively.
Laravel Model Lifecycle Events and How to use Observers in Laravel?
First, let's get familiar with the specific events that an Eloquent model fires. This short video from QiroLab provides a clear list.
Watch the segment from 00:14 to 01:42. Pay close attention to the list of events and the distinction between events that fire before a database operation versus after.
As the video explains, the key events are:
creating/created: Fire when a model is saved for the first time.updating/updated: Fire when an existing model is saved.saving/saved: Fire for both creations and updates.deleting/deleted: Fire when a model is deleted.restoring/restored: Fire when a soft-deleted model is restored.
The most important distinction is between the -ing and -ed events:
- Events like
creating,updating,savingfire before the model's changes are persisted to the database. This is your chance to modify data before it's saved, for example, to generate a slug from a title. - Events like
created,updated,savedfire after the changes have been persisted. This is where you perform actions that rely on the data being in the database, like sending a notification that needs the new model's ID.
2. Creating and Registering an Observer
Let's walk through the process of creating and activating an observer.
Step 1: Generate the Observer Class
Laravel's Artisan CLI makes this simple. To create an observer for a Post model, you would run:
php artisan make:observer PostObserver --model=Post
This command creates a new file at app/Observers/PostObserver.php with placeholder methods for all the key lifecycle events.
// app/Observers/PostObserver.php
namespace App\Observers;

use App\Models\Post;

class PostObserver
{
    public function created(Post $post): void
    {
        // Logic to run after a post is created
    }

    public function updated(Post $post): void
    {
        // Logic to run after a post is updated
    }

    // ... other methods like deleted, restored, etc.
}
Step 2: Register the Observer
For Laravel to use your observer, you need to "attach" it to the corresponding model. The modern and recommended way to do this is with a PHP attribute directly on your model class.
This article from Laravel News provides a clear example.
A guide to Laravel's model events
Let's see how to register the observer. This article section shows the current best practice using the #[ObservedBy] attribute.
Read the section titled 'Listening to Model Events Using Observers'. Focus on how the AuthorObserver is created and then associated with the Author model using the #[ObservedBy(AuthorObserver::class)] attribute.
As the article demonstrates, you simply add the #[ObservedBy] attribute to your model class:
// app/Models/Post.php
namespace App\Models;

use App\Observers\PostObserver; // 1. Import the observer
use Illuminate\Database\Eloquent\Attributes\ObservedBy; // 2. Import the attribute
use Illuminate\Database\Eloquent\Model;


#[ObservedBy([PostObserver::class])] // 3. Attach the observer
class Post extends Model
{
    // ...
}
That's it! Now, whenever you create or update a Post model instance, the corresponding created or updated methods in your PostObserver will be executed automatically.
A Note on Older Projects: You might encounter an older registration method in the app/Providers/EventServiceProvider.php file. While the #[ObservedBy] attribute is preferred now, it's good to recognize the classic approach:
// In EventServiceProvider.php
use App\Models\Post;
use App\Observers\PostObserver;

public function boot(): void
{
    Post::observe(PostObserver::class);
}
3. Practical Application: Automatic Cache Invalidation
Let's look at a practical example that ties into your goal of mastering database optimization. A common performance technique is to cache database query results that are accessed frequently. However, this can lead to stale data if the underlying records change. Observers are the perfect tool to solve this.
Imagine you have a navigation menu that displays a list of all Category models. You cache this list to avoid running a query on every page load. But what happens when an admin adds, edits, or deletes a category? The cache becomes outdated. We can create a CategoryObserver to automatically clear the cache whenever the categories table is modified.
Laravel Model Lifecycle Events and How to use Observers in Laravel?
This video provides an excellent real-world demonstration of using an observer for cache invalidation. It clearly shows the problem and how an observer elegantly solves it.
Watch the segment from 11:48 to 20:26. The video will walk you through: Setting up a cached query for categories. Demonstrating the problem of stale data after a database update. Creating a CategoryObserver with created, updated, and deleted methods. Implementing logic within these methods to clear the cache (Cache::forget(...)). Showing how the cache is automatically invalidated after the observer is in place, ensuring fresh data is always displayed.
This example is powerful because it's not just an abstract concept; it's a direct solution to a common performance and data-integrity problem.
4. Advanced Patterns and Best Practices
Observers are versatile. Here are a few more patterns and crucial best practices to keep in mind.
Dispatching General Events from an Observer
Sometimes, an observer's job is simply to notice a model event and then dispatch a more general application event like the ones you learned about in the last lesson. This is a fantastic pattern for keeping your observers lean and your application logic well-decoupled.
Laravel 12 Events, Listeners & Observers: Complete Guide
Let's look at an article that shows how a UserObserver can dispatch a UserRegistered event. This combines what you learned today with the previous lesson.
Read the section 'Observer for post-registration actions'. Notice how the created method in the UserObserver dispatches event(new UserRegistered($user)). This means any part of your app that creates a user (e.g., seeding, admin panel, API) will trigger the observer, which in turn ensures the general UserRegistered event is always fired.
When to do this: If creating a user needs to trigger multiple, unrelated actions (send email, update analytics, provision a sub-account), it's cleaner to have the observer fire a single UserRegistered event. Then, you can have multiple, dedicated listeners for that event.
The "Gotchas": When Observers Don't Fire
This is one of the most important things to remember. Model events are only fired when using Eloquent methods on a model instance. They are NOT fired for:
- Mass updates/deletes:
// This will NOT trigger 'updating' or 'updated' events Post::where('is_published', false)->update(['is_published' => true]); - Raw DB queries:
// This will NOT trigger any model events
DB::table('posts')->where('id', 1)->delete();
This is because these operations work directly on the database and never actually retrieve the full Eloquent models into memory.
A guide to Laravel's model events
The 'A guide to Laravel's model events' article has a great section on these gotchas. Understanding this will save you hours of debugging down the line.
Read the section 'Gotchas When Using Model Events'. It clearly explains why mass updates and DB facade queries do not trigger observers.
Ensuring Database Transactions are Complete
If your observer's action is queued (e.g., a listener that implements ShouldQueue), you can run into a race condition. The created event fires inside the database transaction. The job could be dispatched to your queue and picked up by a worker before the main transaction has actually been committed to the database. If the job then tries to find the model by its ID, it might fail.
To prevent this, you can have your observer implement the ShouldHandleEventsAfterCommit interface.
use Illuminate\Contracts\Events\ShouldHandleEventsAfterCommit;

class PostObserver implements ShouldHandleEventsAfterCommit
{
    // ...
}
This tells Laravel to only run the observer's methods after the surrounding database transaction has been successfully committed, ensuring the data is available.
Conclusion
You have now learned how to leverage Eloquent Observers to automate actions based on model lifecycle events. This is a powerful tool for creating clean, organized, and maintainable Laravel applications.
Key Takeaways:
- Observers centralize model-specific logic into a single class.
- They are created with
php artisan make:observerand registered on the model with the#[ObservedBy]attribute. - They listen for lifecycle hooks like
created,updated, anddeleted, allowing you to react automatically to database changes. - They are ideal for tasks like cache invalidation, logging, or dispatching broader application events.
- Crucially, remember that observers are not triggered by mass updates or raw DB queries.
- For queued actions, use the
ShouldHandleEventsAfterCommitinterface to avoid race conditions with database transactions.
Up Next:
Now that we can automatically trigger events whenever a model changes, our next step is to broadcast these events to the frontend in real-time. In the next lesson, "Configure Laravel for broadcasting events over WebSockets," we will explore how to take an event fired by an observer, like PostUpdated, and push it instantly to all connected clients, enabling dynamic and interactive user interfaces.