
Welcome. This lesson begins the module on interoception and movement regulation: learning to notice what is happening inside your body so that practice becomes more informed, safer, and less guess-based.
For coordination training, a body scan is not a relaxation test and it is not a search for problems. It is a brief, repeatable way to collect information: What do I notice before movement? What changes while I move? What remains afterwards? Over time, this can make it easier to recognise useful cues such as held breath, unnecessary shoulder tension, fatigue, or a sense of ease and stability.
By the end of this lesson, you will have a short body-scan routine you can use before, during, and after a clinician-approved movement drill.
A body scan is observation, not evaluation
Interoception is your perception of internal bodily signals: breathing, heartbeat, temperature, hunger or fullness, muscle tension, nausea, fatigue, or a feeling of calm or activation. It overlaps with, but is not identical to, proprioception.
During movement practice, you are usually receiving several kinds of information at once:
| Type of information | Example during supported weight shifting |
|---|---|
| Interoception | “My breathing has become shallow”; “my thigh feels warm”; “my heart is beating faster.” |
| Proprioception | “My weight is now more over the right leg”; “my knee is bent slightly”; “my pelvis has shifted sideways.” |
| Touch and pressure | “I feel more pressure under my right foot”; “my hands are leaning on the counter.” |
| External information | “The counter is solid”; “the floor is uneven”; “there is a chair behind me.” |
A useful movement scan includes all of these, but gives particular attention to internal state. The aim is not to make sensations disappear. The aim is to notice them accurately enough that you can make sensible decisions later.
For example, compare these two internal reports:
- Observation: “There is warmth and a pulling sensation in the front of my right thigh; my breath is a little held.”
- Interpretation or judgment: “I am doing it wrong,” or “my knee is definitely damaged.”
The first is information. The second adds a conclusion that may or may not be true. For now, stay with information.
It is also perfectly valid to notice very little. “I cannot detect a clear sensation there” is a more useful report than inventing one. Interoception is a perception skill: repeated, low-pressure attention gives you more opportunities to recognise signals over time.
The stance: curious, specific, and nonjudgmental
Cleveland Clinic’s How to Do a Body Scan Meditation gives a helpful foundation: slow down, move attention through the body, and name what is present without judging it.
How to Do a Body Scan Meditation
Read Cleveland Clinic’s “How to Do a Body Scan Meditation” for the basic structure of a scan and, especially, its nonjudgmental approach. You will adapt the method for movement practice rather than use it only as meditation.
In the section “How to perform a body scan meditation,” begin with the nonjudgment principle. Then read the complete numbered sequence from Step 1, “Get comfortable,” through Step 9, “End the process gently.” In the middle of that sequence, notice the example of simple noticing. Your task is not to reproduce every step exactly; it is to borrow its slow, descriptive attention.
Use plain words. Your labels do not need to be medically precise. Start with a few reliable categories:
- Location: right knee, both feet, upper chest, shoulders, stomach.
- Quality: tight, loose, warm, cool, heavy, light, buzzy, tingling, steady, fluttery.
- Contact or pressure: more under heel, seat pressing on thighs, hands firm on counter.
- Change: same, more, less, appeared, faded.
- Breathing: easy, held, shallow, deeper, regular, irregular.
The key is to describe rather than grade yourself. “My jaw is tight” is useful. “I should not be tense” is not yet useful.
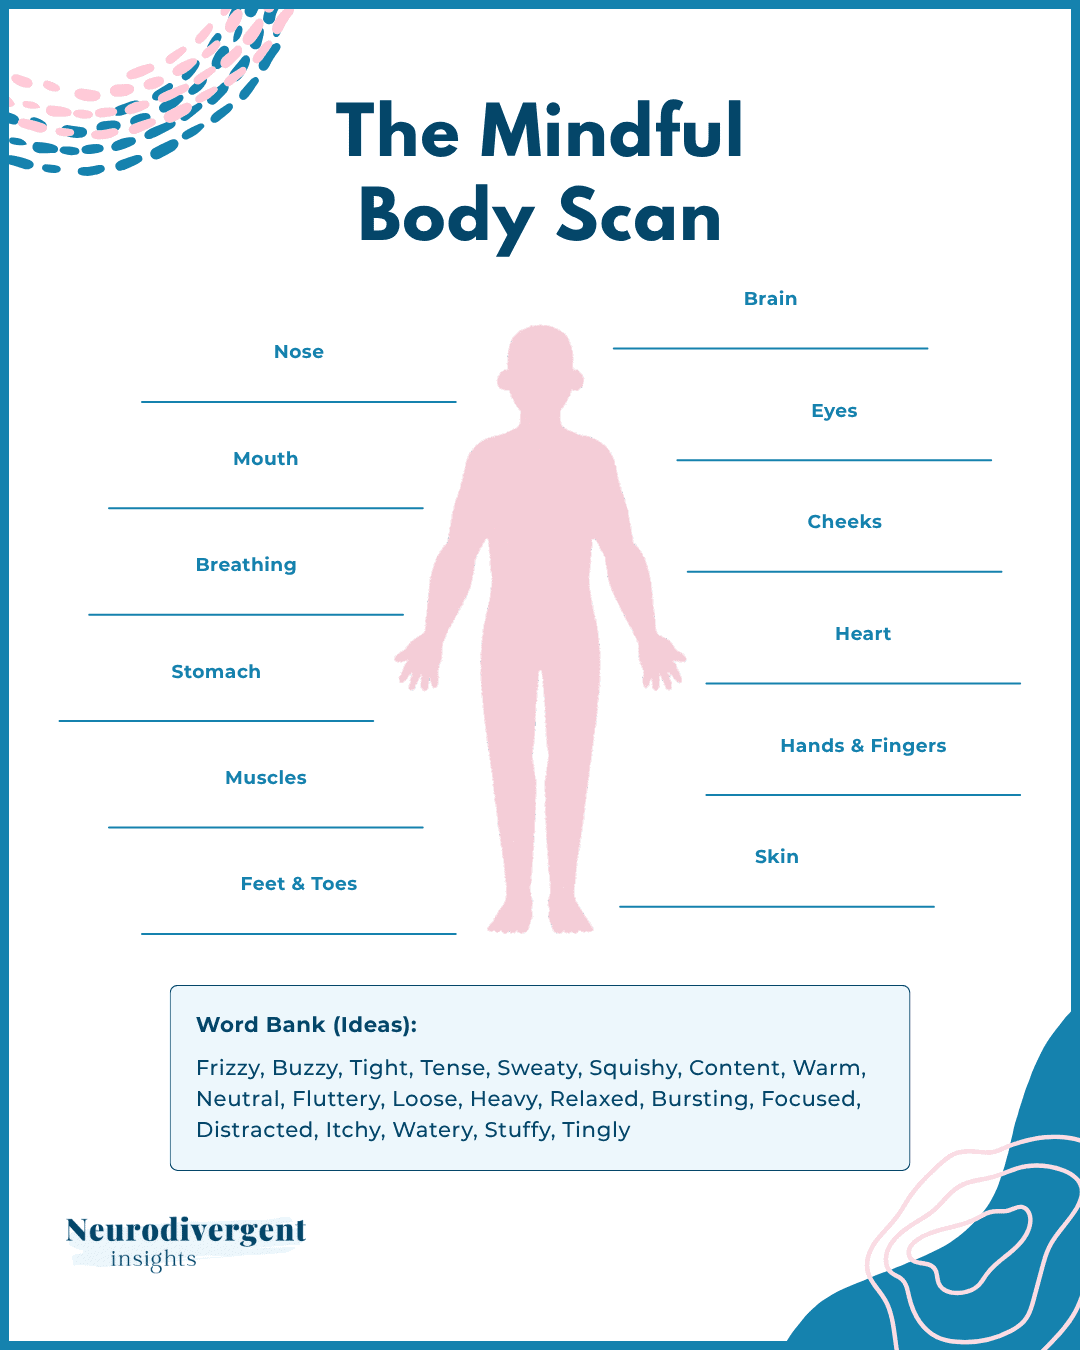
The worksheet’s word bank is a prompt, not a checklist. You do not need to inspect every body part, and you do not need to use every word. During rehabilitation-based movement, a few high-value areas will usually be enough: feet, knee and thigh area, hips, breathing, and shoulders or jaw.
Experience one guided scan first
Before adapting body scans to movement, experience a full scan in a stable position. Choose sitting with your feet supported, or lying down if that is more comfortable for your injury and rehabilitation plan. If closing your eyes feels disorienting, keep them open with a soft downward gaze.
Body Scan Exercise for Wellbeing and Interoceptive Awareness (10 mins)
Watch “Body Scan Exercise for Wellbeing and Interoceptive Awareness” from Inner Sense - Know Your Inner World. It models the unhurried, observational attention you will use in the shorter movement scans below.
Watch the introduction to set up a comfortable position and the principle that your own sensations matter more than following instructions perfectly. Continue with the guided scan, noticing how attention moves from feet through knees, pelvis, breathing, chest, arms, shoulders, and head. Finish with the closing. Do not force relaxation or change any sensation; simply practise detecting and naming what is there.
After the video, write down three short observations. A note such as the following is enough:
Feet: warm, firm contact with floor.
Right knee: neutral, no clear sensation while seated.
Chest: breathing slightly shallow at first, then easier.
This is not a symptom diary and not a diagnosis. Think of it as a brief status report: concrete observations that you can compare with later observations.
The three-moment body scan for movement
A full ten-minute scan is useful occasionally, but it is not necessary before every practice session. For your coordination work, use this short sequence around one physiotherapist-approved drill, such as supported weight shifting, controlled stepping without a pivot, or a permitted seated movement.
Keep the drill easy enough that you can remain physically safe while paying attention. If you are standing, keep your eyes open, maintain your planned hand support, and do not scan in a way that removes attention from balance.
1. Before movement: establish a starting point
Take about 60–90 seconds in a stable position. You might sit first and then stand with support, or begin already supported at a counter.
Notice these four areas:
- Contact and position: Where is your weight? How do both feet meet the floor? Where are your hands relative to support?
- Legs and knee area: Is there tightness, warmth, stiffness, ease, pressure, or no clear sensation?
- Breathing and chest: Is your breath easy, held, shallow, or regular?
- Upper body: Are the shoulders, face, or jaw working harder than necessary?
Then make one neutral statement:
“Before practice, I notice even foot contact, a slightly tight right thigh, easy breathing, and raised shoulders.”
This creates a baseline for the session. It is not a demand that both sides feel identical. Bodies are often asymmetrical, especially during recovery.
2. During movement: use brief safety pauses
During a balance or stepping drill, do not attempt a head-to-toe scan while moving. Coordination tasks already require attention, and internal focus should never compete with safety.
Instead, pause after a small, planned amount of work. For example, after a few supported weight shifts, stop in a stable two-foot stance and check only one or two cues for five to ten seconds:
- “Is my breath still moving, or am I holding it?”
- “What is the pressure under each foot?”
- “What does the knee area feel like compared with the start?”
- “Are my shoulders or hands gripping more tightly than before?”
- “Do I feel steady enough to continue this version of the drill?”
You are not trying to inspect every sensation. You are looking for change.
A simple internal narration can help:
“Shift slowly. Return to centre. Pause. Breath moving. Both feet grounded. Right thigh working, knee sensation unchanged.”
If narration makes the movement feel more complicated, reduce it to one word: breath, feet, or steady. The goal is functional awareness, not mental overload.
The Cleveland Clinic walking-meditation guidance similarly emphasises noticing the sensory components of movement, including foot contact, muscles working, and the beginning, middle, and end of a step. For your present restrictions, use that attention only with permitted slow walking or stepping, and never at the cost of stable alignment or support.
3. After movement: compare rather than judge
End with another 60–90 seconds in a stable seated or supported standing position. Repeat the same areas you checked before:
- feet and lower legs,
- knee and thigh area,
- breathing and chest,
- shoulders and jaw,
- overall energy or settledness.
Then compare your observations with the starting point:
“After practice, both feet feel warmer; breathing is regular; the right thigh feels more worked; the knee sensation is unchanged; shoulders are less raised.”
The most useful outcome is often not “I feel good” or “I feel bad,” but “I can detect what changed.” Over several sessions, this gives you a clearer picture of how particular drills affect you.
A 10–12 minute practice template
Use this format once or twice this week alongside, not instead of, your rehabilitation programme.
| Portion | Time | What to do |
|---|---|---|
| Set up safely | 1 minute | Choose one clinician-approved drill, set up support, and ensure the floor and footwear are suitable. |
| Before scan | 1–2 minutes | Notice feet, knee/thigh area, breathing, and upper-body tension. State two to four neutral observations. |
| Movement practice | 5–7 minutes | Perform the drill at the planned rehabilitation level. Take brief stable pauses to check breath and one local sensation. |
| After scan | 1–2 minutes | Repeat the same observations and identify what is the same, more, less, or new. |
| Brief note | 1 minute | Record a few words for before, during, and after. |
A minimal note can fit on one line:
Date / drill: supported side-to-side weight shifts
Before: shoulders tight; right thigh neutral; breath easy
During: held breath on first set; released after pause; knee unchanged
After: thighs warm; steadier; breath regular
Do not treat a single session as proof that a drill is good or bad. Sensations vary with sleep, stress, time of day, recent activity, and recovery. The value comes from observing patterns across several low-risk sessions.
Keep body awareness compatible with rehabilitation safety
Body scanning should help you notice signals, not persuade you to push through them. Your physiotherapist’s restrictions remain the decision-making framework.
For standing practice:
- Keep your eyes open and your planned support available.
- Do not close your eyes to make body awareness “harder.”
- Do not add pivots, impact, faster movement, or a larger range simply because a scan feels manageable.
- If attention to the body increases anxiety, pain focus, or overwhelm, shorten the scan. Use neutral contact cues instead: feet on floor, hands on support, back against chair.
If you notice new or worsening pain, a feeling that the knee may give way, unusual swelling, dizziness, or any other symptom covered by your clinical stop rules, stop the drill and follow the plan you have agreed with your clinician. A body scan can identify a signal; it cannot determine its medical cause.
Key takeaways
A brief body scan is a trainable observation practice. Before movement, it establishes a starting point; during movement, it uses short safety pauses to notice change; after movement, it compares the outcome with the start.
Use descriptive language rather than judgments: location, quality, pressure, breathing, and change. “No clear sensation” is valid data, and you do not need to force relaxation or symmetry.
In the next lesson, you will use these observations—especially breathing, effort, and recovery—to choose an appropriate level of challenge for coordination practice.
Can't find a good explanation? Sign up and we'll make it for you
Sign up