Hello! Welcome to the next lesson in our module on Multi-Marketplace Automation.
In our last session, we focused on setting up a centralized inventory management system. This was a critical step to create a "single source of truth" for your stock levels, preventing overselling and streamlining your operations.
Today, we're taking automation a step further. We'll move beyond just inventory to connect all sorts of processes across your e-commerce ecosystem. The learning outcome for this lesson is to connect your marketplace accounts to Zapier to enable cross-platform workflows. Zapier is a powerful tool that acts as a bridge between different web applications, allowing them to "talk" to each other without you needing to write any code. Given your IT background, you can think of it as a user-friendly abstraction layer for APIs that automates data transfer and tasks between services.
1. The Core Concepts of Zapier: Triggers and Actions
Before we connect anything, it's essential to understand Zapier's simple but powerful model. Every automation, called a "Zap," consists of two main parts:
- A Trigger: This is the event that starts the automation. For example, "A new order is placed on Amazon."
- An Action: This is what happens automatically after the trigger event occurs. For example, "...send me a push notification on my phone."
A single trigger can lead to multiple actions, allowing you to build complex workflows.
To get a clear overview of these fundamentals, please watch the following two video segments.
Zapier AI Beginners Tutorial: Agents & Automations Made Simple
This first video from AI Master provides a quick, high-level introduction to what a Zap is and what Zapier is used for.
Watch the segment from 00:21 to 01:23. Focus on understanding the simple 'trigger' and 'action' concept.
Zapier Course: From Beginner To Pro In 1 Hour
This next video from Jono Catliff goes a bit deeper, exploring the vast number of potential triggers and actions available in the Zapier ecosystem. This will give you a sense of the possibilities.
Watch from 10:13 to 13:47. Pay attention to the examples given for both triggers (like a new lead, a new form submission) and actions (like sending an email, creating a calendar invite).
2. The First Step: Authorizing Marketplace Connections
For Zapier to see your new orders or perform actions on your behalf, you must first grant it permission. This is done by connecting your marketplace seller accounts within Zapier, a process that relies on API (Application Programming Interface) keys.
The article below provides a high-level overview of this requirement for major marketplaces.
Ultimate Guide to Automation for Marketplaces
This article from Emplicit, 'Ultimate Guide to Automation for Marketplaces', discusses the foundational requirements for setting up automation, including the need for API access.
Read the section titled 'Preparation and Requirements'. Focus on the paragraphs that discuss API access for Amazon and Walmart. This will set the context for the specific steps that follow.
Now, let's look at the practical, step-by-step process for connecting your two primary marketplaces: Amazon and Walmart.
Connecting Amazon Seller Central
To connect your Amazon account, you need to authorize Zapier as a third-party developer in Seller Central. This will generate the credentials Zapier needs to access your account data securely.
The following resource from the Zapier community provides the exact instructions, including the specific developer information you'll need.
How do I integrate Amazon new order to Zapier?
This community post provides a direct, no-nonsense guide on how to get the necessary credentials from your Amazon Seller Central account.
Read the 'Best answer by jesse'. Follow the 8-step guide to find your 'Seller ID' and 'MWS Auth Token'. You will need to enter Zapier's Developer Name and Account Number as provided in the post. Keep these credentials safe.
Once connected, you'll be able to select Amazon Seller Central as an app within Zapier and choose from a list of available triggers, such as a "New Order."

Connecting Walmart Marketplace
Connecting Walmart is a similar process, but instead of authorizing a developer, you generate your own unique API keys from the Walmart Developer Portal.
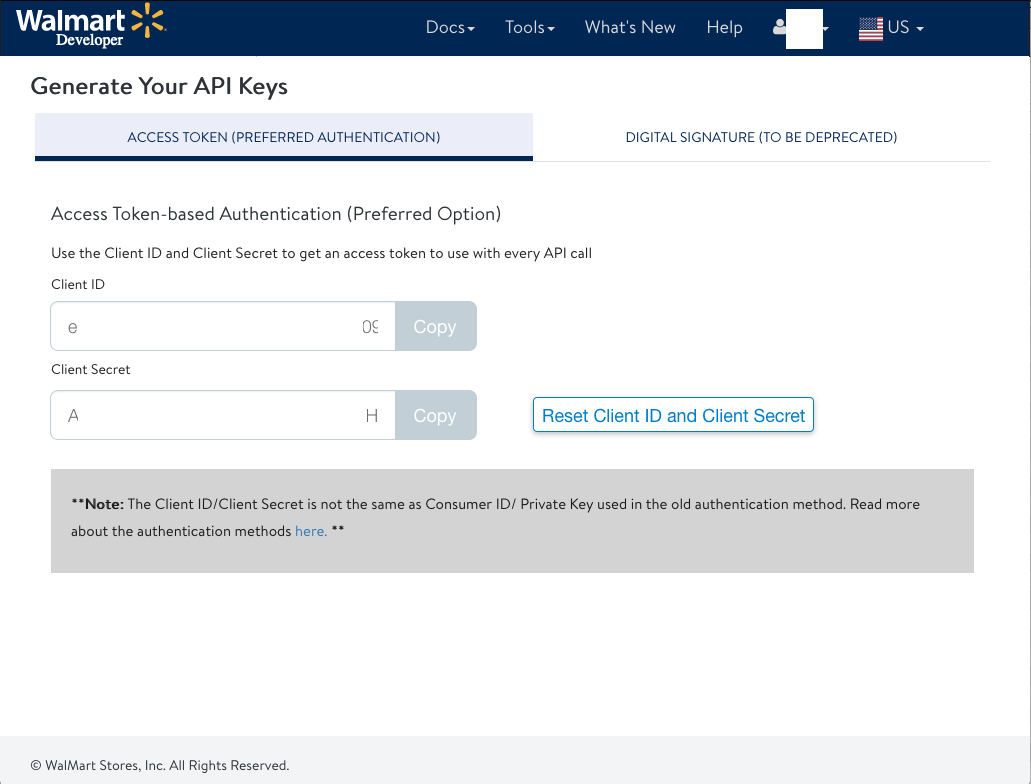
The process is as follows:
- Log in to the Walmart Developer Portal.
- Navigate to the API Keys management section.
- Generate a new set of credentials (Client ID and Client Secret) for production access.
- In Zapier, when you add a new connection for Walmart Marketplace, you will be prompted to enter this Client ID and Secret.
Note on TikTok Shop: The process for TikTok Shop is also similar. You'll typically find an "Apps & Services" or "Partner Platform" section within your TikTok Shop Seller Center, where you can search for and authorize the Zapier application to connect your account.
3. Building Blocks for Smart Workflows
Connecting your accounts is just the beginning. The real power of Zapier comes from building intelligent, multi-step workflows. Let's explore two key features that allow you to do this.
Multi-Step Zaps
You aren't limited to a single action. You can chain actions together to create a sequence. For example, a new order could trigger:
- Adding a row to a Google Sheet.
- AND sending a notification to your team's Slack channel.
- AND adding the customer to a specific email list.
This video demonstrates building a simple but practical multi-step Zap.
Zapier AI Beginners Tutorial: Agents & Automations Made Simple
This segment from the 'Zapier AI Beginners Tutorial' walks through creating a three-step Zap. While the example uses Google Forms, the principle of chaining actions (Form -> Sheet -> Slack) is directly transferable to an e-commerce workflow (Marketplace -> Sheet -> Slack).
Watch from 02:44 to 04:00. Observe how a second action is added after the first, and how data from the initial trigger can be used in all subsequent steps.
Filters
You won't always want a Zap to run for every single trigger event. Filters allow you to add conditional logic. For example, you can set up a rule that says, "Only continue if the order total is greater than $100."
This is incredibly useful for segmenting tasks, such as:
- Flagging high-value orders for special attention.
- Separating domestic from international orders.
- Ignoring test orders.
This next video explains how filters work.
Zapier Course: From Beginner To Pro In 1 Hour
This short clip from the 'Zapier Course' explains the purpose of a Filter step, allowing a Zap to proceed only if certain conditions are met.
Watch from 17:40 to 19:01. Grasp the concept that a filter acts as a gatekeeper, checking conditions before allowing the action steps to run.
Test your understanding!
You want to create an automated workflow for new orders on Walmart. Your goal is to personally review all orders over $150 and add them to a "VIP Follow-up" list in your task manager, Trello.
What would be the Trigger, Filter, and Action for this Zap?
Show answer
- Trigger: New Order in Walmart Marketplace.
- Filter: Only continue if... Order Total (a field from the Walmart data)
(Number) Greater than150. - Action: Create Card in Trello (in the "VIP Follow-up" list).
4. Practical Considerations for Your Business
Before you start automating everything, it's wise to understand the practical and financial aspects of using Zapier.
- Task Limits & Pricing: Zapier's plans are based on "Tasks." A task is counted every time an action step successfully runs in a Zap. It's important to be aware of this as you build workflows.
- Start Small: Don't try to automate your entire business on day one. Pick one repetitive, annoying task and automate it.
- Use Templates: Zapier has a vast library of pre-built templates for common use cases (e.g., "Add new Amazon Seller Central orders to a Google Sheet"). These are a great starting point.
This final video provides excellent, practical advice on how to approach automation strategically.
Zapier AI Beginners Tutorial: Agents & Automations Made Simple
This video section gives you crucial advice on using Zapier effectively, including understanding the pricing model and starting with simple, high-impact automations.
First, watch from 01:41 to 02:44 to understand the free vs. paid plans and task limits. Then, watch from 07:30 to 08:53 for practical tips on how to get started without getting overwhelmed.
Conclusion
In this lesson, you've learned the fundamental principles of Zapier and, most importantly, the practical steps required to connect your Amazon and Walmart seller accounts. This connection is the gateway to unlocking powerful cross-platform automation that can save you countless hours.
Key Takeaways:
- Zapier automates workflows using a Trigger-Action model.
- Connecting marketplace accounts requires generating and using API credentials (MWS Auth Token for Amazon, Client ID/Secret for Walmart).
- Multi-step Zaps allow you to chain several actions from a single trigger.
- Filters are essential for adding conditional logic to your workflows, ensuring they only run when specific criteria are met.
Next Up:
Now that you know how to connect your accounts and understand the building blocks of a Zap, it's time to build your first practical e-commerce automation. In our next lesson, we will apply what you've learned today to automate the logging of new orders from all marketplaces into a single Google Sheet using Zapier.