Hello! Welcome to your next lesson in the "Multi-Marketplace Automation" module.
In our previous session, we laid the essential groundwork by connecting your Amazon and Walmart seller accounts to Zapier. You learned how Zapier uses a "Trigger" and "Action" model and how to authorize these connections using API credentials.
Today, we're going to put that foundation to practical use. Our goal is to build your first, and arguably one of the most useful, automations: logging new orders from all your marketplaces into a single Google Sheet using Zapier. This will create a centralized, real-time dashboard of your sales activity, saving you from having to log into multiple platforms to see what's happening in your business.
1. Step 1: Prepare Your Master Order Log
Before we can tell Zapier where to send data, we need to create the destination. This is a simple but critical first step.
- Go to Google Sheets and create a new, blank spreadsheet.
- Name it something clear, like "Global E-commerce Order Log".
- In the first row, create the column headers for the data you want to track. A great starting point for a multi-marketplace log is:
| Order Date | Marketplace | Order ID | Customer Name | Product(s) | Order Total | Shipping Country |
|---|
This structure allows you to see all orders in one place and easily identify which platform they came from. The article below, which outlines connecting Amazon to Google Sheets, also begins with this exact preparation step.
How to Send Real Time Amazon Orders to Google Sheets ...
This article from LearnDigitalAdvertising.com, 'How to Send Real Time Amazon Orders to Google Sheets', starts by explaining the importance of setting up your Google Sheet correctly.
Read 'Step 1: Setup a Google Sheet'. This will reinforce the structure we just discussed. You don't need to watch the video in the article; we will cover the Zapier part together in more detail.
2. Step 2: Build Your First Zap (Amazon to Google Sheets)
We'll start by creating the automation for one marketplace. The process will then be easy to replicate for the others. Let's begin with Amazon.
A. Set the Trigger
The trigger is the event that starts the automation. In this case, it's a new order.
- In your Zapier account, click "Create Zap".
- For the Trigger, search for and select Amazon Seller Central.
- For the Event, choose New Order. Click "Continue".
- Choose the Amazon Seller Central account you connected in the last lesson.
- Click Test trigger. Zapier will pull in a recent order from your account. This sample data is crucial for the next step.
B. Set the Action & Map the Fields
The action is what Zapier does after the trigger fires. We want it to create a new row in our spreadsheet. This is where you'll map the data from the Amazon order to the columns you created.
The following video demonstrates this exact process of sending data to a Google Sheet. While the example uses Gmail as the trigger, the process for setting up the Google Sheets action and mapping the data is identical.
Automate Google Sheets with Zapier: Step-by-Step Tutorial
Watch this segment from 'Automate Google Sheets with Zapier' by Masters of AI & Automation. It perfectly illustrates how to set up the 'Create Spreadsheet Row' action and map data from a trigger into your sheet.
Watch from 13:40 to 15:11. Pay close attention to how the presenter clicks into each field in the Google Sheets action and selects the corresponding data pill (e.g., Subject, From Name) from the trigger step. This is the core skill of this lesson.
Now, let's apply that to our Zap:
- For the Action, search for and select Google Sheets.
- For the Event, choose Create Spreadsheet Row. Click "Continue".
- Connect your Google Account and select the "Global E-commerce Order Log" spreadsheet and the correct worksheet (usually "Sheet1").
- You will now see the columns from your sheet appear as fields. This is the mapping step. Click into each field and select the corresponding data "pill" from the Amazon "New Order" trigger:
- Order Date: Map to
Purchase Date. - Marketplace: Do not map this. Instead, type the word
Amazondirectly into this field. This hardcodes the source for every order that comes through this specific Zap. - Order ID: Map to
Amazon Order Id. - Customer Name: Map to
Buyer Name. - Product(s): Amazon provides product data as "line items". You can map
Order Items Namehere. - Order Total: Map to
Order Total Amount. - Shipping Country: Map to
Shipping Address Country Code.
- Order Date: Map to
Your mapping setup should look similar to this:
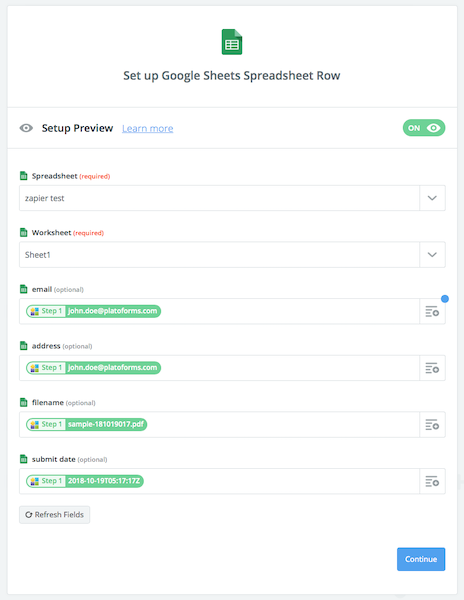
- Click "Continue".
- Click Test step. Zapier will now send the sample order data to your Google Sheet. Go check your sheet—you should see a new row populated with the test data!
- If it looks correct, click Publish Zap and give it a name like "Amazon Orders -> Master Log".
You now have a live automation that logs every new Amazon order into your central spreadsheet.
3. Step 3: Replicate for Walmart and TikTok Shop
You don't need to build a new Zap from scratch for your other marketplaces. The most efficient method is to duplicate and edit the one you just made.
- From your Zapier dashboard, find the Zap you just created.
- Click the three dots (...) and select Duplicate.
- Open the duplicated Zap.
- Edit the Trigger: Change the app from "Amazon Seller Central" to "Walmart Marketplace". Select "New Order" as the event and connect your Walmart account. Test the trigger to pull in a sample Walmart order.
- Edit the Action: The Google Sheets action is already set up. You just need to re-map the fields, as the data pill names from Walmart will be different from Amazon's.
- Crucially, change the hardcoded
Amazonin the Marketplace field toWalmart.
- Crucially, change the hardcoded
- Test the step and publish the new Zap with a name like "Walmart Orders -> Master Log".
Repeat this exact duplication process for TikTok Shop. This modular approach allows you to create a robust, multi-platform logging system in minutes.
Test your understanding!
You decide you also want to track which orders were fulfilled by the marketplace (e.g., FBA) versus fulfilled by you (FBM). You add a new column to your Google Sheet called "Fulfillment Type".
How would you update your "Amazon Orders -> Master Log" Zap to populate this column?
Show answer
You would edit the Action step (the Google Sheets step) in your Zap. In the mapping section, you would find your new "Fulfillment Type" field. Then, you would search through the data pills from the Amazon trigger for a field named something like Fulfillment Channel (which typically contains "AFN" for Amazon-fulfilled or "MFN" for merchant-fulfilled) and map it to your new column.
Conclusion
Congratulations! You have just built a powerful, practical automation that consolidates critical business data. By automatically logging every new order from Amazon, Walmart, and TikTok into a single Google Sheet, you've created a central source of truth for your sales operations.
Key Takeaways:
- Always prepare your destination (the Google Sheet) before you build the Zap.
- The core of the process is mapping data fields from the trigger app to the action app.
- You can hardcode static text (like the marketplace name) into fields to add context to your data.
- Duplicating an existing Zap is the fastest way to create similar workflows for different platforms.
Next Up:
We've automated a key back-end process. In the next lesson, we will shift our focus to front-end automation. You will learn how to set up an AI chatbot on a primary e-commerce store or landing page to handle common customer inquiries, freeing up even more of your time.