
Hello. In the previous lesson, you learned to overlap independent I/O operations—such as retrieval and conversation loading—without blocking Python’s event loop. Now we put that service logic behind a real HTTP boundary.
By the end of this lesson, you will be able to build a FastAPI endpoint that accepts a validated JSON request, calls an async service function, and returns a deliberately typed JSON response. This is the minimal production-shaped unit behind many AI features: “ask a question,” “summarize this document,” or “classify this support ticket.”
An endpoint is a contract, not just a Python function
An API endpoint makes a promise to its client:
- Where to send the request: a URL path such as
/v1/answers - How to send it: an HTTP method such as
POST - What input is acceptable: a JSON request schema
- What success looks like: a JSON response schema
- How invalid input is reported: a structured client error
For an AI-answer feature, a client might send:
{
  "question": "How do I reset my VPN access?",
  "conversation_id": "d9e591b5-03cf-45c4-af18-ab8966826f77"
}
The server should not receive an unstructured dict and hope downstream code handles every missing field, invalid identifier, or accidental client typo. Instead, FastAPI uses your Python type annotations and Pydantic models as an executable API contract.
The request lifecycle is:
- FastAPI receives the HTTP request and parses its JSON body.
- Pydantic validates the JSON against the request model.
- If validation succeeds, FastAPI calls your endpoint with a typed Python object.
- Your endpoint awaits the application service.
- FastAPI validates and serializes the returned value into the declared response shape.
If step 2 fails, your service function is not called. FastAPI returns a 422 Unprocessable Entity response describing which field was invalid. That keeps malformed input at the boundary rather than letting it fail unpredictably in retrieval or model-provider code.
Read the official FastAPI guide’s “Create your data model,” “Declare it as a parameter,” and “Results” sections. It shows how a Pydantic model becomes a validated request body and generates API documentation automatically.
Read FastAPI’s “Request Body” guide to connect Pydantic request models to endpoint parameters. Focus on the boundary behavior FastAPI provides before your handler runs.
In the sections “Create your data model,” “Declare it as a parameter,” and “Results,” read from model declaration through validation results. Notice that fields without defaults are required, while fields with a default value are optional.
Build a small typed AI-answer API
Create a project directory and virtual environment, then install FastAPI and Uvicorn:
python -m venv .venv
Activate the environment using the command appropriate for your shell, then run:
python -m pip install fastapi uvicorn
Create a file named main.py with the following application:
from uuid import UUID, uuid4

from fastapi import FastAPI
from pydantic import BaseModel, ConfigDict, Field

app = FastAPI(title="Support Answer API")


class AnswerRequest(BaseModel):
    model_config = ConfigDict(extra="forbid")

    question: str = Field(
        min_length=1,
        max_length=4_000,
        description="The user's support question.",
    )
    conversation_id: UUID | None = None


class SourceCitation(BaseModel):
    document_id: UUID
    title: str
    page: int | None = Field(default=None, ge=1)


class AnswerResponse(BaseModel):
    request_id: UUID
    answer: str
    sources: list[SourceCitation]


async def answer_question_service(request: AnswerRequest) -> AnswerResponse:
    """
    Application-layer placeholder.

    In later lessons, this will prepare context, retrieve documents,
    call an LLM, and attach real source metadata.
    """
    return AnswerResponse(
        request_id=uuid4(),
        answer=(
            f"Support answer placeholder for: {request.question}"
        ),
        sources=[],
    )


@app.post("/v1/answers")
async def create_answer(request: AnswerRequest) -> AnswerResponse:
    return await answer_question_service(request)
This is compact code, but its boundaries are doing several important jobs.
The request model owns client-controlled input
AnswerRequest describes exactly what this endpoint accepts from a client:
class AnswerRequest(BaseModel):
    model_config = ConfigDict(extra="forbid")

    question: str = Field(min_length=1, max_length=4_000)
    conversation_id: UUID | None = None
Here:
questionis required, because it has no default value.- The
Fieldconstraints reject an empty string and constrain request size. conversation_idis optional because it defaults toNone.UUIDensures the identifier has the expected format before your service uses it.extra="forbid"rejects unknown fields rather than silently ignoring them.
The last choice is particularly useful for command-style endpoints. If a web client accidentally sends conversationId instead of conversation_id, silently ignoring it can create confusing behavior. Rejecting the malformed request makes the integration error visible quickly.
Do not place trusted identity, tenant identifiers, roles, or authorization flags in this public request model. In a production API, those values should come from authentication and authorization middleware, not from client-supplied JSON. You will build those boundaries in the security module.
The response model owns what the client may see
AnswerResponse is a separate contract:
class AnswerResponse(BaseModel):
    request_id: UUID
    answer: str
    sources: list[SourceCitation]
This tells a frontend developer exactly what a successful answer request returns. It also prepares the API for grounded answers: each source has only the metadata the client needs to display a citation, rather than an entire internal database record or raw retrieved chunk.
Notice the deliberate separation:
| Model | Direction | Purpose |
|---|---|---|
AnswerRequest | Client to server | Validate client-provided question and optional conversation reference |
AnswerResponse | Server to client | Promise an answer, a traceable request ID, and display-safe citations |
SourceCitation | Nested response data | Describe a source without exposing document internals |
A response model is not merely documentation. FastAPI uses the declared return type to validate the result, generate OpenAPI schema, serialize JSON, and filter output to the allowed shape. If the endpoint claims it returns AnswerResponse but your application returns an incompatible object, that represents a server-side bug—not a client mistake.
Keep the endpoint thin
The endpoint itself is intentionally small:
@app.post("/v1/answers")
async def create_answer(request: AnswerRequest) -> AnswerResponse:
    return await answer_question_service(request)
Each part has a separate responsibility:
@app.post("/v1/answers")registers the route and HTTP method.request: AnswerRequesttells FastAPI to take this parameter from the JSON request body and validate it.async deflets the endpoint await non-blocking work, such as the concurrent retrieval preparation from the previous lesson.-> AnswerResponsedeclares the response contract.answer_question_service()contains application behavior rather than HTTP-specific concerns.
This separation becomes valuable as the service grows. An endpoint should not contain provider SDK calls, SQL statements, prompt construction, and response transformation all in one function. Keeping it as an adapter between HTTP and application logic makes the service easier to test and to reuse from another interface, such as a background job or workflow.
For now, the application service returns a placeholder. Later, its internal shape will resemble:
async def answer_question_service(request: AnswerRequest) -> AnswerResponse:
    # 1. Load allowed conversational context and retrieve authorized evidence.
    # 2. Construct a prompt using that evidence.
    # 3. Await the model-provider call.
    # 4. Map the internal result to the public AnswerResponse contract.
    ...
The important boundary remains unchanged: validated AnswerRequest enters; typed AnswerResponse leaves.
Run and inspect the endpoint
Start the development server from the directory containing main.py:
uvicorn main:app --reload
The --reload option restarts the development server when you save code. It is convenient locally; production deployments use a more controlled process.
Send a valid request from a second terminal:
curl -X POST "http://127.0.0.1:8000/v1/answers" \
  -H "Content-Type: application/json" \
  -d '{
    "question": "How do I reset my VPN access?"
  }'
The exact UUID will differ, but the response shape should look like this:
{
  "request_id": "2d3f44f8-9b57-4e42-9e83-61ce6ec60cbf",
  "answer": "Support answer placeholder for: How do I reset my VPN access?",
  "sources": []
}
Now send invalid input:
curl -X POST "http://127.0.0.1:8000/v1/answers" \
  -H "Content-Type: application/json" \
  -d '{
    "question": "",
    "unexpected_option": true
  }'
FastAPI should return 422. Its error response identifies the invalid question and the unexpected field. Neither request reaches answer_question_service.
This distinction matters operationally:
| Situation | Typical result | Meaning |
|---|---|---|
| Malformed or invalid request | 422 | The client did not satisfy the request contract |
| Route does not exist | 404 | The client requested an unavailable path |
| Valid request, valid response | 200 | The endpoint fulfilled its contract |
| Service returns data incompatible with its response model | 500 | The server violated its own contract |
Do not “fix” output-validation failures by weakening your response model. A 500 response in this case is useful: it prevents clients from receiving a response that contradicts the API contract.
Why a distinct response model protects data
It is common for internal objects to contain more data than an API is allowed to expose. For example, an internal user record may have password-related fields, provider request identifiers, raw model output, retrieval scores, or internal diagnostic details. Returning that object directly risks leaking information and makes the public API dependent on private implementation details.
FastAPI’s response model mechanism filters output to the declared shape. The official guide demonstrates this with a user input model that contains a password and an output model that omits it.
Read FastAPI’s response-model guide for the other half of the endpoint contract: validating, documenting, serializing, and filtering the data your API sends back.
First read the opening “Response Model - Return Type” discussion, especially the behavior of returned data. Then, in “Add an output model,” read the example where UserIn contains a password and UserOut does not. Focus on why an output model is a security boundary, not just a convenience.
When your endpoint returns precisely the declared Pydantic model, as create_answer() does, the return annotation is clear and gives your editor useful type checking.
Use the decorator form when the internal value legitimately has a different type from the public response schema:
from typing import Any

from fastapi import FastAPI
from pydantic import BaseModel

app = FastAPI()


class PublicUser(BaseModel):
    username: str
    email: str


@app.get("/users/{user_id}", response_model=PublicUser)
async def get_user(user_id: str) -> Any:
    internal_user = {
        "username": "mira",
        "email": "mira@example.com",
        "password_hash": "private",
        "provider_trace_id": "internal-only",
    }
    return internal_user
FastAPI documents and filters this endpoint as PublicUser, so password_hash and provider_trace_id are excluded from the successful response. In a strongly typed codebase, an even better pattern is often to map an internal domain object explicitly into PublicUser. The central rule is stable: the public model, not the internal object, defines the client-visible contract.
Use the generated OpenAPI documentation
Navigate to:
http://127.0.0.1:8000/docs
FastAPI generates Swagger UI from the same models and route declaration used at runtime. You should see POST /v1/answers, its request-body schema, expected 200 response model, and validation-error response.
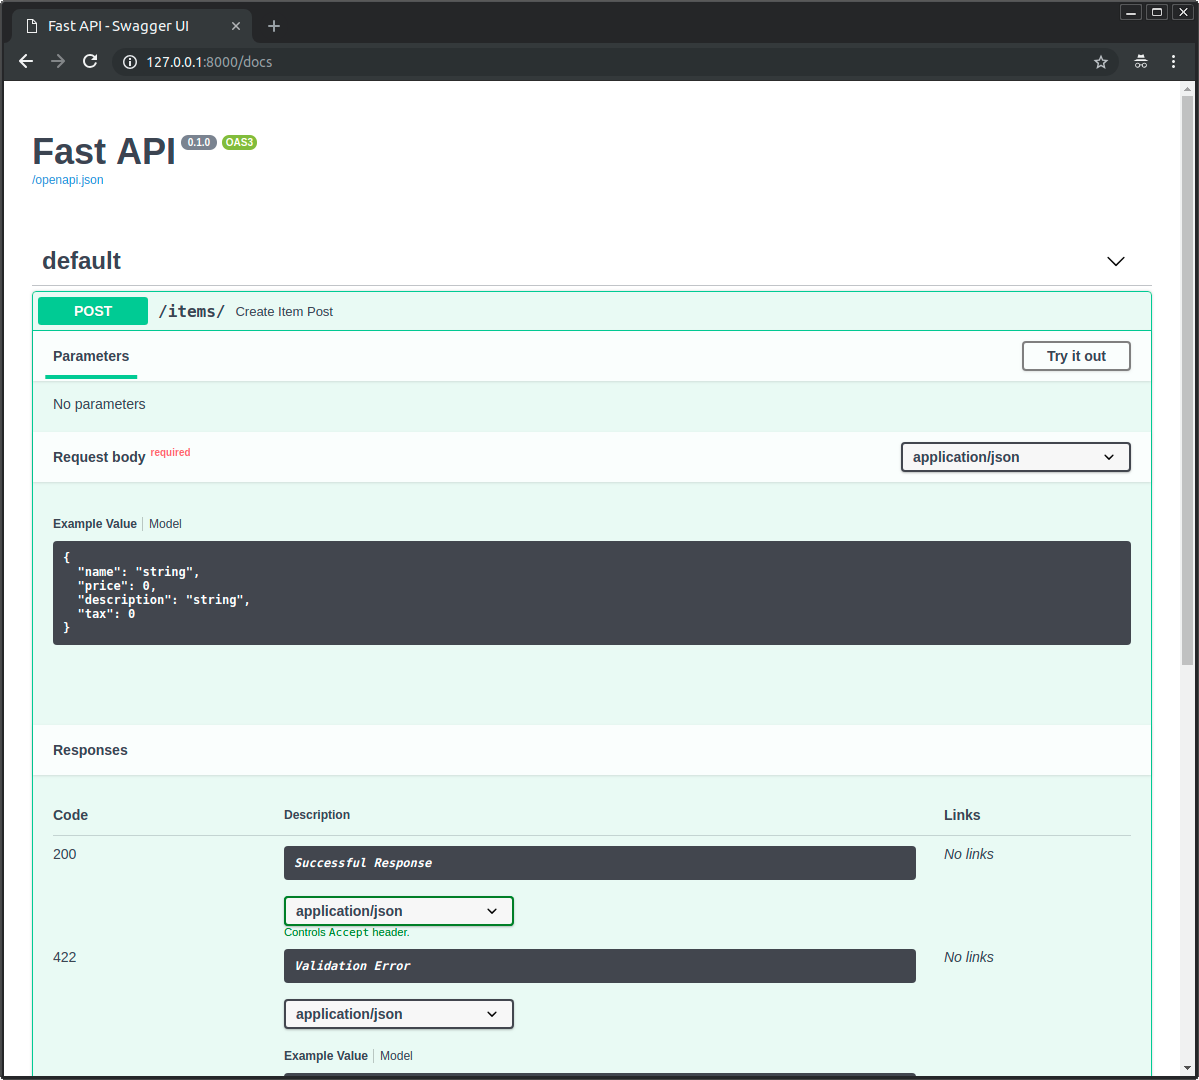
Use Try it out to submit a request directly in the browser. Check that the request body accepts question and optional conversation_id, while the response exposes request_id, answer, and sources.
The short FastAPI tutorial segment below demonstrates the same request-model, response-model, and generated-documentation workflow.
Python FastAPI Tutorial: Build a REST API in 15 Minutes
Watch pixegami’s “Python FastAPI Tutorial: Build a REST API in 15 Minutes” for a compact live demonstration of Pydantic-backed request bodies, response models, and Swagger UI.
Watch Pydantic schemas to see a structured JSON body replace a raw query parameter and to observe request and response models in use. Then watch interactive docs to see how /docs exposes and tests the generated API contract.
Key takeaways
A FastAPI endpoint turns a Python service into a reliable client-facing boundary.
- A Pydantic request model validates JSON before application logic runs.
- Fields without defaults are required; defaults make fields optional.
- Constraints such as
min_length,max_length, and UUID types stop many invalid inputs at the API boundary. ConfigDict(extra="forbid")makes unrecognized client fields visible instead of silently discarding them.- An async endpoint can
awaitthe non-blocking service logic developed in the previous lesson. - A typed return annotation such as
-> AnswerResponsedefines the successful response contract. - Response models provide documentation, validation, serialization, and an important output-filtering boundary.
/docsexposes generated Swagger UI, allowing you to inspect and test the exact API contract.
Next, you will separate configuration from source code and load environment-specific settings without exposing API keys or other secrets.
Can't find a good explanation? Sign up and we'll make it for you
Sign up