
Hello! Welcome to the fourth lesson in our module on Creational Design Patterns.
In our previous lessons, we've explored patterns that help manage object creation in different scenarios. We started with the Singleton to ensure a single instance, moved to the Factory Method for delegating the creation of a single object to subclasses, and then to the Abstract Factory for creating entire families of related objects.
Today, we'll tackle a different but very common problem: how to construct a single, complex object that has many configuration options. Your learning goal for this lesson is to apply the Builder pattern to construct complex objects with a fluent interface. This pattern is a cornerstone of clean API design in Java and is frequently discussed in system design interviews.
The Problem with Complex Object Construction
Imagine you need to create an object representing an HTTP connection. It might have several attributes: a required URL, a required method (e.g., GET, POST), and many optional parameters like a request body, connection timeout, read timeout, headers, and proxy settings.
How would you typically construct such an object?
-
Telescoping Constructors: You could create multiple constructors, one for each combination of parameters.
// Anti-pattern: Telescoping Constructors
HttpConnection conn1 = new HttpConnection("http://example.com", "GET");
HttpConnection conn2 = new HttpConnection("http://example.com", "GET", 5000);
HttpConnection conn3 = new HttpConnection("http://example.com", "POST", "body", 5000, 10000);
// ...this gets out of control quickly!
This approach is hard to read (what do all those
intvalues mean?) and becomes a maintenance nightmare as you add more optional parameters. -
JavaBean Pattern: You could use a no-argument constructor and provide setters for each field.
// Anti-pattern: JavaBean
HttpConnection conn = new HttpConnection();
conn.setUrl("http://example.com");
conn.setMethod("POST");
conn.setBody("some content");
// ... what if we forget to set the URL?
This is more readable, but it has two major flaws:
- The object is in an inconsistent state during its construction (e.g., it exists before all its required properties are set).
- It's difficult to make the object immutable, which is crucial for thread safety and predictable behavior.
The Builder pattern was designed to solve exactly these problems.
The Solution: The Builder Pattern
The Builder pattern separates the construction of a complex object from its representation. Instead of creating the object directly, you use a helper Builder object to configure its attributes step-by-step and then, finally, create the object in one go.
To understand the classic implementation and its advantages, let's start with a foundational resource.
Implement the Builder Pattern in Java
This article from Baeldung, a well-regarded resource for Java developers, clearly explains the need for the Builder pattern and demonstrates its classic implementation.
Please read the 'Introduction', 'Advantages of Builder Pattern', and 'Classic Builder Pattern' sections. Pay close attention to how the Post class has a private constructor and how the inner Builder class is used to assemble the object.
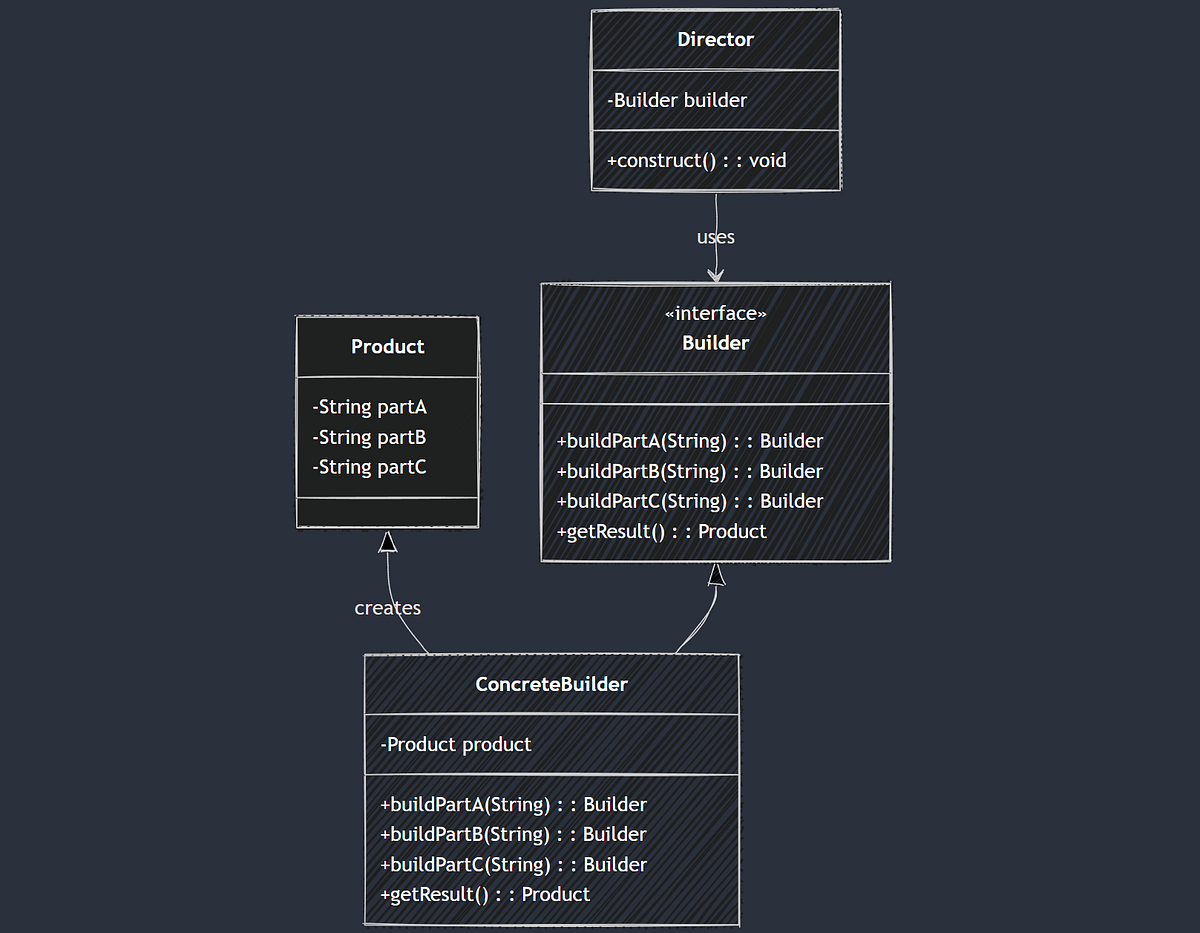
As you've just read, the classic Builder pattern has these key components:
- A static inner
Builderclass inside the class you want to build (e.g.,Post.Builder). - The
Builderhas fields that mirror the fields of the outer class. - The
Builderhas fluent methods for setting each property (e.g.,title(...),text(...)). These methods return theBuilderinstance (return this;) to allow for method chaining. - The outer class has a private constructor that takes the
Builderas an argument. This prevents direct instantiation and forces construction through the builder. - The
Builderhas abuild()method that calls this private constructor to create and return the final, fully-formed object.
Here is a UML diagram illustrating the general structure of the pattern. The Client often acts as the Director by calling the builder's methods.
The result is clean, readable code that can produce an immutable object:
Post post = new Post.Builder()
    .title("Java Builder Pattern")
    .text("Explaining how to implement...")
    .category("Programming")
    .build(); // The Post object is created here, in one atomic step.
Enforcing a Build Sequence with a Fluent Interface
The classic builder is excellent, but it doesn't solve one problem: how do you ensure that mandatory fields are always set? A developer could still forget to call .title(...) and the build() method would happily create an object with a null title.
We can enhance the pattern by using a series of interfaces to guide the user through the build process, ensuring mandatory steps are completed in order. This is often called the Step Builder or Fluent Builder pattern.
Create Complex Java Objects Using Fluent Builder Pattern
The following article explains how to evolve the standard Builder into a true Fluent Builder using interfaces. This technique enforces a specific construction sequence at compile time.
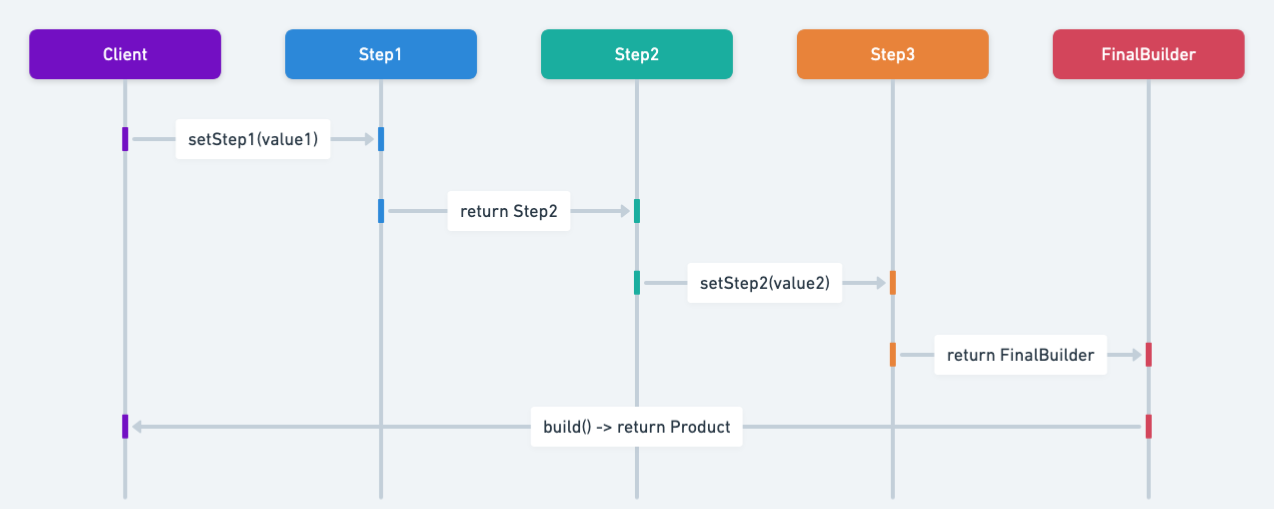
First, review the 'Method Chaining' section, focusing on the code example that uses interfaces like SetAge and SetName. Notice how each method in the chain returns a different interface, guiding you to the next logical step and only exposing the build() method at the very end. The diagram below visualizes this flow.
The core idea you just explored is to have each builder method return an interface for the next step.
Let's look at the Person example from the article:
Person.builder()returns aSetNameinterface. You can only callsetName().setName()returns aSetAgeinterface. You can only callsetAge().setAge()returns aBuilderinterface, which finally has thebuild()method.
This creates a compile-time safe sequence. The IDE won't even suggest invalid methods at any step.
Test your understanding!
You are tasked with creating a builder for a Pizza object. A pizza must have a size and a crust type. It can optionally have cheese and a list of toppings.
How would you design a Step Builder to enforce that size and crust are always set before the pizza can be built? Describe the interfaces and the method signatures you would use.
Show answer
You would create a sequence of interfaces to guide the construction:
ISizeBuilderinterface:- Defines the first mandatory step:
ICrustBuilder setSize(String size);
- Defines the first mandatory step:
ICrustBuilderinterface:- Defines the second mandatory step:
IBuildPizza setCrust(String crust);
- Defines the second mandatory step:
IBuildPizzainterface:- Defines the optional steps and the final build method:
IBuildPizza withCheese(boolean hasCheese);IBuildPizza withTopping(String topping);Pizza build();
- Defines the optional steps and the final build method:
The static builder() method on the Pizza class would return ISizeBuilder. The concrete PizzaBuilder class would implement all three interfaces. This ensures a user must call setSize(), then setCrust(), before they can add optional toppings or call build().
A Practical Shortcut: Lombok
While understanding the manual implementation of the Builder pattern is crucial for interviews and for customizing its logic, writing it by hand involves a lot of boilerplate code. In many real-world projects using frameworks like Spring Boot, you'll use libraries to automate this.
Implement the Builder Pattern in Java
Project Lombok is a popular library that can automatically generate a builder for you with a simple annotation. Let's see how it works.
Read the 'Lombok Builder' section. It's short but shows how powerful the @Builder annotation is. Note that while this is convenient, it generates the 'classic' builder, not the interface-guided Step Builder.
Using @Builder from Lombok, our complex Post class becomes incredibly simple:
@Builder
@Getter
public class LombokPost {
    private String title;
    private String text;
    private String category;
}

// And you can use it immediately!
LombokPost post = LombokPost.builder()
    .title("Lombok is powerful")
    .text("It reduces boilerplate code.")
    .build();
For enforcing mandatory fields with Lombok, you can add @NonNull annotations to the fields. If a non-null field is not set, the build() method will throw a NullPointerException. This provides runtime safety, whereas the Step Builder approach provides compile-time safety.
Conclusion
You've now learned how to use the Builder pattern to construct complex objects cleanly and safely. It's a significant improvement over telescoping constructors and mutable JavaBeans, promoting code readability and object immutability.
Key Takeaways:
- Purpose: To separate the construction of a complex object from its representation, allowing the same construction process to create different representations.
- Core Idea: Use a dedicated
Builderobject to set parameters step-by-step, culminating in a finalbuild()call. - Fluent Interface: The pattern relies on method chaining (
.setter1().setter2()...) for readable and concise code. - Step Builder: An advanced variant that uses interfaces to enforce a specific build order and guarantee that mandatory fields are set at compile time.
- Immutability: The Builder pattern is the preferred way to create complex immutable objects in Java.
- Practicality: Lombok's
@Builderannotation is a widely used shortcut that automates the creation of a classic builder.
In our next lesson, we will shift our focus to the Prototype pattern. While the Builder pattern constructs objects from scratch, the Prototype pattern creates new objects by copying existing ones, which is useful when object creation is an expensive process.