
Hello and welcome back!
In our last lesson, we customized your local n8n instance by configuring its behavior through environment variables. You learned how to set the WEBHOOK_URL (which we temporarily set to http://localhost:5678) and manage execution data. This was a crucial step in tailoring the application to your needs.
Today, we're taking your self-hosted n8n instance public. The learning outcome for this lesson is to set up a reverse proxy with an SSL certificate for secure public access. This will bridge the gap between your local Docker setup and a professional, internet-facing service. By the end of this lesson, you'll be able to access your n8n instance via a secure https:// domain, enabling integrations with external services that require it.
1. The "Why": From Localhost to Public and Secure
Running n8n on localhost is great for development, but its true power is unlocked when it can communicate with the outside world. To do this securely, we need two key components:
- A Reverse Proxy: An intermediary server that receives requests from the internet and forwards them to your n8n container. It acts as the public-facing gateway to your application.
- An SSL Certificate: This enables HTTPS, encrypting the traffic between your users (and external services) and your n8n instance. This is non-negotiable for security and a requirement for many APIs and OAuth2 flows.
The architecture we are about to build is illustrated in the diagram below. An external client connects securely via HTTPS to a reverse proxy, which then routes the request internally to the n8n Docker container.
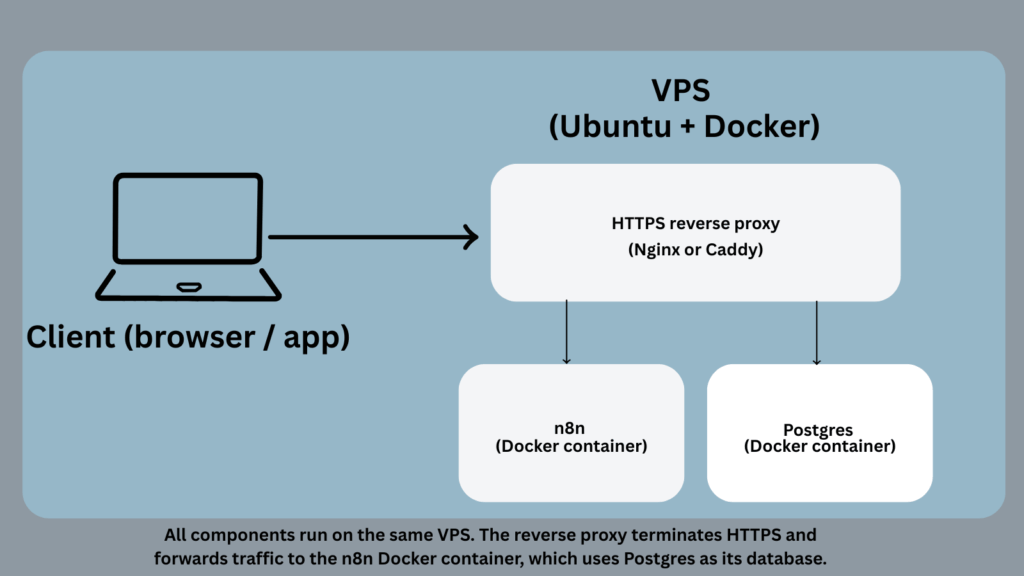
For this setup, we will use Traefik as our reverse proxy and Let's Encrypt to automatically issue a free SSL certificate. Traefik is a modern reverse proxy designed for containerized environments and integrates seamlessly with Docker Compose, making it an excellent choice for our stack.
2. Prerequisites: A Domain Name and DNS
Before we touch our configuration, you need a public entry point.
- A Domain Name: You need a registered domain name that you control (e.g.,
yourdomain.com). - A Server IP Address: You need the public IP address of the server where you are running your Docker setup.
- A DNS 'A' Record: In your domain provider's DNS settings, you must create an A record that points a subdomain (e.g.,
n8n.yourdomain.com) to your server's public IP address.
The official n8n documentation provides a concise guide on this DNS setup. Please review it to ensure you understand what's required.
Read the brief section titled '3. DNS setup'. It shows the exact type of DNS record you need to create.
It can take anywhere from a few minutes to an hour for DNS changes to propagate across the internet. You can use a tool like ping n8n.yourdomain.com in your terminal to check if the domain resolves to your server's IP address before proceeding.
3. Step 1: Update Your Environment Variables
First, we need to inform our setup about the new domain and provide an email for the SSL certificate registration.
Open your .env file and add/update the following variables. Replace the example values with your own domain and email address.
# The top level domain to serve from
DOMAIN_NAME=yourdomain.com

# The subdomain to serve from
SUBDOMAIN=n8n

# The email address to use for the TLS/SSL certificate creation
SSL_EMAIL=youremail@yourdomain.com
Your WEBHOOK_URL in the .env file should also be updated to reflect this change. It should now be:
WEBHOOK_URL=https://n8n.yourdomain.com/
Make sure to replace n8n.yourdomain.com with your actual subdomain and domain.
4. Step 2: Integrate Traefik into Docker Compose
This is where the magic happens. We will modify your docker-compose.yml to add the Traefik service and reconfigure the n8n service to be managed by it.
The official n8n documentation provides an excellent, production-ready Docker Compose file for this exact purpose. We will use it as our guide.
This documentation provides the complete compose.yaml file needed for a secure setup with Traefik. We will use this to update your existing file.
Carefully review the section '6. Create a Docker Compose file'. This contains the full configuration for both the traefik and n8n services. We will be replacing your existing n8n service definition and adding the traefik one.
Now, let's apply these changes. Replace the entire contents of your docker-compose.yml with the following. This new version removes the old PostgreSQL service (since you already have one with persistent data) and adds Traefik.
version: '3.7'

services:
  traefik:
    image: "traefik:v2.9"
    restart: always
    command:
      - "--api.insecure=true"
      - "--providers.docker=true"
      - "--providers.docker.exposedbydefault=false"
      - "--entrypoints.web.address=:80"
      - "--entrypoints.web.http.redirections.entryPoint.to=websecure"
      - "--entrypoints.web.http.redirections.entrypoint.scheme=https"
      - "--entrypoints.websecure.address=:443"
      - "--certificatesresolvers.mytlschallenge.acme.tlschallenge=true"
      - "--certificatesresolvers.mytlschallenge.acme.email=${SSL_EMAIL}"
      - "--certificatesresolvers.mytlschallenge.acme.storage=/letsencrypt/acme.json"
    ports:
      - "80:80"
      - "443:443"
    volumes:
      - traefik_data:/letsencrypt
      - /var/run/docker.sock:/var/run/docker.sock:ro

  n8n:
    image: docker.n8n.io/n8nio/n8n
    restart: always
    environment:
      - DB_TYPE=postgresdb
      - DB_POSTGRESDB_HOST=postgres
      - DB_POSTGRESDB_PORT=5432
      - DB_POSTGRESDB_DATABASE=${POSTGRES_DB}
      - DB_POSTGRESDB_USER=${POSTGRES_USER}
      - DB_POSTGRESDB_PASSWORD=${POSTGRES_PASSWORD}
      - N8N_SECURE_COOKIE=true
      - WEBHOOK_URL=https://${SUBDOMAIN}.${DOMAIN_NAME}/
      - GENERIC_TIMEZONE=${GENERIC_TIMEZONE}
    ports:
      - "127.0.0.1:5678:5678"
    labels:
      - "traefik.enable=true"
      - "traefik.http.routers.n8n.rule=Host(`${SUBDOMAIN}.${DOMAIN_NAME}`)"
      - "traefik.http.routers.n8n.entrypoints=websecure"
      - "traefik.http.routers.n8n.tls.certresolver=mytlschallenge"
      - "traefik.http.middlewares.n8n.headers.STSSeconds=315360000"
      - "traefik.http.middlewares.n8n.headers.forceSTSHeader=true"
      - "traefik.http.middlewares.n8n.headers.browserXSSFilter=true"
      - "traefik.http.middlewares.n8n.headers.contentTypeNosniff=true"
      - "traefik.http.middlewares.n8n.headers.STSPreload=true"
      - "traefik.http.routers.n8n.middlewares=n8n@docker"
    volumes:
      - n8n_data:/home/node/.n8n

  postgres:
    image: postgres:14
    restart: always
    environment:
      - POSTGRES_DB=${POSTGRES_DB}
      - POSTGRES_USER=${POSTGRES_USER}
      - POSTGRES_PASSWORD=${POSTGRES_PASSWORD}
    volumes:
      - postgres_data:/var/lib/postgresql/data

volumes:
  n8n_data:
  postgres_data:
  traefik_data:
Key Changes Explained:
traefikservice: This new container is our reverse proxy.command: These arguments configure Traefik. They tell it to listen on ports 80 (HTTP) and 443 (HTTPS), automatically redirect HTTP to HTTPS, and use Let's Encrypt (acme) to get certificates using the email from your.envfile.ports: It exposes ports 80 and 443 to the world. These are the standard ports for web traffic.volumes: It creates atraefik_datavolume to store the SSL certificates.
n8nservice:ports: Notice we no longer expose port 5678 to the outside world (5678:5678). Instead, it's mapped only to the host's loopback interface (127.0.0.1:5678). Only other containers (like Traefik) and processes on the same machine can access it directly.labels: This is the crucial part. These labels are instructions for Traefik. They tell Traefik to manage this container, what domain name to use (Host(...)), and to secure it with themytlschallengecertificate resolver we defined.
volumes: We've defined a new named volume,traefik_data, at the bottom of the file.
Test your understanding!
Looking at the labels section of the n8n service in the docker-compose.yml file, which specific label tells Traefik which domain name it should listen for to route traffic to the n8n container?
Show answer
The label is traefik.http.routers.n8n.rule=Host(\${SUBDOMAIN}.${DOMAIN_NAME}`). This ruleinstructs Traefik to create a "router" namedn8nthat will match incoming requests based on theHost` header, which is the domain name the user typed into their browser.
5. Step 3: Deploy and Verify
You're ready to launch.
- Open a terminal in your
n8n-deploymentdirectory. - Pull the new Traefik image:
docker compose pull - Start the new stack:
docker compose up -d
Docker will now create the Traefik container, recreate the n8n container with its new configuration, and connect everything. Traefik will automatically contact Let's Encrypt to obtain an SSL certificate for your domain. This may take a minute or two.
Once it's running, open your web browser and navigate to https://n8n.yourdomain.com. You should see your n8n login screen, and your browser should show a padlock icon, indicating a secure connection!
If you encounter issues, the most common causes are:
- Your DNS A record has not propagated yet.
- Your server's firewall is blocking port 80 or 443.
- A typo in your
.envordocker-compose.ymlfile.
The DigitalOcean tutorial has a good troubleshooting section for common SSL issues.
An Alternative: The Nginx Approach
While we used Traefik for its modern, container-native approach, it's worth knowing that Nginx is another extremely popular and powerful choice for a reverse proxy. The principles are identical: Nginx would listen on ports 80/443, manage SSL certificates (often with a tool called certbot), and proxy requests to the n8n container. The main difference lies in the configuration, which typically involves managing separate Nginx configuration files instead of Docker labels.
For a detailed walkthrough of an Nginx-based setup, the following video is a great resource for future reference.
N8N - Install n8n Server on Ubuntu/Debian with Docker | FreeSSL + Domain + Nginx
This video, "N8N - Install n8n Server on Ubuntu/Debian with Docker | FreeSSL + Domain + Nginx" by ToTatCa, provides a complete, step-by-step guide on using Nginx and Certbot to achieve the same result we did with Traefik.
You don't need to follow along and implement this now, but I recommend bookmarking it. Skim through the video from 06:15 to 11:21 to see the process. Notice the manual steps of installing Nginx, creating a config file, and running Certbot. This will give you an appreciation for the different workflows between Nginx and Traefik.
Conclusion
Congratulations! You have successfully deployed a secure, publicly accessible n8n instance. This is a huge milestone and a core competency for managing a "full stack" n8n deployment.
Key Takeaways:
- A reverse proxy (like Traefik or Nginx) acts as a secure gateway for your n8n container, handling incoming internet traffic.
- SSL certificates from providers like Let's Encrypt are essential for enabling
https://and securing your instance. - DNS A records are required to point your custom domain to your server's IP address.
- Traefik integrates with Docker via labels in the
docker-compose.ymlfile, allowing you to define routing and security rules declaratively. - The n8n container should no longer expose its port directly to the internet; all traffic should flow through the reverse proxy.
Preview of the Next Lesson:
In this lesson, we created volumes for Traefik and re-confirmed our use of volumes for n8n and PostgreSQL. In the next lesson, we will dive deeper into this topic: configuring persistent storage using Docker volumes. You'll learn more about how volumes work, why they are critical for data safety, and how to manage them for backups and migrations.