
In our previous lesson, we established the high-level architectural contrast between client-rendered SPAs and hypermedia-driven applications. You now understand the fundamental shift in responsibility: with HTMX, the server becomes the source of truth for both state and presentation, sending rendered HTML over the wire instead of raw JSON.
Today, we move from the "what" to the "how." This lesson will give you your first look at HTMX in action, focusing on the core mechanism that makes this architectural model possible. We will explore how HTMX extends plain HTML with special attributes, allowing any element to trigger server requests and update the page. By the end of this lesson, you will be able to explain, using concrete code examples, how this simple yet powerful pattern fulfills the HATEOAS principle, a cornerstone of the REST architectural style.
Extending HTML: From Static Documents to Dynamic Interactions
At its heart, HTMX is a small JavaScript library that gives "superpowers" to your HTML. Instead of writing JavaScript to handle events, make fetch requests, and manually manipulate the DOM, you declare the desired behavior directly on your HTML elements using a set of custom attributes.
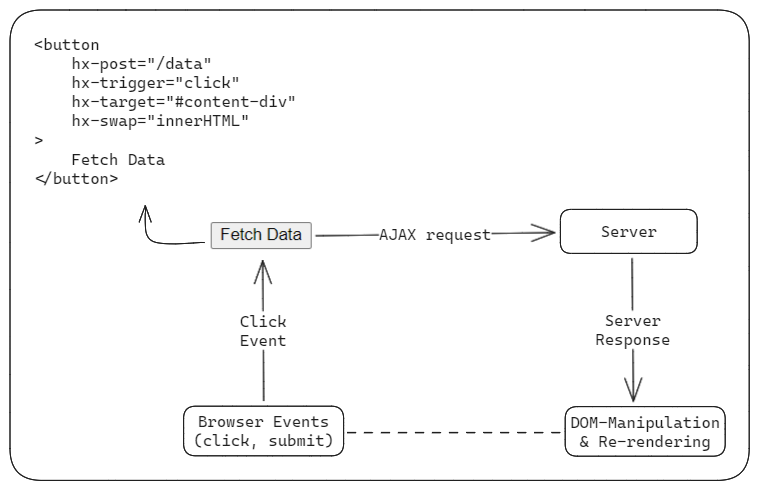
The basic flow is straightforward:
- An element with HTMX attributes triggers an event (e.g., a click, a form submission).
- HTMX intercepts this event and sends an AJAX request to the server URL specified in the attributes.
- The server processes the request and returns an HTML fragment.
- HTMX receives this HTML and swaps it into a designated location in the DOM.
This diagram illustrates the complete cycle, initiated by a simple button.
For someone with your deep experience in React, the conciseness of this approach is best understood through a direct comparison. Consider a simple feature: a button that fetches and displays data.
The following article provides a clear, side-by-side comparison of the code required to implement this in React versus HTMX.
This article from Daniele Teti's blog highlights the simplicity of the HTML-first paradigm.
In the section "A Practical Example," compare the React implementation with the <tf start="HTML-first approach with htmx" end="<div id="result">">HTMX version right below it. Note the significant reduction in boilerplate code for managing state, loading, and errors.
As you can see, the React version requires managing component state (useState), handling side effects (useEffect), making the API call, and conditionally rendering the UI based on loading and error states. This is a pattern you've likely written thousands of times.
The HTMX approach offloads all of this logic to just a few declarative attributes on a standard <button> element. The hx-* attributes tell HTMX everything it needs to know:
hx-get="/data": "When triggered, send a GET request to/data."hx-target="#result": "Place the response from the server inside the element with the IDresult."hx-indicator="#loading": "While the request is in flight, show the element with the IDloading."
The client-side code is reduced to its absolute minimum. There is no manual state management for loading or error states because the server is responsible for returning the appropriate HTML for each case.
Hypermedia as the Engine of Application State (HATEOAS)
This mechanism of embedding server interaction details directly into HTML is a practical application of a principle called HATEOAS, or "Hypermedia as the Engine of Application State." This is one of the key constraints of a truly RESTful architecture, though it's often overlooked in modern JSON APIs.
HATEOAS dictates that a client should be able to navigate and interact with an application entirely through the hypermedia provided by the server. In simpler terms, the server's response shouldn't just contain data; it should also contain the "links" (i.e., controls and actions) that drive the application forward. The client doesn't need prior knowledge of API endpoints; it discovers them dynamically from the server's responses.
HTML, with its <a> tags and <form> elements, is the original hypermedia. HTMX extends this native capability. When the server responds with an HTML fragment containing new buttons or links with hx-* attributes, it's providing the client with the "engine" for the next state transition.
This video from Auryn Codes offers a great explanation of why this is considered a more "real" implementation of HATEOAS compared to theoretical JSON-based approaches.
🚀 HTMX Demystified: Ktor, Mustache, and Real HATEOAS in Action!
The presenter contrasts the theoretical concept of HATEOAS in JSON APIs with the practical implementation in HTMX.
Watch the short segment from 00:46 to 01:31. The key insight is that with HTML, the interaction model (e.g., GET vs. POST) is baked into the controls themselves, whereas a JSON links object requires out-of-band knowledge to interpret correctly.
The article you just read also provides an excellent, detailed explanation of this concept with a concrete example.
This section connects the HTML-first paradigm directly to the HATEOAS principle.
Read the section titled "The HATEOAS Pattern Revives." Focus on the customer list example. It perfectly contrasts a typical JSON API where the client must "know" the endpoint structure (/api/customers/{id}) with the HTMX approach where the server simply provides a ready-to-use <a> tag with an hx-get attribute.
HATEOAS in Practice: A Tabbed Interface
Let's see how this plays out in a common UI pattern: a set of tabs. In a React app, you would typically manage the active tab's ID in state, and clicking a tab would update that state, causing a re-render.
With HTMX and a hypermedia mindset, the server controls the active tab. The official HTMX documentation provides a beautifully simple example of this.
</> htmx ~ Examples ~ Tabs (Using HATEOAS)
This official example shows how the server's response includes the entire state of the tab component.
First, read the brief introduction which explicitly frames this as a HATEOAS example. Next, look at the code for the <tf start="main page simply includes" end="hx-swap = "innerHTML"> ">main page. Notice the hx-trigger="load" attribute, which fires a request as soon as the element is loaded to fetch the content for the initial tab. Finally, examine the HTML structure of an individual tab response. Imagine the server returns the following for "Tab 1":
<!-- The tab navigation links -->
<div id="tabs">
  <div class="tabs">
    <ul>
      <li class="is-active"><a>Tab 1</a></li>
      <li><a hx-get="/tab2" hx-target="#tabs" hx-swap="outerHTML">Tab 2</a></li>
      <li><a hx-get="/tab3" hx-target="#tabs" hx-swap="outerHTML">Tab 3</a></li>
    </ul>
  </div>

  <!-- The content for the active tab -->
  <div class="box">
    Content for Tab 1...
  </div>
</div>
When a user clicks the "Tab 2" link, HTMX makes a GET request to /tab2. The server then returns a similar block of HTML, but this time with "Tab 2" marked as is-active and containing the content for Tab 2. This entire block replaces the existing <div id="tabs">. The "state" of the active tab lives entirely within the HTML served by the backend. The front-end is stateless.
A More Complex Example: Inline Editing
This pattern scales surprisingly well to more complex CRUD interactions. The video below demonstrates implementing an inline edit feature for a list of items, a common requirement in the dashboards you plan to migrate.
This video from the hypermedia-tv channel provides a practical walkthrough of building a complex component with HTMX, showcasing the power of this server-driven approach.
First, watch how an "Edit" button swaps a read-only table row with an editable form from 11:04 to 12:02. This is a classic HTMX pattern. Next, see how a "Close" button within that form fetches and swaps back the original read-only row from 12:54 to 14:10. Notice how the server response for the "edit" state contains the controls to get back to the "view" state. As the presenter explicitly states around 19:40, this is HATEOAS in action.
This example elegantly demonstrates the power of the hypermedia approach. The client doesn't need any logic to toggle between "view" and "edit" modes. It simply displays the HTML it receives, and that HTML contains the hypermedia controls (hx-* attributes) to drive the next state transition.
Key Takeaways
- HTMX extends HTML using
hx-*attributes to enable modern AJAX interactions without complex JavaScript. - Any HTML element can be enhanced to issue any type of HTTP request (
GET,POST, etc.) and swap the response into the DOM. - This approach naturally aligns with HATEOAS (Hypermedia as the Engine of Application State), where the server's HTML response contains not just content, but also the interactive controls for all possible next actions.
- The application's state, including UI state like which tab is active or which row is in edit mode, is managed on the server and reflected in the rendered HTML. The client remains largely stateless and simple.
What's Next
We've now seen how HTMX initiates requests and handles responses. In the next lesson, we'll dive one level deeper to contrast React's virtual DOM diffing with HTMX's HTML-over-the-wire swap model. This will clarify the client-side performance trade-offs and help you understand how HTMX achieves its responsiveness without the overhead of a virtual DOM.
Can't find a good explanation? Sign up and we'll make it for you
Sign up