
Hello. In the previous lesson, you built a short supported coordination session from separate ingredients: weight shifting, accurate stepping, rhythm, simple cues, and recovery awareness. This lesson makes those ingredients more useful by connecting them to situations you actually care about: moving confidently in daily life and rebuilding foundations for a later return to judo.
The central idea is transfer. A drill transfers when it shares an important feature with the activity you want to improve, while still remaining safe and manageable. You will learn a practical method for adapting balance, stepping, rhythm, and reaction tasks without accidentally adding pivots, impact, or excessive complexity.
Train the ingredients of a real task, not a vague idea of “balance”
“Better balance” is not one general ability that automatically appears everywhere. Balance control is partly specific to the situation: the stance, direction of movement, speed, attention demands, visual information, and decision you must make.
For example, standing on one foot beside a counter may help you notice foot pressure and improve confidence. But walking around a kitchen while deciding where to place an item also requires stepping, visual scanning, and choosing a response. Likewise, a future judo return will require stance control and accurate weight transfer, but not necessarily the same skills as quiet standing.
The practical aim is therefore not to imitate an activity in its full complexity. It is to identify its essential ingredients and practise a safer version.
Read the “Evidence and theory” section of this research article. It explains why balance practice can include attention and decision-making, and why practice is most useful when it resembles the demands of daily life.
In “Evidence and theory,” begin at the paragraph starting Balance control also requires. Read through the discussion of secondary tasks, specificity, and real-life situations. Focus on the distinction between a manageable added task and an overly difficult combination of tasks.
A useful adaptation has four parts:
| Part | Question to ask | Example: moving in the kitchen |
|---|---|---|
| Purpose | What am I trying to do better? | Move along a counter confidently while reaching for an item. |
| Movement ingredients | Which physical actions matter? | Shift weight, take side steps, stop accurately. |
| Information and cues | What tells me what to do? | Seeing a target, hearing a cue, noticing foot pressure. |
| Safety limits | What must not be included now? | No pivoting, jumping, fast turning, or carrying awkward loads. |
This resembles good project planning: define the outcome, identify the necessary components, state the constraints, and make one controlled change at a time. “Practise balance more” is too vague to evaluate. “Practise six slow side steps along the counter while keeping knees aligned and stopping accurately at the marker” is observable.
Choose the right cue for the skill you want to practise
External cues can organise movement without requiring you to analyse every body part. A cue may be visual, auditory, or tactile. Each gives slightly different information.
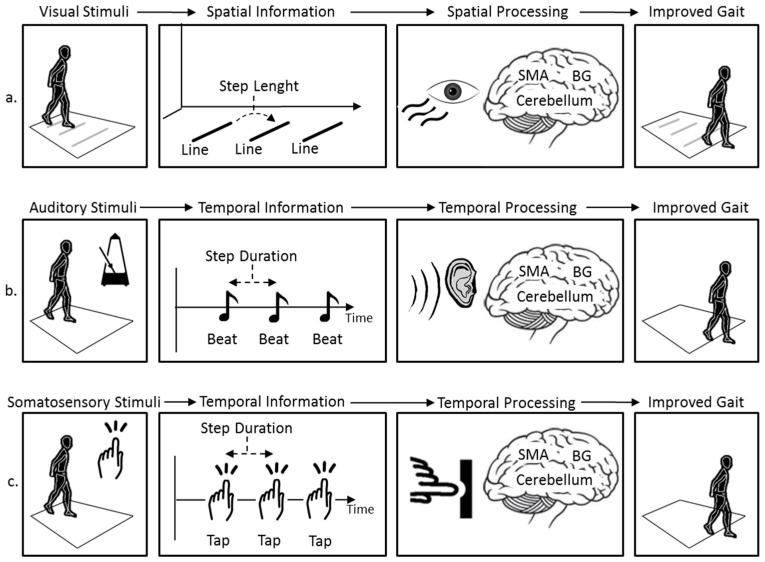
For your current practice, the most useful cues are usually:
- Visual cue: a piece of tape or a paper marker tells you where to place or tap the foot.
- Auditory cue: a spoken count such as “step, settle” tells you when to move.
- Reaction cue: a card, word, or another person’s calm instruction asks you to choose the correct action.
- Internal cue: noticing pressure under each foot or whether you are holding your breath tells you how the movement feels.
The cue should simplify the task, not turn it into a test. For example, a visual marker may make stepping more accurate; a rapid series of random instructions may make you rush and lose knee alignment. At this stage, reaction practice means responding correctly and calmly, not proving that you can respond quickly.
A safe method for adapting an everyday movement
Start with an activity that occurs often enough to matter but is simple enough to control. One suitable example is moving sideways along a kitchen counter while retrieving or placing a light item. This is not a special workout; it is a familiar context in which you can practise purposeful stepping.
First, make the activity easier than real life:
- Clear the floor and use a stable counter for support.
- Place one small visual marker on the floor beside the counter.
- Begin facing the counter, with both hands available.
- Take one small side step toward the marker, keeping toes and knees pointing in the same direction.
- Pause, notice foot pressure, then take a controlled step back.
- Only after this is reliable should you add a light, non-breakable item to pick up or place.
The “real-life” feature here is not carrying a load or making the task difficult. It is practising the sequence of see location, shift weight, step, stop, and return in a meaningful setting.
Health Tips | 6 Exercises to Promote Balance That You Can Do at Home | Choose PT
This guidance from ChoosePT shows how a physical therapist may combine standing balance, stepping direction, and simple everyday activities. Use it as a source of adaptation ideas, while keeping your own rehabilitation restrictions stricter wherever necessary.
Read “1. Standing Step Training,” beginning the setup and cue method. The article includes a rearward clock position; omit that position unless your physiotherapist has specifically cleared it, because your current plan excludes twisting and may limit backward stepping. Then read “4. 1-Leg Stand,” from the everyday-task examples. Treat brushing teeth or doing dishes as future contexts for a supported stance task, not as an instruction to remove support or add distraction immediately.
Add rhythm, then reaction, one at a time
Once one side-step-and-return is calm and repeatable, choose one adaptation:
| Skill being adapted | Low-risk version | What counts as success |
|---|---|---|
| Balance | Pause for one breath at the marker before returning. | You remain tall, breathe normally, and do not grab support. |
| Rhythm | Say “step, settle, return, settle” at an unhurried, even pace. | Foot placement stays accurate on every count. |
| Reaction | Use two written cards: “left” and “right.” Draw one before each repetition. | You choose the correct direction without rushing. |
| Everyday function | Pick up and place one very light object after you have stopped. | Stepping quality does not worsen when the arm task is added. |
Avoid adding the item, a rhythm count, random cues, and reduced hand support in the same session. If the task becomes worse, you need to know which change caused the problem.
A reasonable early practice dose is four to six repetitions each direction, with rests whenever your movement becomes less deliberate. This is coordination practice, not an endurance test.
A clinician-approved judo-related version: stance and travel without technique
At this stage, a “judo-related movement” should mean a foundation relevant to judo, not a partial throw, a turning entry, a resistance drill, or partner work. You are rebuilding the ability to organise your posture and feet while keeping the knee safe.
Only use the following version if your physiotherapist has approved controlled forward, backward, and side stepping in your rehabilitation. If not, use the stance-and-weight-shift version alone.
Level 1: Judo-ready stance awareness
Stand beside a stable support, with one or both hands available. Take a comfortable staggered stance, modest rather than deep, with each foot on its own track and both knees softly unlocked. Hold your arms loosely in front of you as if they were resting in a relaxed, non-pulling grip position.
Shift a small amount of weight forward and back between the feet. Your torso stays generally upright; the feet do not rotate; the knee continues to follow the toes.
This is relevant to judo because it practises the quiet ability to sense where your weight is before you move. It does not imitate kuzushi, gripping force, an entry, a throw, or a defensive reaction.
Level 2: Controlled travel in stance
With a counter or stable support beside you, practise a very small advance and retreat:
- From the staggered stance, move the front foot a short distance forward.
- Transfer weight smoothly without locking the knee.
- Bring the rear foot forward enough to recreate the original comfortable stance width.
- Pause and check that both feet are settled on their tracks.
- To retreat, move the rear foot back first, then bring the front foot back to the starting stance.
Use the rhythm: move, settle; move, settle. The pause matters. It prevents the movement from becoming a hurried shuffle and gives you a moment to notice whether your knee and foot remain aligned.
If you need to change the leading leg, stop completely, return to an even two-foot stance, and turn your whole body by taking several small steps as needed. Do not swivel or pivot on the planted foot.
Level 3: A simple response choice
Only when Level 2 is consistently controlled, prepare three cards:
- Advance
- Retreat
- Pause
Draw one card, take a full breath to register it, then complete the response with support available. “Pause” means return to a stable stance and simply breathe. The goal is response selection under calm conditions, not speed.
This is a useful bridge toward judo because it links stance, stepping, timing, and attention. Yet it stays well inside your current restrictions: no impact, no partner, no pulling, no rapid change of direction, and no pivot.
A 12-minute “transfer” practice menu
On one practice day, choose one everyday context and one judo-oriented context. You do not need to practise every variation in one session.
| Time | Practice block | Choose one version |
|---|---|---|
| 1 minute | Check-in | Notice knee comfort, breathing, foot pressure, and confidence level. |
| 3 minutes | Everyday stepping | Counter side steps, or a front marker tap and return. |
| 3 minutes | Judo-oriented stance | Stance weight shifts, or approved advance-and-retreat stepping. |
| 2 minutes | Rhythm | Add a calm spoken count to only one of the tasks. |
| 2 minutes | Reaction | Use two or three slow cue cards with only one task. |
| 1 minute | Review | Record the version, support used, and movement quality. |
Use the same movement-quality checklist from the previous lesson:
- Your breathing remains available.
- The knee follows the toes.
- The foot lands quietly and without a twist.
- You can pause at any point.
- You can describe where the weight was and whether the task felt manageable.
If any of those conditions fail, the task is too demanding in its present form. Modify it immediately by using more support, shortening the step, removing the added cue, or returning to predictable rather than random instructions.
Stop rather than “pushing through” sharp or increasing pain, giving-way, catching or locking, new swelling, dizziness, or a symptom that does not settle promptly with rest. Your clinician’s instructions always override this lesson.
Record transfer, not perfection
For the next two weeks, a short record can show whether practice is becoming more functional. After a session, note:
- Context: “side steps at kitchen counter” or “supported judo stance travel.”
- Version: predictable sequence, rhythm added, or slow cue cards.
- Support: two hands, one hand, fingertip touch, or other clinician-approved arrangement.
- Best evidence of control: for example, “quiet feet for six repetitions” or “paused without gripping.”
- Reason to modify next time: for example, “left knee felt guarded,” “lost the count,” or “right-side step was less accurate.”
A useful improvement is not necessarily a longer single-leg stance or a faster reaction. It may be that you can do the same modest task with quieter feet, less tension, more accurate placement, less reliance on the counter, or more confidence in an ordinary environment.
Key takeaways
Transfer comes from practising the important ingredients of a meaningful activity while keeping its difficulty appropriate. For everyday movement, you can adapt a counter-based stepping task by using familiar locations, visual markers, calm rhythm, and simple response cues. For judo, the current bridge is controlled stance awareness and clinician-approved stepping, not turning, throwing, or partner drills.
Keep the sequence simple: establish quality first, then add either rhythm, reaction, an arm task, or a small reduction in support. Change only one variable at a time, and let your rehabilitation restrictions define the safe boundary.
Next, you will formalise this approach into a longer-term progression plan: how to reassess periodically, decide when a task is ready to progress, and avoid advancing merely because a drill has become familiar.
Can't find a good explanation? Sign up and we'll make it for you
Sign up