
Hello. This part of the course is about turning separate coordination skills into a short, repeatable practice that fits around rehabilitation rather than competing with it. The aim is not to make the session exhausting or to test your balance. It is to give your nervous system frequent, safe repetitions of noticing position, shifting weight, stepping accurately, responding to a cue, and recovering composure.
A useful session has a clear “job” for each block. That makes it easier to notice what is improving and to adjust one element without changing everything at once.
Build around safety, quality, and rehabilitation
Your physiotherapist’s plan always takes priority. This coordination session is an addition only when it does not duplicate or overload the work already prescribed.
For the current stage, use these selection rules:
- Practise on a flat, uncluttered, non-slippery floor, beside a stable kitchen counter or similarly secure support.
- Begin with two hands available for support. “Supported” is not a lesser version of the task; it lets you practise accurate movement without rehearsing a near-fall.
- Keep the standing foot and knee facing the same direction. Do not twist on a planted foot, pivot, jump, run, or make abrupt direction changes.
- Keep steps small enough that you can return to the start position deliberately and quietly.
- Stop the drill if you get sharp or increasing pain, a feeling of the knee giving way, new swelling, catching or locking, dizziness, or symptoms that do not settle quickly with rest. Use your clinician’s specific stop rules where they differ.
Your movement-quality checklist for this session is:
- Tall but not stiff: head, ribcage, and pelvis stay generally stacked rather than pitching forward or sideways.
- Knee and foot agree: the knee follows the direction of the toes; the foot does not twist to make the movement happen.
- Controlled contact: feet land quietly and you can pause at any point.
- Breathing continues: no breath-holding to “force” balance.
- Attention remains available: you can notice pressure under the foot and tell whether your effort feels manageable.
A wobble is normal information, not failure. A “rescue” grip on the counter, an uncontrolled foot slap, or loss of knee alignment simply means that version of the task is currently too difficult. Reduce the range, slow the count, or use more support.
Why a short mixed session works
A coordination session differs from a general fitness workout. It has several related components, each practised at a manageable level:
| Component | What you are training | Example in this session |
|---|---|---|
| Sensory orientation | Noticing foot pressure, body position, and internal effort | Slow supported weight shifts |
| Dynamic balance | Controlling the body as weight moves between feet | Step-and-return patterns |
| Rhythm and sequencing | Organising movements in a predictable order | A counted front-and-side tap pattern |
| Response selection | Choosing the correct movement after a cue | Responding to a spoken or written direction |
| Regulation | Settling breathing and observing symptoms | Brief check-in and closing reset |
The order matters. Balance and precision work are best done while you are relatively fresh, not after fatiguing leg-strength work. If you combine this with your rehabilitation session, put it after any gentle warm-up your physiotherapist has prescribed but before more tiring strength or mobility work.
The American Council on Exercise describes 10–15 minutes as a practical duration for balance training and emphasises that practice should be safe but sufficiently challenging. It also explains why real-life balance requires more than holding still: everyday movement often combines balance with attention, choices, and distraction.
Designing Balance Exercise Programs for Older Adults
Read this American Council on Exercise article for the programme-design principles behind the session below: combining components, sequencing balance work sensibly, and progressing without making several changes at once.
In the numbered recommendation “Multi-component training is superior to single-component balance training,” read the explanation of multi-component practice. Then, in recommendation 4, “Correctly sequence balance exercises,” read the sequencing guidance. Next, find the section “F.I.T.T. Recommendations for Balance Training” and read the duration and intensity recommendation. Finally, under “Effectively Progressing Balance-training Exercises,” read the four progression categories. For now, treat altered surfaces and reduced vision as later, clinician-approved options rather than default challenges.
Your 12-minute supported coordination session
Prepare:
- a stable counter or heavy table that will not move;
- two or three small floor markers, such as pieces of tape or paper;
- a timer;
- stable shoes, unless your clinician has specifically advised otherwise.
Place one marker a small, comfortable distance in front of you and one slightly to each side. All markers should be close enough that you can tap them without reaching, twisting, or leaning. Do not wear slippery socks. The session can be completed in ordinary supportive footwear.
Use this as a base version for approximately two or three sessions. It is deliberately modest. Consistency and clean repetitions matter more than making it difficult.
| Time | Block | What to do | Main focus |
|---|---|---|---|
| 0:00–1:00 | Arrive and check | Stand with both hands on the counter. Notice breathing, effort, knee comfort, and pressure under each foot. | Interoception and safety |
| 1:00–3:00 | Weight shifts | Shift gradually left and right, then, if already approved in rehabilitation, gently forward and back. | Controlled transfer of weight |
| 3:00–6:00 | Rhythm sequence | Use a slow count for a front-and-side toe-tap sequence. | Timing, position sense, sequencing |
| 6:00–8:30 | Cue response | Respond to simple direction cues with a small tap or weight shift. | Reaction and decision-making |
| 8:30–10:30 | Supported one-leg stance | Use a toe-touch or brief foot hover, alternating sides. | Single-leg control and foot awareness |
| 10:30–12:00 | Reset and record | Return to easy standing, breathe, and make a short note. | Recovery and learning feedback |
1. Arrive and check: one minute
Stand facing the counter with feet about hip-width apart. Use both hands initially. Take two ordinary, unforced breaths.
Briefly label what you notice:
- Where is pressure strongest: heel, forefoot, inside edge, or outside edge?
- Does one leg feel more loaded or guarded?
- How does the knee feel at rest?
- Is your effort level low enough that you could have a calm conversation?
This is not a search for perfect internal sensitivity. It is simply a repeatable starting observation. Over time, you may notice that the descriptions become more specific.
2. Supported weight shifts: two minutes
Keep both feet planted and your knees softly unlocked. Shift your body weight a little toward the right foot, pause for one calm breath, and return to the middle. Repeat to the left.
Use a gentle count: “centre, right, centre, left.” Do not force the non-weight-bearing foot to lift. If it becomes lighter naturally, that is enough.
If forward-and-back shifting is in your current rehabilitation programme, add it only in the same small, controlled range your physiotherapist has approved. Keep your torso upright; do not reach your chest forward to create the shift.
Your success criterion is simple: you can identify the heavier foot without holding your breath or leaning heavily into the counter.
3. Rhythm sequence: three minutes
This block practises sequencing without the complication of speed.
With both hands lightly available on the counter, start with weight mainly on your left leg. Tap the right toes to the front marker, return beside the left foot, tap to the right-side marker, then return. Repeat slowly for about 30 seconds. Rest and reset for 15 seconds. Then practise the same pattern with the other foot.
Use a steady four-count:
- Tap front
- Return
- Tap side
- Return
Complete two short rounds per side. Keep your pelvis and standing foot facing the counter. The tapping leg moves; you do not rotate your body to chase the marker.
The toe-tap pattern shown in 10 Minute Balance Workout for Seniors and Beginners is a useful visual model for slow, supported positioning. The video includes a rear tap; omit that part unless your physiotherapist has specifically cleared it and you can do it without twisting.
10 Minute Balance Workout For Seniors And Beginners
Watch selected moments from “10 Minute Balance Workout for Seniors and Beginners” by Senior Fitness With Meredith. Use it as a form reference for support, posture, side-to-side movement, and a deliberate toe-tap sequence—not as a requirement to copy the full workout.
Begin with the setup, noting the use of a stable support and attention to the whole foot. Then watch side steps and weight shifts for the upright, controlled quality to aim for. Finish with the toe taps. Focus on the slow front-and-side pattern and the choices of support. Do not copy the rear tap in this video unless that movement is already approved in your rehabilitation plan.
4. Cue response: two and a half minutes
For the first few sessions, reaction practice should mean correct, calm selection, not rapid movement.
Prepare a simple cue list before you start, such as:
- “left”
- “right”
- “front”
- “pause”
You can ask someone else to call the cues, use a shuffled set of written cards, or read a pre-written unpredictable-looking list one item at a time. Respond as follows:
- Left/right: shift weight gently in that direction, or tap the corresponding side marker if appropriate.
- Front: tap the front marker with the nominated foot.
- Pause: return to an even, stable stance and take one breath.
Give yourself a whole breath to respond. Accuracy comes before speed. If the cue causes rushed movement, simplify it: use weight shifts only, keep both hands on support, or shorten the response range.
This is a realistic form of coordination training. In everyday life, you often must notice something, select a response, and move while retaining balance. But at your current stage, the task must remain controlled enough that it does not turn into a twist or an unplanned pivot.
5. Supported one-leg stance: two minutes
Stand near the counter. Shift most of your weight to one foot. Keep the other toes resting lightly on the floor at first. Maintain this for 10–20 seconds, then switch.
If this is consistently controlled, hover the free foot just above the floor for a few seconds, with one or both hands still ready at the counter. The supporting knee stays soft, the toes remain relaxed, and the foot makes broad contact with the floor.
The target is not immobility. Small ankle and trunk adjustments are how balance works. The target is that you can make those adjustments without panic, pain, or a sudden grab for support.
6. Reset and record: ninety seconds
Return to a comfortable two-foot stance. Notice whether breathing settles and whether the knee feels the same, better, or more irritated than at the start.
Record only a few facts:
- date and session version;
- support used;
- the block that felt most controlled;
- the block that needed the most attention;
- knee symptoms during and shortly after;
- perceived effort, such as easy, moderate, or too demanding.
This is a small project-management loop: you are collecting enough information to make the next decision, rather than relying on a vague impression of whether the session was “good.”
How to modify without losing the purpose
A useful rule is: change one variable, then observe the result for at least two sessions.
For example, if front-and-side toe taps become reliable, choose only one of these changes:
| If you need to make it easier | If you are ready for a small progression |
|---|---|
| Use two hands on the counter | Use a lighter fingertip touch |
| Bring markers closer | Keep marker distance but improve accuracy |
| Replace a foot hover with toe-touch support | Add a few seconds of controlled hovering |
| Use a predictable sequence | Use simple, slow random cues |
| Slow the count | Keep the same sequence with a slightly steadier rhythm |
Do not simultaneously reduce hand support, widen the steps, speed the rhythm, and add random cues. You would not know which change caused a problem, and the session would become a test of recovery rather than a practice of skilled control.
A cognitive add-on, such as counting backward while stepping, can eventually be useful. It is not necessary now. First, make the physical task stable and recognisable. Then add a mental task as the one new variable, while keeping support and step size unchanged.
Where the step-up fits, if it is already cleared
The step-up is not part of the base session. It can be a useful later substitution only if your physiotherapist has already included low step-ups in your rehabilitation plan and has approved the platform height and dosage.
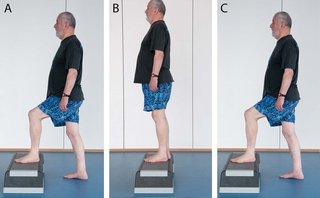
If clinician-approved, use it to replace—not add to—the cue-response or rhythm block on that day. Keep the platform low and stable, support close, movements slow, and the knee aligned with the toes. Do not turn on the supporting leg at the top or step down hurriedly. A step-up becomes a coordination task when the emphasis is on alignment, quiet placement, controlled weight transfer, and accurate return, rather than on doing many repetitions.
Key takeaways
A good 10–15-minute coordination session is short enough to repeat, specific enough to observe, and conservative enough to complement rehabilitation. This base session combines body awareness, supported weight shifting, rhythmic sequencing, simple response selection, and single-leg control without impact or pivots.
Keep the session at a level where movement quality is visible: steady breathing, controlled foot contact, knee-foot alignment, and a clear sense of what your body is doing. Progress by changing one variable only, and let your rehabilitation guidance determine which movements remain appropriate.
Next, you will adapt these same ingredients to a real everyday activity and to a currently permitted judo-related movement, so that practice begins to transfer beyond the counter and floor markers.
Can't find a good explanation? Sign up and we'll make it for you
Sign up