
Hello! Welcome to the first lesson of our module on Web Application Analysis.
In the previous module, we focused on gaining initial access to networks by exploiting misconfigurations and weak credentials in services like SMB, FTP, and databases. We were operating primarily at the network and service level. Now, we're shifting our focus up the stack to the application layer, where a vast and complex attack surface awaits: web applications.
To effectively test web applications, you need to see and control the communication between your browser and the web server. Your most essential tool for this is an interception proxy. In this lesson, you will learn how to configure your browser to proxy web traffic through Burp Suite, the industry-standard tool for web penetration testing and bug bounty hunting. This is a foundational skill that we will build upon throughout the rest of the course.
1. What is an Interception Proxy?
Before we start configuring things, let's understand what an interception proxy does and why it's so critical. In essence, an interception proxy acts as a "man-in-the-middle" between your web browser and the target web server.
Normally, your browser sends an HTTP request directly to the server, and the server sends a response directly back. An interception proxy sits in the middle of this conversation, allowing you to:
- Intercept: Pause requests before they reach the server and responses before they reach your browser.
- Inspect: View the full, raw content of every request and response, including headers, body, and parameters.
- Modify: Change any part of a request or response on the fly. For example, you could change the user ID you're requesting, alter the price of an item in a shopping cart, or inject a malicious payload.
This capability is the core of manual web application security testing. The following video provides an excellent conceptual overview of how Burp Suite works and why it's so powerful.
How Hackers Use Burp Suite to Get Into Websites
Watch this segment from 'How Hackers Use Burp Suite to Get Into Websites' by Neurix to understand the role of an interception proxy and see a simple demonstration of its power.
Watch from 01:25 to 02:57. Focus on how the video explains Burp Suite as a 'middleman' and the example of changing a search query from 'Paris' to 'New York'. This illustrates the core concept of interception and modification.
2. Setting Up Burp Suite: The Easy Way
Burp Suite's developer, PortSwigger, has made it incredibly easy to get started. The modern versions of Burp Suite Community and Professional editions come with a pre-configured Chromium browser. This is the quickest way to get up and running.
Let's walk through this simple approach first.
How Hackers Use Burp Suite to Get Into Websites
This next clip from the same video demonstrates launching Burp Suite and its pre-configured browser.
Watch from 03:38 to 04:41. Follow the steps to open Burp's browser. Notice how as soon as the browser starts, traffic begins populating the 'HTTP history' tab in Burp Suite. This requires no manual configuration.
This built-in browser is fantastic for quick tests. However, many professionals prefer to use their own customized browser (like Firefox or Chrome) with their favorite extensions and settings. For that, you need to perform a one-time manual configuration. We'll cover that next.
3. Professional Setup: Configuring an External Browser
For your day-to-day work as a penetration tester or bug bounty hunter, you'll want the flexibility of using your main browser. We'll use Firefox for this guide, as its proxy settings are independent of the operating system.
The process involves three key steps:
- Installing a proxy-switching extension (FoxyProxy).
- Configuring the extension to send traffic to Burp Suite.
- Installing Burp's CA certificate in your browser to handle HTTPS traffic.
This video provides a complete walkthrough of the entire process. We will follow it step-by-step.
How to configure Burp Suite with Firefox FoxyProxy | Kali Linux 2025
The video 'How to configure Burp Suite with Firefox FoxyProxy' by HackHunt is a clear, concise guide to setting up an external browser. Watch it and follow along to configure your own Firefox browser.
Watch the entire video (00:00 - 02:44) and perform the steps shown: Install FoxyProxy Basic in Firefox. Add a new proxy in FoxyProxy's options. Use the IP 127.0.0.1 and port 8080, which are Burp's defaults. Install the Burp CA Certificate by visiting http://burpsuite in your configured browser. Verify the setup by enabling the proxy and intercepting a request.
To help you with the configuration, here are some key steps and concepts broken down in more detail.
Step 3.1: FoxyProxy Installation and Configuration
FoxyProxy is a browser extension that lets you quickly switch between different proxy configurations or turn them off entirely. This is much more convenient than digging into your browser's settings every time.
After installing the extension, you'll need to add a new proxy configuration that points to Burp Suite.

Step 3.2: The Importance of the CA Certificate for HTTPS
When you enable the proxy and try to visit an HTTPS website, Burp Suite needs to decrypt the traffic to show it to you. It does this by breaking the end-to-end encryption. Your browser sees this and, for security, would normally block the connection, warning you about a man-in-the-middle attack.
To prevent this, you must tell your browser to trust Burp Suite. You do this by installing Burp's custom Certificate Authority (CA) certificate. With Burp running and your browser proxied through it, you can download the certificate by visiting the special URL http://burpsuite.
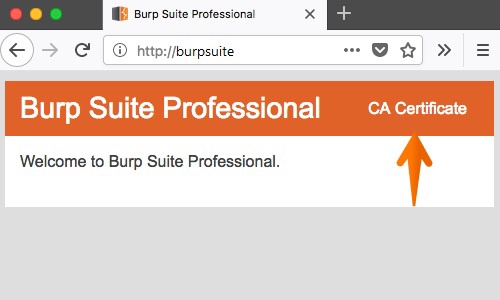
Once downloaded, you must import this file into your browser's certificate manager and explicitly trust it to identify websites. The video guide shows this process for Firefox.
For a detailed text and image-based walkthrough of this entire process, you can also refer to the following guide.
The ultimate beginner's guide to Burp Suite
The 'Ultimate Beginner's Guide to Burp Suite' from Bugcrowd provides excellent step-by-step instructions for the setup we just discussed.
Read the sections 'FoxyProxy' and 'Burp Suite: Configuration'. This guide reinforces the steps shown in the video, providing clear text instructions and screenshots for configuring FoxyProxy and installing the CA certificate.
Test your understanding!
You have successfully configured FoxyProxy to point to Burp Suite on 127.0.0.1:8080. When you enable the proxy and try to visit https://google.com, the browser shows a major security warning like "SEC_ERROR_UNKNOWN_ISSUER" or "Your connection is not private". What is the most likely cause of this issue, and what specific two-step action must you take to resolve it?
Show answer
The cause is that Burp's CA certificate has not been installed or trusted in the browser. The browser doesn't recognize the certificate Burp is using to intercept the HTTPS connection.
To resolve this:
- Navigate to
http://burpsuitein the proxied browser and download the CA certificate. - Go into your browser's settings, find the certificate manager, import the downloaded certificate file, and edit its trust settings to allow it to identify websites.
Conclusion
Congratulations! You have now configured the single most important tool in your web security arsenal. Whether you use the convenient built-in browser or your own configured external browser, you are now ready to intercept and analyze web traffic.
Key Takeaways:
- An interception proxy like Burp Suite acts as a man-in-the-middle, allowing you to view and modify all traffic between your browser and a web server.
- Burp Suite offers a pre-configured browser for a quick and easy start.
- A professional setup involves using an external browser (like Firefox) with a proxy switcher extension (FoxyProxy) pointing to Burp's listener (default:
127.0.0.1:8080). - To intercept HTTPS traffic without errors, you must download and install Burp's CA certificate in your browser and explicitly trust it.
Next Lesson Preview:
Now that you can intercept traffic, what do you do with it? In our next lesson, we will dive into the structure of HTTP/S requests and responses. You will learn how to analyze headers, cookies, and API calls to understand how a web application functions and begin to identify its potential weak points.