
Welcome back. In our last lesson, we explored the trade-offs between strength and formability for common automotive sheet metals like HSLA and DP steels. You learned that as material strength increases, its ductility, or ability to be formed, generally decreases. This fundamental relationship is the source of many challenges in the stamping plant.
Today, we will investigate the direct consequences of this trade-off. Our focus is on identifying the three most common stamping defects—springback, wrinkling, and tearing—and understanding the process controls engineers use to mitigate them. Mastering this topic is critical; it's the bridge between a theoretical part design and a physically manufacturable, dimensionally accurate component.
Identifying Common Stamping Defects
Stamping is a battle against the inherent properties of metal. When the forces applied by the die are not perfectly balanced with the material's resistance, defects occur. The image below shows the "big three" defects you will constantly work to prevent.

Let's dissect each of these defects to understand its root cause and the engineering solutions used to control it.
1. Springback: The Elastic Recovery
Springback is the geometric change a part undergoes after the forming pressure is released. Since you have a background in mechanical engineering, you'll recognize this as a direct result of elastic recovery. The material is plastically deformed, but a portion of the strain is elastic. When the load is removed, this elastic strain is recovered, causing the part's angles to "spring back" toward their original state.
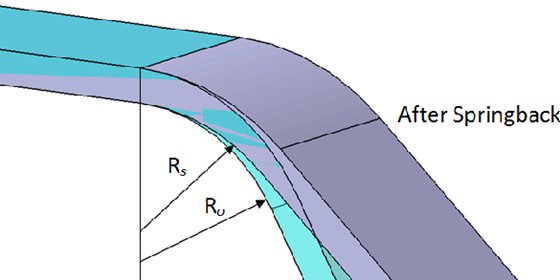
Higher-strength materials, like the DP steels we discussed, exhibit more springback because their yield strength is a larger fraction of their ultimate tensile strength. This means they can store more elastic energy before permanently deforming.
To see how this is measured and managed in practice, let's watch a short video.
The YouTube channel "The Fabrication Series" offers a clear, practical demonstration of springback. Pay attention to how it's defined as a measurable difference and how that measurement is used to compensate for the effect.
Please watch the following segments: Springback definition: Understand the concept as the difference between the target angle and the achieved angle. Influencing factors: Note the variables that affect springback, reinforcing why it's not a single universal value. Calculating compensation: Follow the process of measuring the net angle and calculating the required overbend. Summary of the process: This recap solidifies the concept of adding the springback amount to the target angle.
How to Control Springback
As the video demonstrated, the primary methods for controlling springback are integrated into the die design and process.
- Overbending: This is the most common strategy. The die is designed to bend the part to a sharper angle than required, anticipating that it will spring back to the correct final angle. The calculation shown in the video is exactly what a process engineer does during die tryout.
- Restriking or Coining: The part is hit a second time in a subsequent die station. This operation applies highly localized compressive stress in the bend radius, which reduces internal stresses and "sets" the angle.
- Stretch Forming: The die process can be designed to stretch the material by 2% or more during forming. This induced tension helps minimize residual stresses, thereby reducing springback.
- Advanced "Shape-Set" Processes: For high-strength steels, more advanced techniques are used. These involve locking the part in the die at the bottom of the press stroke and applying a final stretching action to eliminate residual stress before the die opens.
The "High Strength Steel Stamping Design Manual" provides excellent real-world examples. For instance, a case study on a Chrysler floor pan rail (which you can find in Section 6, Page 58 of resource LINK) details how restrike operations and the addition of stiffening darts were used to control springback and bring the part into tolerance.
2. Wrinkling and Tearing: The Two Sides of Material Flow
While springback affects the final geometry, wrinkling and tearing are defects that can scrap the part entirely. They represent the two extremes of material flow control.
For an overview of these defects and their immediate causes, let's consult a quick-reference guide.
Common Metal Press Tool Problems and Solutions - JEELIX
This article from JEELIX provides a concise yet thorough engineering breakdown of common stamping defects. It's a great resource for diagnostics.
Please read the following: "Quick Reference Checklist for Common Stamping Defects" table: Focus on the rows for Wrinkling and Tearing / Cracks. Note the primary causes and diagnostic checks. "Issue Two: Cracking, Tearing, and Fracture" and "Issue Three: Wrinkling, Bulging, and Surface Defects": Read these short sections to understand the "physical essence" behind each defect.
Wrinkling: Uncontrolled Compression
As the resource explains, wrinkling is a buckling failure. It occurs when compressive stresses in the plane of the sheet exceed the material's ability to resist them. This typically happens in the flange area of a drawn part as the material's perimeter shrinks while being pulled into the die cavity.
How to Control Wrinkling:
- Blankholder Force: This is the primary tool. The blankholder, or binder, is the part of the die that holds the flat sheet in place as the punch forms the part. Increasing the force applied by the blankholder prevents the material from buckling.
- Draw Beads: These are ridges on the blankholder surface that create additional restraining force, forcing the material to bend and unbend as it flows into the die. This "irons out" any tendency to wrinkle.
- Die Design: As noted in a case study in the HSS Design Manual (Section 6, page 68 of resource LINK), replacing sharp transitions in the part geometry with more gentle, larger radii can alleviate metal compression and prevent wrinkles.
Tearing: Excessive Tension
Tearing, or splitting, is a tensile failure. It occurs when the stress required to stretch the material into the die exceeds its ultimate tensile strength. This is directly related to the "Total Elongation" property we covered in the previous lesson.
How to Control Tearing:
- Reduce Restraint: This is the direct opposite of wrinkle control. If parts are tearing, the blankholder force may be too high, or the draw beads may be too aggressive. Reducing this restraint allows material to flow more easily into the die, reducing tension.
- Increase Radii: Sharp corners on the punch or die create stress concentrations. Increasing the radius over which the material is bent allows the strain to be distributed over a larger area, preventing failure.
- Improve Lubrication: Better lubrication reduces friction between the sheet and the die, lowering the force needed to draw the part and thus reducing tensile stress.
- Control Strain Rate: For challenging materials, the forming speed itself is a critical variable. Modern servo presses allow for precise control over the press stroke.
Let's watch a brief clip that brilliantly explains this last point.
The Mind-Blowing Machines that Stamp Millions of Metal Parts - Smarter Every Day 288
In this clip from "Smarter Every Day", a stamping expert explains a key feature of advanced servo presses.
Watch from servo press capabilities. The speaker connects press speed directly to strain rate and the material's tensile properties—a concept that should resonate with your mechanical engineering background.
As he states, pulling the material too quickly can exceed its tensile stress limit. By slowing down during the critical drawing phase, the strain rate is reduced, keeping the material within its plastic deformation regime and preventing tears.
The Process Window
The crucial takeaway is that there is a process window for every stamped part. You need enough blankholder force to prevent wrinkling, but not so much that you cause tearing. This window can be narrow, especially when working with high-strength materials. The job of the stamping engineer is to find and maintain this stable process window through the precise control of blankholder force, lubrication, die geometry, and press speed.
Conclusion
In this lesson, we have diagnosed the most common defects that arise during sheet metal stamping. You can now identify them, explain their underlying physical causes, and describe the primary process controls used in industry to prevent them.
Key Takeaways:
- Springback is the elastic recovery of material after forming. It is controlled by overbending, restriking, and stretch forming.
- Wrinkling is a buckling failure caused by excessive compressive stress. It is controlled primarily by increasing blankholder force and using draw beads.
- Tearing is a tensile failure caused by excessive stretching. It is controlled by reducing restraint (e.g., blankholder force), increasing die radii, and managing the strain rate.
- Successful stamping requires operating within a process window that balances the competing risks of wrinkling and tearing.
In our next lesson, we will shift our focus from reactive defect control to proactive design prevention. We will cover the "golden rules" for sheet metal design—guidelines for bend radii, hole placement, and flange design that help you design parts that are inherently more manufacturable from the very beginning.
Can't find a good explanation? Sign up and we'll make it for you
Sign up