
Hello. In the previous lesson, you composed workplace lighting as a set of layers: ambient light for the overall field, task support where activity occurs, vertical illumination for spatial depth and faces, and selective focal light for hierarchy. That composition now becomes the basis for a more precise question: where might the design cause visual discomfort, for whom, and in which view?
This lesson focuses on diagnosing discomfort glare in workplaces and correcting it without simply making the entire office dimmer or flatter. You will learn to distinguish direct glare from reflected glare, use UGR appropriately as a verification tool, and choose corrections that address the actual source of the problem.
Glare is a relationship, not simply “too much light”
A bright light source is not automatically glaring. The same luminous object can feel acceptable in a bright, visually balanced room and unpleasant in a dark field of view. Discomfort glare occurs when a source or reflection is bright enough, large enough, and close enough to a person’s line of sight that it causes annoyance, eye strain, or an urge to look away.
In a workplace, that discomfort can reduce concentration even when the measured illuminance on the desk is perfectly adequate. It is therefore possible to have:
- sufficient desk illuminance but uncomfortable visible luminaires;
- a technically compliant ceiling layout but strong reflections in monitors;
- a visually dramatic social zone that creates an uncomfortable brightness transition for nearby desk users;
- daylight that is welcome for view and orientation but disruptive when it is unshaded or poorly coordinated with screens.
The key distinction is between two common mechanisms.
| Mechanism | What the user experiences | Typical workplace source |
|---|---|---|
| Direct glare | A bright source is seen directly and feels intrusive or uncomfortable | A downlight in the forward view, an exposed LED strip, a luminous pendant at eye level, or a bright window |
| Reflected glare | A bright image appears in a reflective surface and obscures information or causes fatigue | Ceiling luminaires reflected in a monitor, glazing reflected in a screen, or a spotlight reflected in a polished table |
A third condition often accompanies both: excessive brightness contrast. For example, a small high-luminance fitting against a very dark ceiling can dominate the visual field, even if it is not directly reflected in a screen. Likewise, a bright window beside a dark interior can make the eyes repeatedly adapt between two very different luminance levels.
Uncovering the Mystery of Glare - What is UGR19?
Watch Uncovering the Mystery of Glare – What is UGR19? by eFIXX for a concise visual introduction to glare as a contrast between a source and its surroundings, and to the limits of relying on a product’s UGR label.
Watch the basic idea to connect perceived glare to the brightness of the surroundings. Then watch the location issue: glare changes with observer position and viewing direction, so it cannot be reduced to one room-average number. Finish with direct and reflected glare, noting the discussion of monitor reflections and recessed light sources.
The practical implication is important: do not begin a glare review by asking, “Is this fitting low glare?” Begin by asking:
What does the occupant see from a real working position while carrying out a real task?
A low-glare luminaire used in the wrong position can still be uncomfortable. Conversely, a well-controlled luminaire can support a rich lighting composition when its optic, location, and viewing geometry are coordinated.
The variables that make a glare risk likely
You do not need to calculate UGR manually to diagnose most early-stage glare problems. But you do need to understand the variables that a calculation is trying to represent.
The risk rises when a visible light source has one or more of these characteristics:
-
High luminance in the observer’s direction
The critical issue is not only total lumens. A small, intense LED aperture, bare strip, exposed lamp, or shallow downlight can have high apparent brightness at the angles where seated people look across a room. -
A large apparent size
A luminaire subtends a larger part of the visual field when it is close to the observer. This is one reason low ceilings and luminaires mounted close to desks require particular care. -
An unfavorable position
A source near the normal direction of view is more troublesome than the same source at the edge of vision. A person looking toward a meeting-room screen, colleague, whiteboard, or window may have a different glare experience from someone facing the opposite way. -
A dark or underlit visual background
If ceilings and walls are visually dark, a bright source has little contextual brightness around it. Moderate, controlled illumination of meaningful vertical and upper surfaces can reduce this contrast without increasing desk light indiscriminately. -
A reflective intermediary surface
Screens, glazed partitions, polished stone, glossy tables, framed graphics, and glass whiteboards can turn a source that is out of direct view into an intrusive reflection.
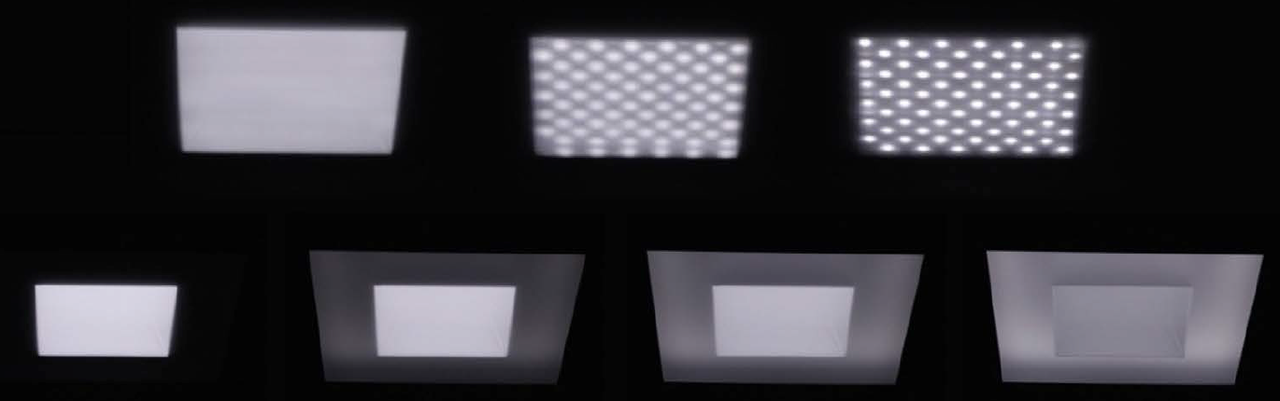
The image illustrates why a specification that gives only lumens and wattage is insufficient. Two fittings with similar output may present very different luminous patterns to an observer. Likewise, changing the surrounding ceiling or wall brightness can alter how strongly a source stands out.
Read the UGR Lighting Glare Guide for a technical but accessible account of the quantities behind Unified Glare Rating. Treat it as a guide to interpreting calculation outputs and product information, rather than as a substitute for checking the actual project conditions and applicable local requirements.
In “What Is the Unified Glare Rating?”, read the scale overview. In “The UGR Formula”, focus on the explanation beginning with background contrast, then identify how source luminance, apparent size, and position contribute to the result. In “Key design implications for hitting UGR”, note the connection between high-angle light control, surface reflectance, and workstation orientation. Finally, in “Common Mistakes and the 4H/8H Grid,” read the product-rating warning: a luminaire described as “UGR less than 19” does not guarantee that the completed room will achieve that result.
UGR: useful evidence, not a design shortcut
Unified Glare Rating, or UGR, is the standard calculation metric commonly used for discomfort glare from indoor electric luminaires. Higher values indicate greater predicted discomfort. In projects using EN 12464-1, a general office target is typically , while sustained precision tasks such as CAD or technical drafting can require a stricter limit such as . Confirm the applicable standard and client brief for the actual project; these figures should not be treated as universal legal requirements.
UGR is valuable because it formalizes four observations already made:
- the luminance of each visible luminaire;
- its apparent size from the observer’s location;
- its position relative to the line of sight;
- the average luminance of the surrounding background.
However, UGR has boundaries. It does not by itself diagnose daylight glare at windows, a reflection in a monitor, poor screen settings, flicker, or every issue of visual adaptation. It is also dependent on observer position and direction. A result should therefore be evaluated from representative seated and standing locations and the main viewing directions, rather than treated as a room-wide average.
Most importantly, a manufacturer’s “UGR less than 19” notation normally indicates performance in a defined reference arrangement. It does not certify the result in your room, with your ceiling height, reflectances, spacing, furniture layout, and viewing directions.
A practical glare-diagnosis workflow
When an occupant says, “The lighting is harsh,” avoid immediately changing products. Translate the complaint into a visual condition that can be observed, recorded, and corrected.
1. Locate the task and the observer
Mark the affected desk, meeting seat, reception position, circulation point, or collaboration table. Then record:
- whether the user is seated or standing;
- their normal gaze directions during the task;
- the screen, paper, whiteboard, colleague, or route that they need to see;
- the time of day, blind position, and daylight condition;
- whether the complaint is constant or occurs only with certain scenes or occupancy patterns.
A complaint at a hot desk may be specific to one orientation. A presentation room may be comfortable for the audience but uncomfortable for the presenter facing the room. A reception desk may be visually acceptable during the day and problematic after daylight fades because the contrast with exterior glazing changes.
2. Classify the symptom before choosing a correction
Use the person’s view to distinguish the likely mechanism.
| Observed symptom | Probable diagnosis | First places to inspect |
|---|---|---|
| The user squints or feels distracted when looking toward a colleague or screen | Direct glare | Luminaires in the forward view, bright windows, decorative pendants, exposed source apertures |
| Bright patches or ghost images appear on a display | Reflected glare | Ceiling grid reflected in monitor, side window reflections, task-lamp position, screen tilt |
| The room feels harsh despite modest desk illuminance | High contrast or non-uniform source luminance | Dark ceiling, dark walls, bright points or segmented LEDs, isolated pools of light |
| Paper work is comfortable but screen work is not | Task-plane and display conflict | Excessively bright desk layer, monitor orientation, local task lamp, window brightness |
| One area is comfortable while another is not | Observer geometry or zoning issue | Desk orientation, luminaire spacing, daylight exposure, local scene settings |
3. Test reflections directly
A fast site technique is the mirror test. Place a small mirror in front of the monitor, roughly in the plane of the screen, and look for reflected luminaires or windows. This does not replace detailed assessment, but it reveals which sources are likely to appear in the display.
Work with display screen equipment
Read the relevant guidance in Work with display screen equipment from the UK Health and Safety Executive. It connects lighting decisions to actual display-screen tasks and offers a sensible order of corrective actions.
On PDF page 42, in “Lighting, reflections and glare,” read from the lighting guidance. Focus on the need to support screen, keyboard, paper, and writing tasks together, not as isolated targets. Then go to the workstation checklist on pages 60–61. Under “Display screens,” read from the reflection check, noting that relocating or shielding the source is preferred to adding a screen filter.
4. Inspect the proposed scheme in section as well as plan
A reflected ceiling plan can conceal the most important glare relationships. Draw or model a section through:
- seated eye height and monitor position;
- luminaire aperture and shielding angle;
- window head, view direction, and shading;
- pendant height above a meeting or shared desk;
- glossy material planes and glazed partitions.
In plan, a row of luminaires may look orderly. In section, the same row may be directly visible from a seated workstation, reflected in monitors, or positioned at an uncomfortable angle relative to a video-call screen.
5. Verify with calculations, then return to the view
For an established design, calculate UGR using the actual room geometry, photometry, surface reflectances, and relevant observer positions in suitable lighting-design software. Investigate the worst result rather than relying on the average result or a favorable point selected after the fact.
Then return to the spatial question: does the visual impression at the desk agree with the calculation? A passing UGR result does not make a visible monitor reflection acceptable. Equally, a good visual impression should not be used to ignore a calculated failure that may affect another workstation or viewing direction.
Targeted corrections: solve the cause, preserve the composition
The most effective corrections change the source, geometry, or contrast relationship responsible for the problem. Dimming every lighting layer at once is rarely the best response; it may reduce glare but also compromise vertical brightness, facial visibility, hierarchy, or task support.
Direct glare from ceiling luminaires
If an open-plan desk user sees a bright luminaire in a critical forward view, first examine the luminaire’s high-angle brightness and its location relative to the desk orientation.
Possible corrections include:
- use a luminaire with better high-angle control, a deeper recess, louvre, shielding, or a suitably selected low-glare optic;
- relocate or re-space the luminaire so it does not occupy a frequent forward sightline;
- coordinate desk orientation with the ceiling layout before furniture positions become fixed;
- use a more indirect or direct-indirect distribution where it supports the architectural intention;
- increase useful wall or ceiling brightness in a controlled way, reducing the extreme source-to-background contrast;
- provide separate dimming for the offending ambient group if lower output is viable at that time of day.
Do not assume that adding more downlights is a cure for a dark area. It may raise horizontal illuminance while adding more bright apertures to the visual field.
Reflected glare in display screens
For screens, the preferred sequence is usually reposition the screen or source, then control the window or luminaire, and only then consider accessories.
A robust workplace layout generally places monitors so that major windows are to the side rather than directly in front of or behind the user. This reduces both the reflected window image and the extreme contrast between screen and view. The same logic applies to strong electric-light sources.
Useful corrections include:
- rotate or relocate the desk and monitor;
- tilt or adjust the screen where appropriate;
- move or re-aim local task lighting;
- select a more controlled distribution over the workstation;
- use functioning blinds, shades, or other shading appropriate to the façade;
- reduce the output of a problematic perimeter lighting group while retaining adequate local visual support;
- maintain clean displays and adjust screen brightness, contrast, and text settings as part of the workstation response.
An anti-glare screen filter is a last resort, not a substitute for solving the reflected source or window condition.
Glare from glazing and bright exterior conditions
Daylight glare is often a façade, layout, interior-surface, and lighting-controls problem together. The electric-lighting designer should not try to overpower a bright view with indiscriminate interior brightness. Instead, coordinate:
- seating and screen orientation;
- window shading and user operability;
- the luminance of nearby walls and ceiling;
- daylight-responsive dimming of perimeter electric light;
- task lighting and visual hierarchy deeper in the plan.
A fully darkened interior beside a bright façade can be uncomfortable even when blinds are absent for a valid reason, such as preserving an exterior view. A deliberately illuminated internal wall or core surface can provide a visual counterweight, provided it does not become a competing glare source.
Reflections from polished workplace finishes
Glossy table surfaces, glass whiteboards, polished stone, framed graphics, and glazed partitions require a viewing-angle review. A tight spotlight aimed toward a shiny surface may create a bright reflected image for seated users even if its beam is well controlled at the source.
Corrections may include changing the source position, broadening or softening the distribution, changing the aiming angle, choosing a more matte finish in critical reflection zones, or moving the reflective object. The appropriate choice depends on which surface needs emphasis. For a collaboration wall, uniform vertical illumination may be more useful than multiple sharp spots. For a feature material, a controlled grazing effect may be appropriate only after checking where its reflections travel.
Worked diagnostic example: an open office near glazing
Consider a workplace with perimeter workstations, a dark exposed ceiling, broad luminous panels above desks, and a highly polished shared project table. Users report screen fatigue in the afternoon and discomfort when looking across the room.
A weak response would be: “Add more light to the desks.” That increases the likelihood of both direct and reflected glare.
A targeted diagnosis would identify several interacting causes:
- Perimeter screens face the glazing, producing reflected daylight images and strong screen-to-window contrast.
- Ceiling panels sit in forward views from several seated positions.
- The dark ceiling and weakly illuminated internal walls make the panels visually dominant.
- The project table reflects the panel grid toward users seated across from one another.
A coordinated correction can retain the layered concept:
- rotate monitor and desk orientations so glazing is predominantly lateral to the screen;
- provide adjustable shading that users can operate;
- select or reposition the ambient luminaires for lower apparent brightness at seated viewing angles;
- introduce controlled vertical illumination on the internal collaboration wall and selected core surfaces, giving the eye a brighter, calmer background;
- review the project-table luminaire in section and alter its distribution, position, or output to prevent a reflected grid;
- separately control perimeter ambient light, internal ambient light, collaboration lighting, and the vertical layer.
Notice that these are not four unrelated fixes. They restore the intended hierarchy: comfortable focused work by the façade, a legible internal visual anchor, and a collaboration zone that remains usable without turning the entire office into an evenly lit ceiling grid.
Key takeaways
Discomfort glare is caused by a relationship between source luminance, apparent size, position in the field of view, background brightness, and reflective surfaces. In workplaces, the two essential diagnoses are direct glare from visible sources and reflected glare in monitors or glossy finishes.
UGR is valuable evidence for electric-light discomfort glare, particularly when calculated for the actual room, observer locations, and viewing directions. It is not a universal measure of visual comfort, and a luminaire’s “UGR less than 19” label is not a guarantee for a completed scheme.
When correcting glare, first identify the mechanism. Then prioritize changes to source control, luminaire or workstation geometry, window shading, and meaningful background luminance. Avoid blanket dimming or adding more fixtures unless that action specifically addresses the diagnosed cause.
Next, you will develop an adaptable workplace lighting concept that can accommodate changes in furniture layout, occupancy, and workplace use without losing its visual order or comfort.
Can't find a good explanation? Sign up and we'll make it for you
Sign up