
Hello! Welcome to the first lesson of our "AI and LLM Integrations" module.
In the previous modules, you mastered building complex, modular, and maintainable workflows. You learned to structure automations like a seasoned developer, ensuring they are scalable and easy to understand. Now, we're going to add one of the most transformative capabilities to your toolkit: Artificial Intelligence.
This lesson marks your entry into the world of AI-powered automation. You will learn the fundamental skill of connecting n8n to a Large Language Model (LLM), which opens up endless possibilities for generating content, analyzing text, and making intelligent decisions within your workflows.
By the end of this 60-minute lesson, you will be able to connect to the OpenAI API to build a text generation workflow.
We will accomplish this by:
- Understanding how n8n integrates with AI models.
- Setting up the connection to OpenAI using an API key.
- Building a workflow that takes a user prompt and generates a response from an AI model.
- Refining the AI's behavior with system prompts and memory.
1. Understanding AI in n8n
At its core, integrating AI in n8n means sending data to a model (like OpenAI's GPT-4) and receiving a generated response. Given your background in software development, you can think of this as making a specialized API call. n8n provides high-level nodes that handle the complexities of these interactions for you.
The two main ways to interact with models like OpenAI are:
- The
OpenAInode: A direct-access node for specific tasks like text generation, image analysis, etc. - The
AI Agentnode: A more powerful, high-level orchestrator that can use a chat model, memory, and tools to perform complex, multi-step tasks.
For most modern AI workflows, the AI Agent node is the recommended starting point due to its flexibility. We will focus on it today.
Tutorial: Build an AI workflow in n8n
To start, let's clarify the distinction between a basic LLM and an AI Agent. This official n8n documentation provides a concise explanation.
Please read the introduction and the section titled 'AI concepts in n8n'. Focus on the table that compares an LLM to an AI Agent to understand why we're using the Agent node.
The key takeaway is that an AI Agent is goal-oriented and can use tools, whereas a raw LLM simply generates text. We'll start with simple text generation but use the agent architecture as it's the foundation for more advanced capabilities later.
2. Building Your First AI Workflow
Let's get hands-on and build a workflow that connects to OpenAI. For this, you will need an OpenAI API key.
- Prerequisite: Go to the OpenAI API keys page, sign in, and create a new secret key. Copy this key and save it somewhere secure. You will only be shown it once.
The following video from the official n8n channel will be our main guide for this section. It walks through the exact steps we need to take.
Building AI Agents: Chat Trigger, Memory, and System/User Messages Explained [Part 1]
This video, 'Building AI Agents [Part 1]', is a perfect walkthrough for our goal. We'll watch it in segments as we build our workflow.
Watch from 03:28 to 08:09. Follow along in your own n8n instance to complete these steps: Create a new workflow and add the 'On Chat Message' trigger (confusingly named 'Chat Trigger' in some versions). Add the 'AI Agent' node. Attach an 'OpenAI Chat Model' to the agent. Create a new credential for OpenAI and paste in your API key. Select a model, such as 'gpt-4o-mini' or 'gpt-4o'. Use the Chat panel to test the workflow with a simple prompt like 'Hello'.
Let's recap the key steps from the video for clarity.
Step 1: The Trigger
You started with an On Chat Message trigger. This is a convenient trigger for development because it provides a simple chat interface directly within the n8n canvas for testing your AI.
Step 2: The AI Agent
This is the central orchestrator of your AI logic. By default, it's a Tools Agent, which is the most versatile type.
Step 3: The Chat Model & Credentials
This is the core of the lesson's learning outcome. The AI Agent needs a "brain," which you provided by connecting the OpenAI Chat Model node. During this process, you did something critical:
- You created a new Credential in n8n. This securely stores your OpenAI API key, separating it from the workflow logic itself—a crucial security best practice.
- You selected a specific model (e.g.,
gpt-4o). Different models have different capabilities, speeds, and costs.
After connecting these pieces, your workflow should look something like this:
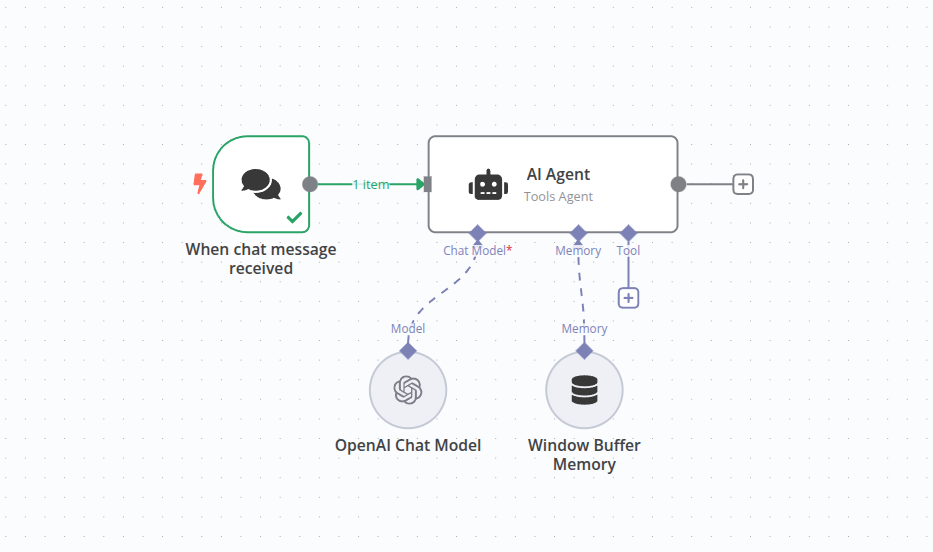
When you test it, you can see the data flow: the trigger passes a JSON object containing your message (e.g., {"chatInput": "Hello"}) to the agent, and the agent outputs the AI's response.
3. Customizing the AI's Behavior
Simply connecting to the API is only the beginning. The real power comes from instructing the AI on how to behave.
System Message vs. User Message
You've already provided a "user message" by typing in the chat. However, to guide the AI's persona, tone, and rules, you use a System Message.
- User Message: The specific, immediate task or question (e.g., "What is n8n?"). In our workflow, this comes from the
Chat Trigger. - System Message: A set of high-level instructions that define the AI's role, personality, and constraints (e.g., "You are a helpful assistant who explains technical concepts simply.").
Let's see how to add and use a system message to control the AI's output.
Building AI Agents: Chat Trigger, Memory, and System/User Messages Explained [Part 1]
Continuing with the same video, let's explore how to use the System Message to customize our agent.
Watch from 08:09 to 14:14. Pay close attention to: How to add the 'System Message' option to the AI Agent node. The difference between the user message (prompt source) and the system message. The best practices for writing a system message: defining a role, style, and boundaries. How you can use expressions in the system message to provide dynamic context, like the current date.
Test your understanding!
Open your AI Agent node and add a System Message. Change the default message to: "You are a pirate who is an expert in workflow automation. All your responses must be in the style of a pirate."
Now, use the chat panel to ask it: "What is an API?" Does the response match the persona you defined?
Show answer
You should get a response like: "Ahoy, matey! An API, ye see, be like a secret treasure map for software! It be a set o' rules that lets one piece o' software talk to another, sharin' precious data and functions without revealin' all its buried code. Savvy?" The key is that the AI adopted the pirate persona from the system message while still answering the user's question.
Adding Memory for Conversation
By default, the AI Agent is stateless. Each time you send a message, it's a completely new conversation. It has no memory of what you just said. To build a true chatbot, you need to add memory.
Building AI Agents: Chat Trigger, Memory, and System/User Messages Explained [Part 1]
Let's add memory to our agent. This final clip will show you how straightforward it is.
Watch from 14:14 to 17:11. Follow along to: Add 'Memory' to your AI Agent node. Select the 'Window Buffer Memory' option. Test the memory by telling the AI a fact (e.g., 'The secret code is 1234') and then asking about it in a separate message ('What is the secret code?').
By adding the Window Buffer Memory, you made the agent stateful. n8n now automatically keeps track of the conversation history (up to the configured limit) for a given session, passing the relevant context back to the model with each new message. This is fundamental for building interactive chatbots.
Conclusion
Congratulations on completing your first AI-powered workflow! You've successfully bridged the gap between n8n's automation engine and the powerful generative capabilities of OpenAI.
Key Takeaways:
- n8n's
AI Agentnode is the primary tool for building modern AI workflows. - Connecting to OpenAI requires getting an API key and storing it securely in n8n's Credentials.
- The System Message is used to define the AI's persona and rules, while the User Message is the specific task.
- AI Agents are stateless by default; adding Memory is essential for creating conversational experiences.
Preview of the Next Lesson:
You've learned how to make an AI generate text based on your instructions. Now, we'll flip the script. In the next lesson, you will learn how to use AI to classify, summarize, or extract structured data from unstructured text. This is a cornerstone of intelligent automation, allowing you to turn messy inputs like emails or documents into clean, usable data for your workflows.