
Hello, and welcome to the first step in the pathway. This module establishes the Python working environment you will use for everything that follows: numerical work, PyTorch models, tokenizers, training loops, and eventually Hugging Face development. The immediate goal is deliberately practical: create an isolated, reproducible project environment and demonstrate that PyTorch is executing an operation on your NVIDIA RTX 3080 Ti Laptop GPU.
For this course, WSL2 with Ubuntu is the recommended primary environment. Most LLM tooling, training documentation, containers, and open-source workflows target Linux first. Native Windows remains a valid option, and this lesson includes its activation commands, but choose one primary environment for the course rather than installing the same project dependencies in both.
By the end, you should have:
- a project directory with an isolated
.venvPython environment; - a CUDA-enabled PyTorch installation;
- a
gpu_check.pyscript that reports your actual NVIDIA GPU and runs a tensor operation on it; - a
requirements.txtfile you can commit and recreate later.
Why this needs a few layers
A virtual environment is not a virtual machine. It is an isolated Python installation and package directory attached to one project. It prevents one project’s packages from silently changing another project’s behavior—a concern that becomes important once PyTorch, Transformers, CUDA-related libraries, and experiment tooling enter the picture.
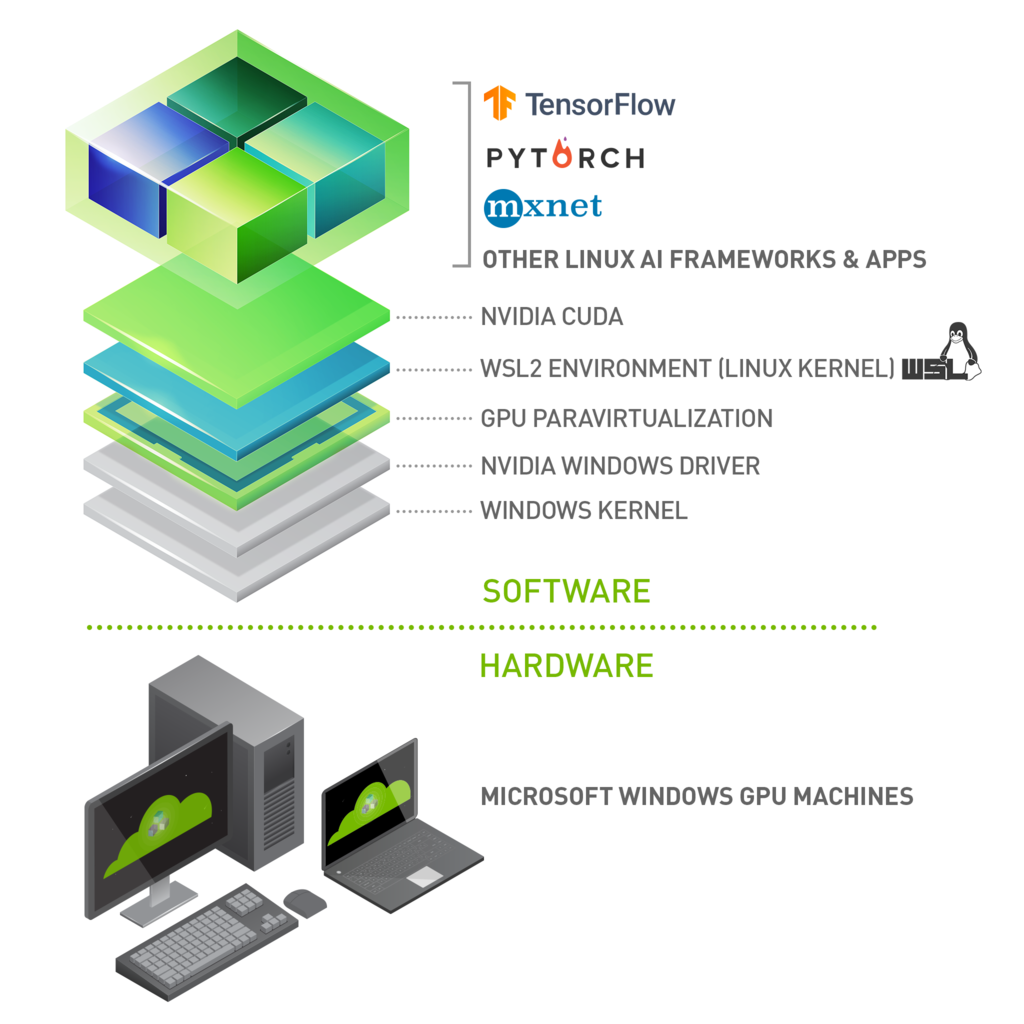
The image separates two responsibilities:
- Windows owns the physical GPU and NVIDIA driver.
- WSL2 provides a Linux environment that can access that GPU.
- PyTorch runs inside Linux and ships with the CUDA user-space components it needs in its GPU-enabled package.
A useful consequence: for the standard PyTorch installation in this lesson, do not install a separate Linux NVIDIA display driver inside WSL. The Windows NVIDIA driver is what makes the GPU available to WSL.
The line labeled “CUDA Version” in nvidia-smi is also frequently misunderstood. It indicates the newest CUDA runtime version supported by the installed driver; it does not prove that a matching system-wide CUDA toolkit has been installed. For ordinary PyTorch work, use the CUDA-enabled PyTorch package selected from the official PyTorch installer page rather than attempting to assemble CUDA and cuDNN manually.
1. Prepare Windows, WSL2, and GPU access
Before creating Python environments, verify that Windows itself sees the NVIDIA GPU. Open PowerShell or Windows Terminal and run:
nvidia-smi
You should see an NVIDIA-SMI status table, including your GPU name—ideally something similar to NVIDIA GeForce RTX 3080 Ti Laptop GPU—plus driver information. If nvidia-smi is not recognized or reports no device, address the Windows NVIDIA driver first. Install or update the NVIDIA Windows driver, reboot if requested, and rerun the command.
If WSL2 is already installed, confirm both its status and the installed distributions:
wsl --status
wsl -l -v
Your Ubuntu distribution should report Version 2. If WSL is not yet installed, open PowerShell as Administrator and run:
wsl --install -d Ubuntu
Restart when Windows asks, then launch Ubuntu from the Start menu and create the requested Linux username and password. Once inside Ubuntu, update WSL from an elevated Windows PowerShell session if needed:
wsl --update
Then, in the Ubuntu terminal, run:
nvidia-smi
Seeing the same GPU family here is the key WSL checkpoint. It confirms the GPU bridge is working before Python is involved.
Windows 11 GPU Setup for TensorFlow & PyTorch (Full CUDA + cuDNN Guide)
Watch “Windows 11 GPU Setup for TensorFlow & PyTorch” by Fahim Amin for a short visual walkthrough of the WSL2 prerequisites and Ubuntu installation flow.
Watch WSL prerequisites for the virtualization check and the administrator installation command. Then watch Ubuntu setup to see how a distribution and its initial Linux user are created. The video later uses Conda, but this course will use Python’s built-in venv instead, keeping the environment mechanics transparent.
Native Windows alternative
If you intentionally choose native Windows, you can continue after the first nvidia-smi succeeds. You do not need WSL2. Later, use the Windows-specific virtual-environment activation command and select Windows on PyTorch’s installation page.
For the remainder of this lesson, commands without a PowerShell label assume your chosen primary environment. The WSL commands are shown first.
2. Create a project-owned Python environment
For WSL, keep active development projects in the Linux filesystem—for example, under ~/src—rather than /mnt/c/.... This generally avoids file-system overhead and permission oddities when Python tooling creates many small files.
In Ubuntu, create the project and ensure Python’s virtual-environment support is available:
sudo apt update
sudo apt install -y python3 python3-venv python3-pip

mkdir -p ~/src/llm-pathway
cd ~/src/llm-pathway
git init
Check the Python version:
python3 --version
For the course, Python 3.12 is a good stable target if it is available. The current PyTorch Windows guidance supports Python 3.10 through 3.14, but using the same Python major/minor version consistently in a project matters more than pursuing the newest interpreter immediately.
Create and activate the environment:
python3 -m venv .venv
source .venv/bin/activate
python --version
python -m pip install --upgrade pip
After activation, your prompt normally begins with (.venv). More importantly, python and python -m pip now refer to the interpreter and package installer inside .venv.
On native Windows PowerShell, create and activate the equivalent environment like this:
mkdir llm-pathway
Set-Location llm-pathway
git init

py -3.12 -m venv .venv
.\.venv\Scripts\Activate.ps1
python --version
python -m pip install --upgrade pip
If PowerShell prevents activation because of an execution-policy setting, allow it for the current terminal session only:
Set-ExecutionPolicy -Scope Process -ExecutionPolicy Bypass
.\.venv\Scripts\Activate.ps1
A virtual environment is disposable: it should contain installed artifacts, not the source of truth. Your source files, dependency specification, and setup instructions are the durable project assets.
12. Virtual Environments and Packages
Read the relevant parts of Python’s official tutorial to connect the commands above with the underlying isolation and reproducibility model.
In Section 12.1, read the rationale for using a self-contained environment. Then read Section 12.2, “Creating Virtual Environments,” through the activation and deactivation commands; focus on the fact that venv uses the Python interpreter with which it was created. In Section 12.3, “Managing Packages with pip,” read from the freeze workflow. This explains why a requirements.txt file belongs in version control.
A small convention now prevents future confusion: always install packages with:
python -m pip install PACKAGE_NAME
rather than relying on a bare pip. This guarantees that the package installer belongs to the python interpreter you just checked. It is the Python equivalent of making a project’s dependency boundary explicit rather than relying on whatever tool happens to be on the global path.
3. Install the CUDA-enabled PyTorch package
With (.venv) active, open the official PyTorch installation page. On its installation selector choose:
| Running environment | OS selection | Package | Compute platform |
|---|---|---|---|
| Ubuntu inside WSL2 | Linux | Pip | A listed CUDA option |
| Native PowerShell | Windows | Pip | A listed CUDA option |
Copy and run the exact command the selector currently presents. The available CUDA package builds change over time, so a command copied today from a static tutorial can easily be obsolete. The PyTorch selector is the authority for the current stable package command.
Do not select “CPU” or “None” for this laptop. Do not choose a CUDA release merely because the nvidia-smi header displays the same number: choose one of the CUDA variants that the current PyTorch selector offers, provided your NVIDIA driver is current.
Use PyTorch’s official installation guidance as the source for the current pip command, then use its verification guidance as a minimal installation check.
Read the “Installing on Windows” section if you chose native Windows, or use the page’s installation selector with Linux if you chose WSL2. Focus on the CUDA installation guidance: the important decision is selecting a CUDA-capable build, not installing PyTorch from source. Then read the “Verification” material beginning the verification procedure. The random-tensor check establishes that PyTorch imports; the CUDA availability check establishes that it can access the GPU.
After installation completes, inspect what entered the environment:
python -m pip show torch
python -m pip check
pip check should report no broken requirements. This does not prove GPU access yet, but it catches incompatible package metadata before you begin debugging CUDA.
4. Verify actual GPU computation, not only installation
Create a file named gpu_check.py in the project root with the following contents:
import platform
import torch

print(f"Python platform: {platform.platform()}")
print(f"PyTorch version: {torch.__version__}")
print(f"PyTorch CUDA runtime: {torch.version.cuda}")
print(f"CUDA available: {torch.cuda.is_available()}")

if not torch.cuda.is_available():
    raise SystemExit(
        "CUDA is unavailable. Check the active environment, the PyTorch build, "
        "the Windows NVIDIA driver, and WSL2 GPU access."
    )

device = torch.device("cuda:0")

print(f"GPU count: {torch.cuda.device_count()}")
print(f"GPU 0: {torch.cuda.get_device_name(0)}")

properties = torch.cuda.get_device_properties(0)
vram_gib = properties.total_memory / (1024 ** 3)
print(f"Total VRAM: {vram_gib:.1f} GiB")

left = torch.randn((2048, 2048), device=device)
right = torch.randn((2048, 2048), device=device)
result = left @ right

# CUDA work is asynchronous; synchronize so errors surface before reporting success.
torch.cuda.synchronize()

print(f"Result device: {result.device}")
print(f"Result shape: {tuple(result.shape)}")
print("GPU tensor operation completed successfully.")
Run it from the directory containing the script:
python gpu_check.py
A successful result has all of these properties:
CUDA available: True- a detected NVIDIA device name matching your laptop GPU
Result device: cuda:0GPU tensor operation completed successfully.
The matrix multiplication is intentionally modest for a 16 GB GPU, but it is more meaningful than simply importing torch. The tensors are created directly on cuda:0, the multiplication is dispatched to CUDA, and torch.cuda.synchronize() waits for the GPU to finish. If the script completes, PyTorch has genuinely used the GPU.
To observe the workload externally, run this in a second terminal while the script is executing:
nvidia-smi -l 1
The operation may be too brief to observe consistently, but during longer training runs the process table and memory use shown by nvidia-smi become a valuable operational diagnostic.
5. Capture the environment as a reproducible artifact
Now freeze the exact installed package versions:
python -m pip freeze > requirements.txt
Add a minimal .gitignore file so the machine-local environment is not committed:
.venv/
__pycache__/
*.pyc
In README.md, record the facts that a dependency file cannot express by itself:
# LLM Pathway Environment

- Primary environment: Ubuntu on WSL2
- Python version: 3.12.x
- GPU: NVIDIA GeForce RTX 3080 Ti Laptop GPU, 16 GB VRAM
- Verification: `python gpu_check.py`
- Recreate: create `.venv`, activate it, then run
  `python -m pip install -r requirements.txt`
Commit the durable artifacts:
git add .gitignore README.md requirements.txt gpu_check.py
git commit -m "Set up reproducible PyTorch GPU environment"
To recreate the project later—on the same operating-system family and Python version—the sequence is:
- Clone the repository.
- Create a new
.venvwith the recorded Python version. - Activate it.
- Run
python -m pip install -r requirements.txt. - Run
python gpu_check.py.
A requirements.txt lock captures Python packages, but not the Windows NVIDIA driver, WSL version, or operating system. Those belong in the README or a more complete environment manifest. Also, if you later use both native Windows and WSL, maintain separate lock files because some packages and binary wheels differ by platform.
Diagnose failures by layer
Avoid treating torch.cuda.is_available() as a mysterious yes/no outcome. Check the layers from outside inward.
| Symptom | Likely layer | First response |
|---|---|---|
nvidia-smi fails in Windows | NVIDIA driver or hardware | Install/update the Windows NVIDIA driver and reboot. |
Windows nvidia-smi works, but it fails in Ubuntu | WSL2 GPU bridge | Confirm WSL version 2, run wsl --update, reboot, and avoid installing a Linux GPU driver in WSL. |
torch.version.cuda is None | CPU-only PyTorch build | Activate .venv, uninstall/recreate the environment, and install using the official CUDA selector command. |
CUDA runtime is listed but is_available() is False | Driver compatibility or wrong environment | Check which python in WSL or Get-Command python in PowerShell, then update the Windows NVIDIA driver if necessary. |
ModuleNotFoundError: torch | Environment activation | Activate .venv, then run python -m pip show torch. |
| A later model causes out-of-memory errors | VRAM capacity, not installation | Reduce batch size or sequence length; later modules will cover mixed precision, gradient accumulation, quantization, and LoRA. |
A final note about your MacBook Pro: it does not use NVIDIA CUDA. Apple Silicon PyTorch can use the separate MPS backend, which is useful for smaller experiments, but your Windows RTX laptop is the appropriate machine for the CUDA-based training work in this course.
You now have a clean boundary between your operating system, a project-specific Python environment, package versions, and GPU verification. The important operational habit is to record what ran—not merely to make it run once.
Next, we will begin writing Python itself by translating familiar control flow and function patterns into idiomatic Python, with type hints from the start.
Can't find a good explanation? Sign up and we'll make it for you
Sign up