
Hello again. Your Player is now configured as a stable top-down physics object: a dynamic Rigidbody, a solid collider, no gravity, frozen Y position, and frozen X/Z rotation. That setup gives the movement code a reliable physical body to control.
In this lesson, you will replace the old CharacterController.Move approach with Rigidbody-driven movement. The goal is that BattleFire’s Player moves at the same intended speed on fast and slow machines, stays responsive to input, collides with arena geometry, and turns only around the vertical axis.
Two clocks: rendered frames and physics steps
Unity does not call every method at the same rhythm:
Update()runs once per rendered frame. Its frequency changes with frame rate.FixedUpdate()runs on Unity’s fixed physics schedule. By default, that interval is seconds, or 50 physics steps per second.
A fast device might render many frames between two physics steps. Conversely, a slow frame can require Unity to run more than one physics step before it renders again. This is why a Rigidbody should be moved in FixedUpdate(), not by changing its Transform in Update().
Moving in Unity3D w/ FixedUpdate vs Update - Unity Physics and Movement For beginners
Watch “Moving in Unity3D w/ FixedUpdate vs Update” by Jason Weimann (GameDev). It gives a concise visual explanation of why physics operations use a different update cycle from ordinary frame-based code.
Watch the timing model to see why a rendered frame can have zero, one, or several physics steps. Then watch the recommended pattern, which separates collecting input from processing it during physics updates.
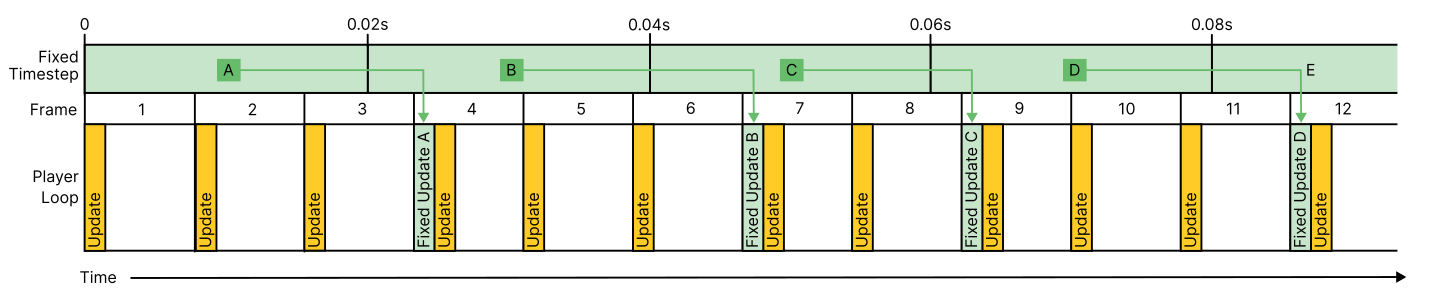
For movement, use this division of responsibility:
- Read and store continuous input in
Update(). - In
FixedUpdate(), convert the most recent input into a movement direction. - Move the Rigidbody by a distance based on the fixed physics interval.
This avoids tying physical motion to the number of rendered frames.
Why time multiplication makes speed independent of frame rate
moveSpeed should mean Unity units per second. It should not mean “units every update.”
The distance for one physics step is:
With moveSpeed = 5 and Unity’s default fixed time step of :
So each physics step moves the Player units. At 50 steps per second, the Player covers 5 units in one second. If you later change the fixed time step, multiplying by Time.fixedDeltaTime preserves the same meaning of “5 units per second.”
Use Time.fixedDeltaTime explicitly inside FixedUpdate(). In some Unity contexts Time.deltaTime also reports the fixed step during FixedUpdate(), but fixedDeltaTime documents your intent and avoids ambiguity.
There is another speed issue to solve: diagonal input. Raw horizontal and vertical input can produce . That vector has a magnitude of about , which would make diagonal movement 41% faster than movement on a single axis.
Vector3.ClampMagnitude(direction, 1f) fixes this cleanly:
- Input below magnitude 1 is preserved. This matters for an analog joystick.
- Input above magnitude 1 is limited to 1. This prevents a keyboard diagonal from moving faster.
Replace the old CharacterController movement
Your earlier PlayerController used a CharacterController, controller.Move(...), and direct transform.rotation changes. Those do not belong in the Rigidbody version.
Replace the contents of Assets/Scripts/Player/PlayerController.cs with the following:
using UnityEngine;

[RequireComponent(typeof(Rigidbody))]
public class PlayerController : MonoBehaviour
{
    [Header("Movement")]
    [SerializeField] private float moveSpeed = 5f;
    [SerializeField] private float rotationSpeed = 720f;

    // An external control source, such as the future on-screen joystick,
    // can write its normalized value here.
    [HideInInspector] public Vector2 movementInput;

    private Rigidbody rb;
    private Vector2 keyboardInput;

    private void Awake()
    {
        rb = GetComponent<Rigidbody>();
    }

    private void Update()
    {
        ReadKeyboardInput();
    }

    private void FixedUpdate()
    {
        MovePlayer();
    }

    private void ReadKeyboardInput()
    {
        keyboardInput = new Vector2(
            Input.GetAxisRaw("Horizontal"),
            Input.GetAxisRaw("Vertical")
        );
    }

    private void MovePlayer()
    {
        Vector2 activeInput = keyboardInput.sqrMagnitude > 0.0001f
            ? keyboardInput
            : movementInput;

        Vector3 direction = new Vector3(
            activeInput.x,
            0f,
            activeInput.y
        );

        direction = Vector3.ClampMagnitude(direction, 1f);

        Vector3 nextPosition = rb.position
            + direction * moveSpeed * Time.fixedDeltaTime;

        rb.MovePosition(nextPosition);

        if (direction.sqrMagnitude > 0.0001f)
        {
            Quaternion targetRotation = Quaternion.LookRotation(
                direction,
                Vector3.up
            );

            Quaternion nextRotation = Quaternion.RotateTowards(
                rb.rotation,
                targetRotation,
                rotationSpeed * Time.fixedDeltaTime
            );

            rb.MoveRotation(nextRotation);
        }
    }
}
Save the script and return to Unity. Wait for compilation to complete, then select the root Player GameObject and confirm that the Inspector still shows PlayerController and its Rigidbody.
Set the Inspector values to a useful initial feel:
| Field | Starting value | Meaning |
|---|---|---|
| Move Speed | 5 | Maximum movement speed in Unity units per second |
| Rotation Speed | 720 | Maximum turn speed in degrees per second |
Because your old script used rotationSpeed = 10f, Unity may retain 10 on the existing Player component even after you change the code default. Set it manually to 720 in the Inspector. Serialized Inspector values override code defaults for an existing component.
Reading the movement method carefully
The important part of the script is not merely that it “uses Rigidbody.” It is the order and meaning of each operation.
Vector2 activeInput = keyboardInput.sqrMagnitude > 0.0001f
    ? keyboardInput
    : movementInput;
This chooses an input source. During editor testing, held keyboard input takes priority. When no keyboard movement is held, the public movementInput value can control the Player. Keeping this handoff means the eventual mobile joystick can supply movement without replacing the physics code.
Vector3 direction = new Vector3(
    activeInput.x,
    0f,
    activeInput.y
);
A 2D input vector becomes a world-space direction on BattleFire’s ground plane:
- Horizontal input becomes the world X direction.
- Vertical input becomes the world Z direction.
- Y remains zero because the Player should not rise or fall.
direction = Vector3.ClampMagnitude(direction, 1f);
This makes diagonal keyboard movement fair while retaining partial analog joystick pressure. Avoid using Normalize() unconditionally here: it would turn a gentle joystick tilt into full-speed movement.
Vector3 nextPosition = rb.position
    + direction * moveSpeed * Time.fixedDeltaTime;

rb.MovePosition(nextPosition);
The code starts from rb.position, the Rigidbody’s physics position, calculates one fixed-step displacement, and asks the Rigidbody to move there with MovePosition. It does not assign transform.position directly. This keeps the movement operation in the physics update path and works with the Rigidbody interpolation setting configured in the preceding lesson.
Finally, the rotation block runs only when there is a meaningful movement direction:
if (direction.sqrMagnitude > 0.0001f)
Without this check, Quaternion.LookRotation would be asked to face a zero-length vector when the Player is idle. The Player instead retains its last facing direction.
Quaternion.RotateTowards turns toward the movement direction by a capped number of degrees each physics step. Since the cap is multiplied by Time.fixedDeltaTime, rotationSpeed has the intuitive unit degrees per second.
Test it in the Main scene
Before testing, verify these scene details from the previous lesson:
- The Player root has the
Rigidbody,Capsule Collider, andPlayerController. - The old
CharacterControllercomponent is gone. - Use Gravity is off.
- Rigidbody constraints freeze Position Y and Rotation X/Z.
- Rigidbody Interpolate is set to Interpolate.
- The floor and obstacles have non-trigger colliders.
Then enter Play mode and test deliberately:
- Hold W, A, S, and D individually. The Player should move along the world X-Z plane.
- Hold two movement keys together. Diagonal movement should not be faster than straight movement.
- Release all movement keys. The Player should stop immediately and retain its last facing direction.
- Move into an obstacle. The Player should remain upright and should not pass through it.
- Observe the Player while moving. It should turn toward its travel direction without tilting.
- Test under different editor loads, such as with the Scene view open or closed. The apparent render smoothness may differ, but the intended travel speed should remain consistent.
If Input.GetAxisRaw does not respond in your project, check Edit > Project Settings > Player > Active Input Handling. The keyboard test code assumes the legacy Input Manager is enabled, either alone or alongside the newer Input System. The physics movement method itself does not depend on that choice; it only requires that some input source writes a Vector2.
Diagnose common movement problems
| Symptom | Likely cause | Fix |
|---|---|---|
| Player moves much faster diagonally | Direction was not clamped or normalized | Keep Vector3.ClampMagnitude(direction, 1f). |
| Player speed changes with the physics time step | Time factor is missing or wrong | Multiply displacement by Time.fixedDeltaTime. |
| Player clips through or behaves inconsistently near obstacles | Position is assigned through transform.position, or a collider is missing | Use rb.MovePosition in FixedUpdate() and verify colliders. |
| Player moves but never rotates | The rotation block is missing, or Rotation Y is frozen | Keep MoveRotation and unfreeze Rigidbody Rotation Y. |
| Player tips on collisions | Rigidbody Rotation X/Z are not frozen | Reapply those two rotation constraints. |
| Player does not move at all | Input is zero, the script has a compile error, or the Rigidbody reference is absent | Check the Console, confirm the component is attached, then test the input axes. |
| Turning feels slow or abrupt | rotationSpeed is poorly tuned | Start at 720 and adjust in the Inspector. |
Key takeaways
You now have a Rigidbody-based Player movement loop suited to BattleFire:
Update()captures frame-based continuous input.FixedUpdate()performs physics movement.Time.fixedDeltaTimemakesmoveSpeedconsistent in units per second.Rigidbody.MovePositionandRigidbody.MoveRotationreplace Transform andCharacterControllermovement.- Clamping input magnitude prevents an unintended diagonal speed bonus.
- The Player turns around Y only, while the Rigidbody constraints preserve stable top-down behavior.
movementInputremains available for an external input source while keyboard controls provide editor testing.
Next, you will configure a top-down camera that follows this physics-driven Player smoothly during movement.
Can't find a good explanation? Sign up and we'll make it for you
Sign up