
Hello! Welcome back to our n8n course.
In the last two lessons, we explored the If and Switch nodes. You learned how to route all incoming items down different paths based on conditions. This is fundamental for controlling the logical flow of your workflow. However, what if you don't want to route items, but get rid of them entirely?
This brings us to today's topic. This lesson covers how to use the Filter node to selectively process items from a list. The Filter node doesn't create new paths; it acts as a gatekeeper, inspecting each item and deciding whether it's allowed to continue or if it should be discarded. For a software developer, this is analogous to the filter() method on an array: you provide a condition, and only the items that satisfy it remain.
1. The Strategic Value of Filtering
Before we dive into the "how," let's establish the "why." In any data processing pipeline, filtering is not just a convenience—it's a strategic necessity. Placing a Filter node early in your workflow can have a massive impact on performance, cost, and reliability.
This is especially critical in complex automations. Imagine pulling 10,000 potential leads from an API but only being interested in 100 of them who meet specific criteria. Processing all 10,000 through subsequent API calls or AI models would be incredibly wasteful.
To get a solid grasp of these benefits, let's look at a well-articulated summary.
Post #13: Filter Node - The Data Gatekeeper That Keeps ...
The following post from the n8n subreddit, titled 'Filter Node - The Data Gatekeeper...', explains the core reasons why the Filter node is essential.
Read the sections 'The Stats That Matter' and 'Why the Filter Node Is Essential'. Pay close attention to the three key benefits: Computational Efficiency, Cost Control, and Data Quality.
As the article highlights, effective filtering is the first line of defense for building robust and efficient workflows. It ensures that your subsequent nodes only work with data that is complete, relevant, and valid.
2. How to Configure the Filter Node
Now for the hands-on part. The Filter node allows you to define one or more conditions. Items that pass all conditions (using AND logic) or any condition (using OR logic) will proceed to the next node. All other items are removed from the execution.
The following video provides a clear, practical demonstration of setting up a Filter node to process data from a Google Sheet.
Google Sheets in n8n – Read, Append, Update, Filter & Delete
This video, 'Google Sheets in n8n', by Ryan & Matt Data Science, will walk you through the core mechanics of the Filter node.
Watch the segment from 04:55 to 07:32. As you watch, focus on these key steps: Adding the Node: How the Filter node is added after the data retrieval step. Data Types: The crucial step of changing the data type from the default 'String' to 'Number' when comparing numerical values. Single Condition: Setting up a simple filter for grade equals 10. Multiple Conditions: How to combine rules using both AND and OR logic to create more complex filters (e.g., grade = 10 AND price > 1,000,000).
This workflow diagram illustrates how a Filter node fits into a larger process, taking a set of items and passing on a smaller, refined subset.
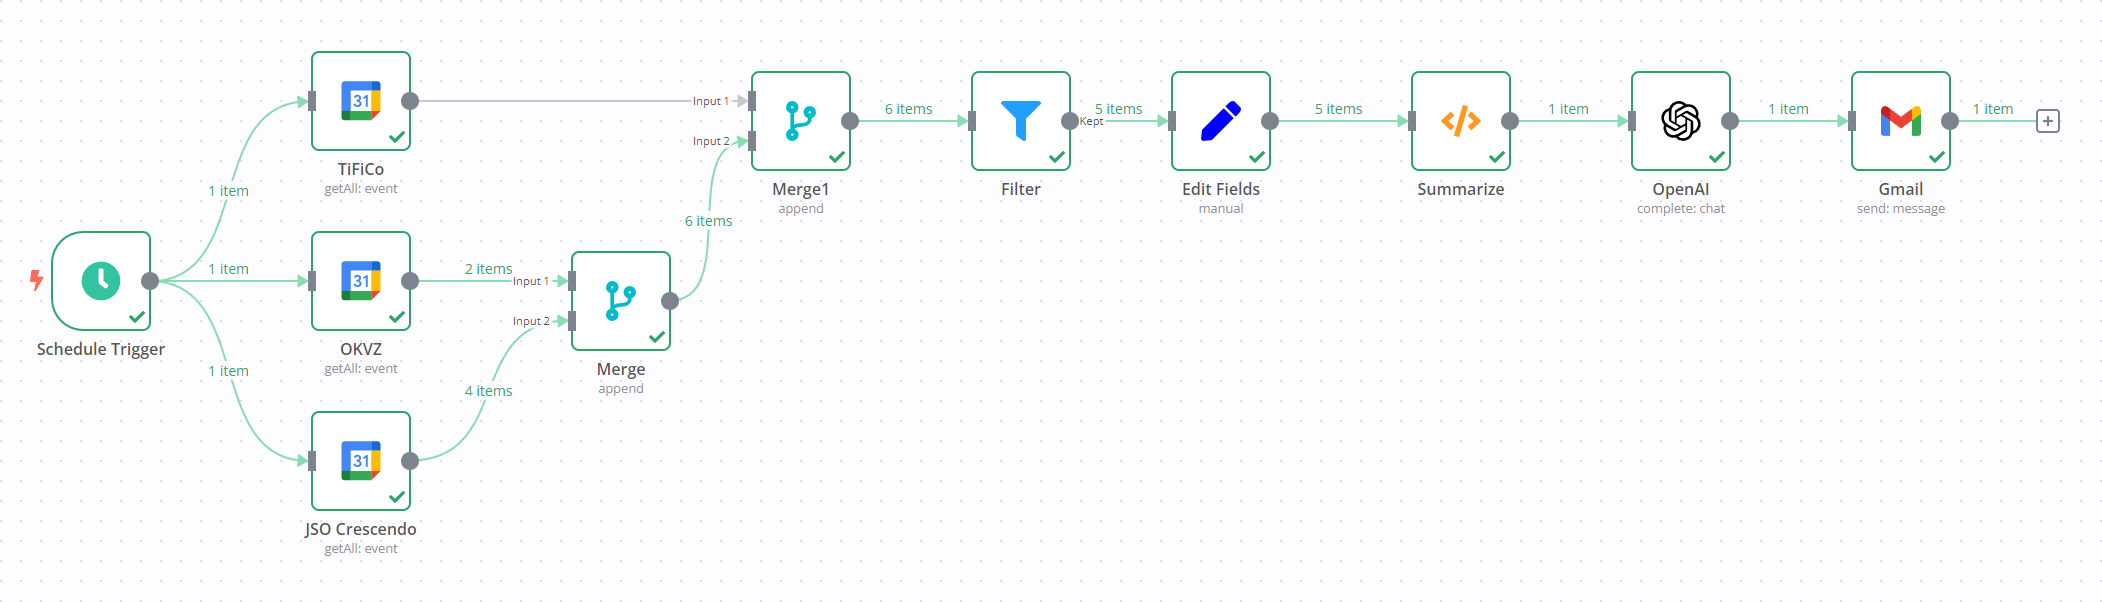
The main components of the Filter node's configuration are:
- Conditions: You can set rules for
AND(all must be true) orOR(any can be true). - Value 1: The data from the incoming item you want to check, typically an expression like
{{ $json.fieldName }}. - Operation: The comparison to perform (e.g.,
Equal,Is Greater Than,Contains,Is Not Empty). - Value 2: The value to compare against. This can be a static value (like
10or"active") or a dynamic value from another expression.
3. A Critical Distinction: Filter vs. If vs. Switch
It's easy to confuse the purpose of these three logic nodes. Let's clarify:
- Filter: Has one output. It's a bouncer at a club. It checks every item's credentials and either lets it in or sends it home. Items that are sent home are gone for good.
- If: Has two outputs (
true,false). It's a fork in the road. It sends every item down one of two paths. No items are discarded. - Switch: Has multiple outputs. It's a train station dispatcher. It sends every train (item) to a specific platform (output) based on its destination. No trains are lost; they are just routed differently.
Using a Filter node when you actually want to route items is a common mistake that leads to lost data. The article we looked at earlier has a great section on this.
Post #13: Filter Node - The Data Gatekeeper That Keeps ...
To reinforce this concept, let's revisit the Reddit post and look at the common pitfalls.
Read the section 'Common Mistakes to Avoid'. Pay special attention to 'Mistake 1: Using Filter Instead of IF for Routing'.
4. Best Practices for Effective Filtering
To build the kind of complex, professional workflows you're aiming for, it's important to use the Filter node correctly and strategically.
Filter Early, Filter Often
This is the single most important best practice. Place your Filter node as early as possible in the workflow, ideally right after you fetch data. This maximizes efficiency and cost savings by preventing downstream nodes from ever seeing or processing irrelevant items.
Use Multi-Stage Filtering for Complex Logic
Instead of creating one giant Filter node with 15 AND conditions, break your logic into sequential, single-purpose Filter nodes. This makes your workflow far more readable and easier to debug.
For example, to find qualified job candidates:
- Filter 1 (Validity): Remove applications where
emailis empty ORresume_urlis empty. - Filter 2 (Experience): From the remaining, keep only those where
years_experienceis greater than3. - Filter 3 (Skills): From the remaining, keep only those where the
skillsarraycontainsJavaScript.
This multi-stage pattern is explained beautifully in the "Real-World Example" section of the Reddit post (LINK), showing how 1000 items can be progressively refined down to just 12 perfect matches.
Test your understanding!
You are building a workflow to process a list of 500 user sign-ups from a CSV file. You only want to send a welcome email to users who:
- Are from Canada (
countryfield is"CA"). - Have explicitly consented to marketing emails (
marketing_consentfield istrue). - Have a valid email address (the
emailfield is not empty).
How would you configure a single Filter node to achieve this?
Show answer
You would add a Filter node and configure it with AND conditions.
- Rule 1:
- Data Type:
String - Value 1:
{{ $json.country }} - Operation:
Equal - Value 2:
CA
- Data Type:
- Rule 2:
- Data Type:
Boolean - Value 1:
{{ $json.marketing_consent }} - Operation:
Is True
- Data Type:
- Rule 3:
- Data Type:
String - Value 1:
{{ $json.email }} - Operation:
Is Not Empty
- Data Type:
This setup ensures that an item must satisfy all three conditions to pass through the filter. Any item failing even one of these checks will be discarded.
Conclusion
You've now mastered the three fundamental logic nodes in n8n. While If and Switch nodes direct traffic, the Filter node is your essential tool for ensuring data quality and workflow efficiency by removing unwanted items from the flow entirely.
Key Takeaways:
- The Filter node removes items from a workflow based on conditions, it does not route them.
- The primary benefits of filtering are improved efficiency, reduced cost, and higher data quality.
- Filter early! Place your Filter node immediately after fetching data to maximize its impact.
- For complex criteria, use a multi-stage filtering pattern with several simple Filter nodes in sequence for better readability and maintenance.
- Always ensure your data types (String, Number, Boolean) are set correctly within the Filter node to avoid unexpected behavior.
So far, we've mostly used simple expressions like {{ $json.fieldName }} to access data. But what if you need to transform that data before you can filter it? For instance, what if you need to check if a project name starts with "Internal-" or if a due date falls on a weekend?
In our next lesson, we will dive deeper into the Expression Editor and learn how to write basic JavaScript to manipulate strings, numbers, and dates. This will unlock a much greater level of dynamic control and allow you to prepare your data for more sophisticated logic and filtering.