
Hello! Welcome back to your course on penetration testing and bug bounty hunting.
In our last lesson, you learned to perform service and version enumeration with Nmap. By using flags like -sV and -A, you can now identify the specific software and version running on an open port, turning a simple port scan into a treasure map of potential targets.
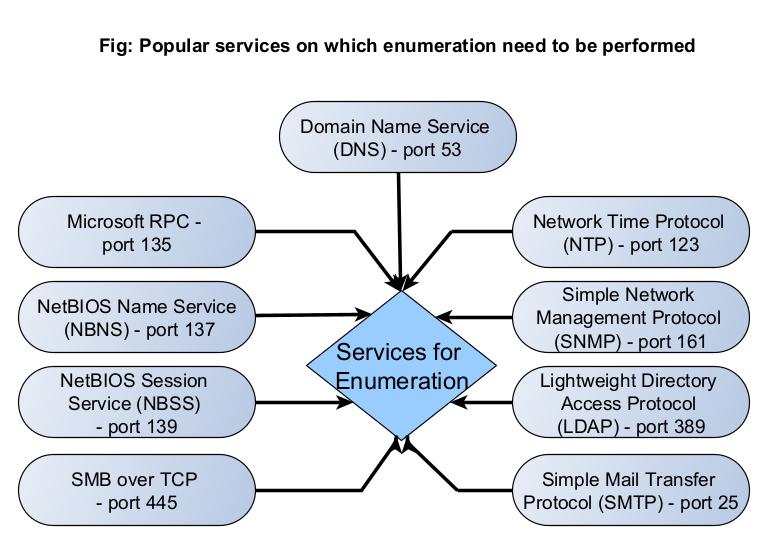
Today, we'll follow that map. This lesson directly addresses the learning outcome: Enumerate common network services like SMB, FTP, and DNS to gather detailed configuration and user information. We will move beyond just identifying a service and learn to interact with it using specialized tools to extract valuable intelligence like file listings, user accounts, and network architecture details. This is the crucial step where you gather the specific information needed to formulate an attack.
Let's begin by looking at some of the most common services you'll encounter.
1. FTP Enumeration: The Anonymous Check
File Transfer Protocol (FTP), typically on port 21, is one of the oldest services you'll find. While its use has declined, it's still present in many environments. The number one goal when enumerating FTP is to check for anonymous login. This misconfiguration allows any user to log in without a password, potentially exposing sensitive files.
You can test this manually with the built-in ftp client on Kali Linux. When prompted for a name, use anonymous or ftp. For the password, simply press Enter.
# ftp <target_ip>
Connected to <target_ip>.
220 (vsFTPd 2.3.4)
Name (10.10.10.3:user): anonymous
331 Please specify the password.
Password:
230 Login successful.
ftp> ls
If login is successful, you have an interactive shell. You can use commands like ls to list files, cd to change directories, and get to download files. You should look for configuration files, scripts, user lists, or any data that seems out of place or sensitive.
Automating with Nmap Scripts
Manually checking is good for understanding the process, but you can automate it with the Nmap Scripting Engine (NSE). The ftp-anon script does exactly what we just did manually.
nmap -p 21 --script ftp-anon <target_ip>
If anonymous login is permitted, the output will clearly state it:
PORT   STATE SERVICE
21/tcp open  ftp
| ftp-anon: Anonymous FTP login allowed (FTP code 230)
|_Can't get directory listing: TIMEOUT
An allowed anonymous login is a significant finding and often your first foothold.
2. SMB Enumeration: Peeking into Windows Networks
Server Message Block (SMB) is a protocol used primarily in Windows networks for file sharing, printer sharing, and inter-process communication. It typically runs on port 445. Properly configured, it's secure. Misconfigured, it's a goldmine of information.
Our goals with SMB enumeration are to:
- List available file shares.
- Determine our permissions on those shares (e.g., can we read or write files?).
- Enumerate users and groups on the system.
The following video provides a great practical introduction to the core tools used for this.
SMB Enumeration - What You Need To Know For OSCP
This video from Elevate Cyber demonstrates the core workflow for SMB enumeration. It's practical and tool-focused, covering the essential first steps you'll take when you find an open SMB port.
Watch from 02:12 to 06:59. This segment covers three key tools: smbclient to list shares, smbmap to check permissions, and crackmapexec (now more commonly called netexec) to get OS info and enumerate shares.
Key Tools for SMB Enumeration
Based on the video, here are the essential commands to start with:
- List Shares: Use
smbclientto see what shares are broadcast by the server. The-Nflag attempts a "null session" (anonymous-like access).smbclient -L //<target_ip> -N - Check Permissions:
smbmapis excellent for quickly seeing your access level to each share.READaccess is good;WRITEaccess is even better.smbmap -H <target_ip> - Connect to a Share: Once you find a share you can access (e.g.,
PublicwithREADaccess), you can connect to it withsmbclientand browse it like a filesystem.
Inside the client, usesmbclient //<target_ip>/Public -Nls,cd,get <filename>, andput <filename>.
Advanced User Enumeration: RID Cycling
Beyond file shares, SMB can be used to discover valid usernames and groups on a Windows host through a technique called RID Cycling. This technique exploits the fact that every user and group has a unique Security Identifier (SID), and the last part of the SID, the Relative ID (RID), is often sequential. By guessing RIDs (e.g., 1000, 1001, 1002), we can resolve them back to usernames.
This is a more advanced technique that demonstrates how deep enumeration can go. The following cheatsheet provides an excellent overview.
The video showed the basics. This 'SMB Enumeration Cheatsheet' from the blog 0xdf is an excellent, in-depth resource that covers more advanced techniques. You will likely use this as a reference throughout your career.
First, review the 'Checklist' to get a high-level overview of the process. Then, read the sections on 'Enumerate Host' and 'List Shares'. Finally, read the 'Background' part of the 'User / Object Enumeration' section on 'RID Cycling'. Don't worry about memorizing every command; focus on understanding what RID cycling is and why it's a powerful technique for user enumeration.
Tools like netexec (the successor to crackmapexec) and Impacket's lookupsid.py can automate RID cycling to quickly dump a list of all users on a system, which is invaluable for later attacks like password spraying.
3. DNS Enumeration: Mapping the Kingdom
The Domain Name System (DNS), on port 53, translates domain names to IP addresses. While your theoretical networking knowledge covers its legitimate use, for a pentester, DNS is a map to an organization's digital infrastructure. Effective DNS enumeration can reveal subdomains, internal servers, mail servers, and other network information that isn't publicly advertised.
The most sought-after prize in DNS enumeration is a successful Zone Transfer (AXFR). This is a mechanism for replicating DNS records between servers. If a DNS server is misconfigured to allow zone transfers to anyone, it will hand over its entire database of records for a domain.
This video from HackerSploit provides a clear walkthrough of the concepts and tools.
DNS Enumeration And Zone Transfers
HackerSploit provides a clear walkthrough of DNS enumeration, explaining the 'why' before showing the 'how'. This video covers fundamental tools and the powerful technique of a DNS zone transfer.
Watch from the beginning to 11:32. This will cover: the concept of DNS enumeration and zone transfers; using host and dig for manual lookups; performing a zone transfer with dig; and using the automated tool dnsenum.
Core DNS Enumeration Techniques
As you saw in the video, the workflow typically involves:
- Finding Name Servers (NS): Identify the authoritative DNS servers for a domain.
host -t ns <domain.com> - Attempting a Zone Transfer: Use
digto request an AXFR from each name server.
dig axfr @<nameserver_ip> <domain.com> - Automated Enumeration: If a zone transfer fails, use tools like
dnsenumordnsreconto brute-force subdomains using wordlists and query for various record types (A, MX, TXT, SRV).
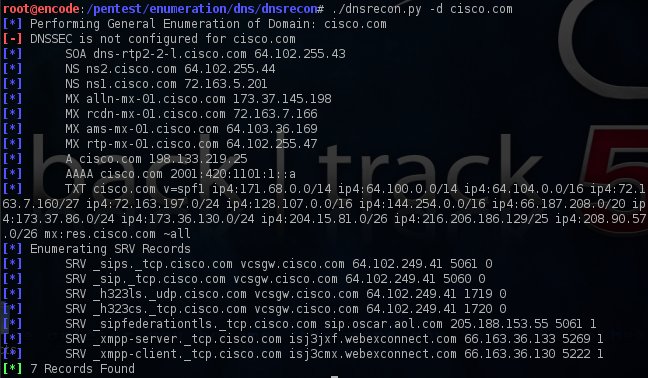
Here is an example of the rich output from a successful DNS enumeration using dnsrecon.
Test your understanding!
You've identified an open SMB port (445) on a server. You run smbclient -L //<target_ip> -N and discover a share named backups that you can access. What is your immediate next step, and what command would you use?
Show answer
Your immediate next step is to connect to the backups share and explore its contents for sensitive information.
You would use the command: smbclient //<target_ip>/backups -N
Once connected, you would use ls to list files and get to download anything that looks interesting (e.g., .config, .bak, .sql, password files).
For a quick reference of commands for various DNS enumeration techniques, the guide below is an excellent resource to bookmark.
The video gave a great overview. For a quick reference of commands and to see a wider range of DNS enumeration techniques, this guide from VeryLazyTech is very useful.
Skim through the 'Attack workflow' to see the variety of DNS attacks. Then, focus on the command examples under 'Penetration Testing Techniques for DNS'. Pay special attention to the commands for 'Zone Transfer', 'Subdomain Brute-Forcing', and 'Active Directory DNS Service Enumeration'.
Conclusion
In this lesson, you've learned to move past simple port scanning and engage directly with common network services to extract actionable intelligence. This is a fundamental skill that separates a beginner from a practitioner.
Key Takeaways:
- Enumeration goes beyond just finding a service; it's about interrogating it for configuration details, user information, and files.
- FTP: The primary goal is to check for anonymous login using
ftpornmap --script ftp-anon. A successful login is often an easy win. - SMB: A rich source of information on Windows networks. Use
smbclientandsmbmapto find and access file shares, and learn about advanced techniques like RID cycling to enumerate users. - DNS: Key to mapping an organization's attack surface. A successful Zone Transfer (AXFR) is a critical finding that can expose the entire domain infrastructure.
dig,dnsenum, anddnsreconare your go-to tools.
Next Lesson Preview:
So far, we have focused on active reconnaissance, where we directly interact with the target's systems. In the next lesson, we will switch gears to passive reconnaissance. You will learn how to extract metadata from public documents and analyze social media to gather intelligence on a target—all without sending a single packet to their servers.