
Welcome to the first lesson of your journey into penetration testing and bug bounty hunting! Your goal to become an expert requires a strong, practical foundation, and that foundation begins not with an attack, but with building a safe and controlled environment to learn and practice.
This lesson is dedicated to achieving your first learning outcome: setting up and configuring a virtual penetration testing lab environment using Kali Linux. We will build your personal training ground, a crucial asset for every security professional. By the end of this session, you will have a fully functional lab consisting of a hypervisor, your attacker machine (Kali Linux), and a vulnerable target machine to practice on. This lab will be the sandbox where you'll hone the skills covered in all subsequent lessons.
1. Understanding the Lab Architecture
Before we start building, let's clarify what we're creating. A virtual penetration testing lab consists of a few key components operating on your physical computer (the Host System).
- Hypervisor: Software like VirtualBox or VMware that creates and runs virtual machines (VMs). It's the foundation of your lab.
- Attacker VM: This will be your "offensive" machine, equipped with all the necessary tools for penetration testing. We will use Kali Linux, the industry standard.
- Target VM(s): These are intentionally vulnerable machines that you will legally and safely attack to practice your skills.
The most critical concept here is network isolation. Your VMs will communicate with each other on a private virtual network, separate from your main home network. This prevents your practice attacks from affecting other devices and, just as importantly, prevents the vulnerable target VMs from being exposed to the internet.
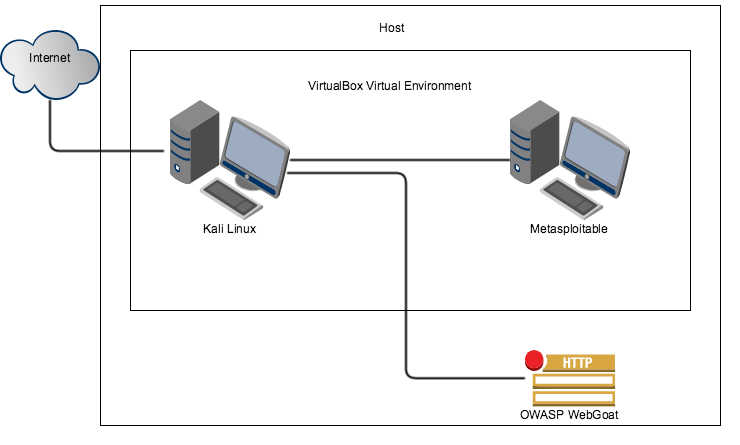
We will be using Oracle VirtualBox as our hypervisor. It's free, open-source, and runs on all major operating systems, making it an excellent choice for your first lab.
To get a concise overview of the components and hardware considerations, please read the first two sections of the following article.
Build a Pentesting Lab at Home (Free VirtualBox Guide)
This article from CyberDesserts, 'Build a Pentesting Lab at Home', provides a clear, high-level overview of the lab's architecture and the components we'll be using.
Please read the sections 'Understanding Lab Architecture' and 'Hardware Requirements'. This will clarify the roles of the host, attacker, and target machines and give you a sense of the system resources needed.
2. Building Your Lab: A Step-by-Step Guide
Now for the hands-on portion. We will follow a detailed video guide to download, install, and configure all the necessary components. The following video by Nielsen Networking provides a clear, step-by-step walkthrough. I will break it down into segments for you.
How to Build Your Own Virtual Lab to Practice Penetration Testing
This video, 'How to Build Your Own Virtual Lab', will be our primary guide. We will use it to set up VirtualBox, download our attacker and target VMs, and configure them correctly.
You will follow the video from the beginning up to the 13:36 mark. The steps below correspond to segments within this time frame.
Follow these steps, watching the corresponding sections of the video.
Step 1: Download the Necessary Software (Video 02:22 - 05:09)
First, you'll need to download all the components:
- VirtualBox: The hypervisor.
- Kali Linux (Virtual Machines image): Your attacker machine. The video correctly points out that you should download the pre-built "Virtual Machines" image, not the installer ISO. This saves significant time and effort.
- Metasploitable 2 & 3: Your vulnerable target machines. We will set up both, providing you with a wide array of vulnerabilities to practice on later.
- 7-Zip (or a similar tool): For extracting the downloaded files.
Step 2: Install VirtualBox and Create the Isolated Network (Video 05:09 - 07:21)
- Install VirtualBox using the downloaded installer. The default settings are fine.
- The most crucial part of this step is creating the NAT Network. This is what provides network isolation for your lab. The video walks you through creating a new NAT Network in VirtualBox's preferences. This single network will contain all your lab VMs, allowing them to talk to each other and the internet (for updates) but keeping them separate from your host machine's network.
Step 3: Import Your Virtual Machines (Video 07:21 - 12:17)
Once the files are downloaded and extracted, you need to add them to VirtualBox. The video shows a slightly different process for each VM, so pay close attention:
- Metasploitable 3 is imported as an "appliance."
- Kali Linux is "added" as an existing machine.
- Metasploitable 2 is created as a "new" machine, but you attach its existing virtual hard disk file (
.vmdk).
Following these distinct methods is good practice for handling different VM distribution formats you'll encounter.
Step 4: Configure VM Resources and Network Settings (Video 12:17 - 13:36)
Before booting, you need to perform two final configuration steps for each VM:
- Adjust RAM: The video provides sensible defaults. As a rule of thumb, give Kali Linux 2-4GB of RAM and the target machines 512MB-1GB. Ensure the total RAM allocated to running VMs stays well within your host machine's physical RAM capacity.
- Assign to NAT Network: For each VM (Kali, Metasploitable 2, and Metasploitable 3), go into its
Settings > Networkand change theAttached to:dropdown from the default to NAT Network. Make sure the name of the network you created in Step 2 is selected.
Once you have completed these steps, you will have a fully configured, but not yet running, penetration testing lab.
3. First Boot and System Hardening
With the lab configured, it's time to power on the machines and perform initial setup and verification.

Continue with the video guide.
How to Build Your Own Virtual Lab to Practice Penetration Testing
This segment of the video covers the first boot of your VMs, including essential initial setup tasks for Kali Linux.
Watch the section from 13:36 to 21:58. Focus on the procedures for logging in, changing passwords, and updating the system.
Key "First Boot" Actions:
- Boot All VMs: Start your Kali Linux and both Metasploitable machines.
- Log into Kali: The default credentials are
kalifor the username andkalifor the password. - Change Default Passwords: This is the first thing you should do. The video shows how to change the password for both the
kaliuser and therootuser using thepasswdandsudo passwd rootcommands. This is a critical security habit. - Update Your System: Kali Linux is a rolling-release distribution, so it's vital to keep it updated. Run the following commands in the Kali terminal to update the package list and upgrade all installed packages:
sudo apt update
sudo apt full-upgrade -y
Test your understanding!
What is the difference between sudo apt update and sudo apt full-upgrade? Why is it important to run them in that order?
Show answer
sudo apt updatedoesn't install any new software. It downloads the latest package lists from the repositories, essentially telling your system what new versions are available.sudo apt full-upgradeperforms the actual upgrade. It compares the versions of the packages currently installed with the lists downloaded byapt updateand installs the newer versions. It's called a "full" upgrade because it will also remove installed packages if that's required to resolve a dependency conflict when upgrading the system.- You must run
updatefirst so thatfull-upgradeknows what to upgrade to. Runningfull-upgradewithout first runningupdatewould do nothing, as the system would think it's already on the latest version.
4. Essential Lab Management: Snapshots and Ethics
Your lab is a dynamic environment. You will install tools, change configurations, and sometimes, you will break things. Snapshots are your safety net. A snapshot is a saved state of a VM at a specific point in time, which you can revert to instantly.
The video briefly mentions snapshots at 26:07. For a more detailed explanation of why they are crucial and how to use them effectively, please review the following sections.
Build a Pentesting Lab at Home (Free VirtualBox Guide)
We'll return to the 'Build a Pentesting Lab at Home' article to cover two crucial topics for managing your lab responsibly.
Read the sections 'Essential Lab Management' and 'Legal and Ethical Boundaries'. Pay close attention to the snapshot strategy and the rules for ethical practice.
Golden Rule of Snapshots: Always take a snapshot of your VMs in a clean, freshly-installed, and updated state. Before attempting any potentially destructive test, take another snapshot. This allows you to revert your machine in seconds instead of spending hours rebuilding it.
Test your understanding!
You are about to test a new exploit script against your Metasploitable 2 VM. The script might be unstable and could potentially corrupt the target system. What is the correct sequence of actions?
- Run the exploit. If it fails, restore the "Clean Install" snapshot.
- Take a new snapshot of the Metasploitable 2 VM named "Pre-Exploit-Test". Run the exploit. Restore to the "Pre-Exploit-Test" snapshot if needed.
- Re-install the Metasploitable 2 VM to ensure it's clean before the test.
Show answer
Option 2 is the best practice. Taking a snapshot immediately before the test allows you to quickly revert to the exact pre-test state without losing any other configuration changes you might have made since the initial "Clean Install" snapshot. It is the most efficient and safest workflow.
Conclusion
Congratulations! You have successfully built and configured your own personal penetration testing lab. This is a monumental first step and the most important prerequisite for developing practical, hands-on cybersecurity skills.
Key Takeaways:
- A pentesting lab consists of a hypervisor (VirtualBox), an attacker VM (Kali Linux), and target VMs (Metasploitable).
- Network isolation (using a NAT Network) is critical for creating a safe environment where you can practice without risk to your home network or the internet.
- Always perform initial system hardening on a new machine, starting with changing default credentials and fully updating the system.
- Snapshots are your most valuable tool for lab management, allowing you to experiment freely and revert to a known-good state instantly.
Now that your lab is ready, you have the environment to start learning the actual techniques of hacking. In our next lesson, we will begin our journey into the structured process of a professional engagement by exploring "The Phases of a Penetration Test". You will learn about the formal methodologies that separate a professional from an amateur, starting with the very first phase: Reconnaissance.