
Hello and welcome to the final lesson in our module on AI-Powered Video Marketing!
In the last few lessons, we've assembled the core components of a marketing video: you've scripted it, generated a voiceover, created a talking-head avatar, and even composed custom background music. You have all the raw materials. Now, it's time for the final polish that separates amateur content from professional-grade marketing assets: audio enhancement.
Today's learning outcome is to enhance audio recordings by removing background noise and improving clarity with Adobe Podcast AI.
Why is this so important? Poor audio quality is one of the fastest ways to lose a viewer's trust and attention. A clean, crisp voiceover conveys professionalism and authority, ensuring your message is heard loud and clear. For a founder aiming to rapidly produce high-quality content, mastering a tool that achieves this in one click is a massive strategic advantage.
1. The Power of One-Click Audio Enhancement
Traditionally, cleaning up audio—removing background hums, room echo, or microphone static—required specialized software like Adobe Audition or Audacity and a significant amount of technical skill. It was a time-consuming process of applying noise gates, EQs, and compressors.
This is where AI tools create a paradigm shift. Adobe Podcast AI, specifically its Enhance Speech feature, automates this entire process. It uses machine learning to distinguish the human voice from unwanted noise and intelligently processes the audio to make it sound as if it were recorded in a professional studio.
To understand what AI audio enhancement is and why it's a game-changer, let's start with a brief overview from Adobe.
How Enhance Speech can improve your recording sound ...
This article from Adobe, 'How Enhance Speech can improve your recording sound quality', explains the core concept of AI audio enhancement and the specific problems it solves for content creators.
Please read the introduction and the sections 'Why sound quality matters in podcasting' and 'What is an AI Audio Enhancement?'. This will set the stage for the tool we're about to explore.
The key takeaway is that this technology democratizes professional audio production, which is perfect for your goal of scaling content creation efficiently.
2. What Can Adobe 'Enhance Speech' Actually Do?
Adobe's tool is remarkably powerful and versatile. It's not just for removing a little background hiss. It can salvage audio from a wide range of challenging recording situations.
To see its capabilities in action, we'll watch a detailed review that tests the tool against several common audio problems.
Improve ANY audio - Adobe Enhance Speech v2 is INSANE!
The video 'Improve ANY audio - Adobe Enhance Speech v2 is INSANE!' from the Mike Russell channel provides an excellent series of before-and-after demonstrations.
Watch the following demonstrations to see how Enhance Speech handles different scenarios: General Noise (00:51 - 02:28): See how it cleans up a basic recording with ambient noise. Noisy Expo Floor (02:28 - 03:33): A great example of isolating a voice in a very loud environment. Zoom Call Audio (03:33 - 04:48): Shows how it can fix the compressed, low-quality audio common in online calls. Microphone Bleed (05:49 - 06:39): This is a common podcasting issue where one person's voice leaks into another's mic, causing an echo. See how the tool isolates the primary speaker. Distortion (06:39 - 07:34): This is one of the most difficult audio problems to fix, and the tool's ability to handle it is impressive.
As you can see, the tool is effective for almost any audio issue you'll encounter when creating marketing videos, from a product demo recorded on a laptop to a customer testimonial filmed on a smartphone in a café.
3. Your Tactical Workflow: From Raw Video to Polished Audio
Now, let's get to the practical, step-by-step process. Using Adobe Podcast AI involves three main stages: Extract, Enhance, and Replace.

Step 1: Extract Audio from Your Video
Adobe Podcast AI works with audio files (.mp3, .wav, etc.). If your voiceover is part of a video file, you must first extract it.
Enhance your video's audio using Adobe Podcast
The article 'Enhance your video's audio using Adobe Podcast' by Jim Babbage provides a clear, practical guide on this workflow. We'll focus on the extraction part first.
Read the section titled 'Extract the Audio'. It provides two methods: one for Mac using QuickTime and another using Adobe Media Encoder. The core idea is to separate the audio track from your video and save it as an MP3 or WAV file. If you don't have these specific tools, a quick web search for 'extract audio from video free' will yield many online converters that do the same job.
Step 2: Enhance the Audio File
This is the simplest part of the process. You'll upload your extracted audio file and let the AI do its work.
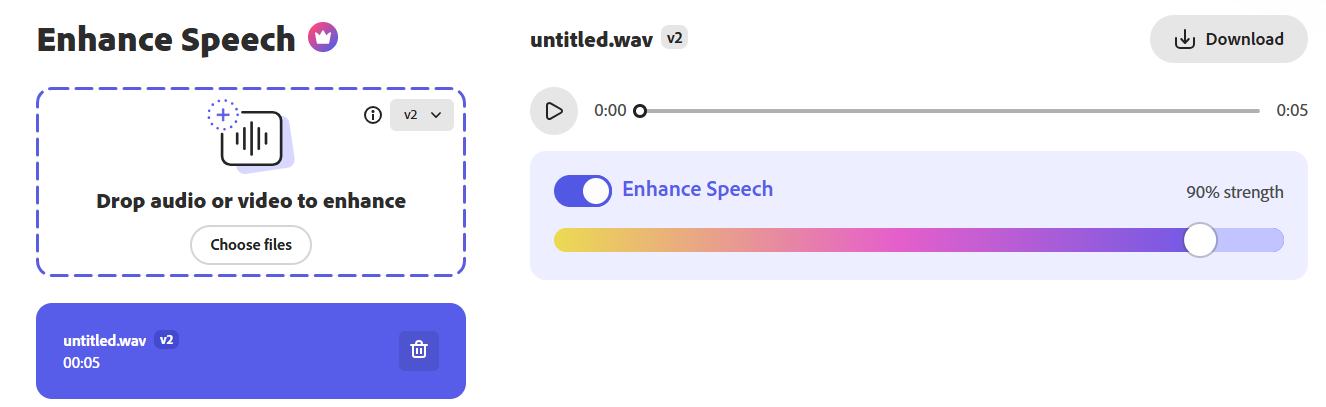
How Enhance Speech can improve your recording sound ...
Let's return to the Adobe article 'How Enhance Speech can improve your recording sound quality' for the exact steps within the tool itself.
Read the section 'Enhance Speech: An AI Audio Wiz Kid'. This walks you through navigating to the tool, uploading your file, and using the strength slider. This slider is a key feature; 100% can sometimes sound too clean or artificial. Experimenting with a setting between 70-95% often yields a more natural result.
Important Note on Limits: As shown in the first image and mentioned in other resources, the free version of Adobe Podcast AI has limitations (e.g., 30 minutes max duration per file, 1 hour total per day). For your goal of scaling 10 SaaS companies, you will likely hit these limits quickly. The paid plan is part of the Adobe Express subscription, which removes these constraints. For now, the free tier is more than enough to master the tool.
Step 3: Replace and Sync in Your Video Editor
Once you download the enhanced audio (usually a high-quality .wav file), the final step is to bring it back into your video editor (like CapCut, which you're familiar with) and sync it with your video.
The general process is as follows:
- Import the new, enhanced
.wavfile into your video project. - Drag it onto the timeline, placing it on a new audio track below your original video clip.
- Align the start of the new audio clip with the start of your video clip.
- Mute or delete the original, unedited audio track that is part of the video clip.
- Play the video to confirm the new audio is perfectly in sync with the speaker's lips and on-screen actions.
This process is visually detailed in the "Adding and syncing the new audio file to your footage" section of the Jim Babbage article (LINK), using Adobe Premiere Pro as an example. The principles are identical for CapCut or any other video editor.
Test your understanding!
You've just recorded a 5-minute product walkthrough video for your new SaaS on your MacBook. The audio was captured with the built-in microphone, and you can hear a faint air conditioner hum in the background.
Outline the precise, tactical steps you would take to clean up this audio using the workflow we've just discussed.
Show answer
- Extract: Open the video file in QuickTime Player. Go to
File > Export As > Audio Only. Save the resulting file (e.g.,walkthrough_original.m4a). If the format isn't supported, use a free online converter to change it to.mp3. - Enhance: Navigate to the Adobe Podcast 'Enhance Speech' website. Drag and drop the
walkthrough_original.mp3file into the uploader. - Adjust & Download: Once processed, listen to the 'before' and 'after'. Adjust the "strength" slider to about 85% to keep it sounding natural but clean. Click 'Download' to get the
walkthrough_original (Enhanced).wavfile. - Replace: Open your video project in CapCut. Import the new
.wavfile. Drag it onto the timeline. Select the original video clip, and in the audio settings, mute or set its volume to zero. Make sure the new audio track is perfectly aligned with the start of the video. - Export: Export your final video from CapCut with the newly polished audio.
Conclusion
Congratulations! You have now mastered the final step in the AI-powered video creation pipeline. By combining AI-generated scripts, voices, avatars, music, and now audio enhancement, you have a complete, scalable system for producing an unlimited stream of professional marketing videos.
Key Takeaways:
- Adobe Podcast AI is a powerful tool that uses machine learning to remove background noise, echo, and distortion from voice recordings with a single click.
- It saves an enormous amount of time compared to traditional, manual audio editing in a Digital Audio Workstation (DAW).
- The standard workflow is a three-step process: Extract the audio from your video, Enhance it using the web tool, and Replace the original audio in your video editor.
- The strength slider is a key control for balancing clarity with naturalness; 100% is not always the best setting.
Preview of the Next Module:
This lesson concludes our module on AI-Powered Video Marketing Strategy. You now know how to create the core content—the talking-head explainer or demo video.
Our next module, Module 7: Video Production & Repurposing, will build directly on this foundation. In the first lesson, we will learn how to "Generate or source relevant B-roll footage using Runway ML, Pexels, or other stock libraries." B-roll is the supplementary footage you cut to while your main speaker is talking, which makes your videos dramatically more dynamic and engaging. It's the key to taking your AI-generated videos to the next level of visual polish.