
Hello! Welcome to the final lesson in our module on API & Web Application Security.
In our previous lesson, we explored Cross-Origin Resource Sharing (CORS), which controls which external domains can access your API from a browser. We learned that while CORS is a browser security feature, it doesn't protect your API from being called directly.
Today, we'll implement a crucial server-side protection mechanism: API Rate Limiting. This lesson addresses how to control how often your API endpoints can be accessed. By applying rate limiting (also known as throttling), you can prevent abuse from malicious actors, protect your server resources from being overwhelmed, and ensure fair usage for all your clients.
1. The "Why": Preventing Abuse and Ensuring Stability
Imagine an API endpoint that performs a resource-intensive task, like generating a report or querying a large dataset. Without any limits, a single user or a malicious script could bombard this endpoint with thousands of requests per second. This could slow down your application for everyone, increase your server costs, or even cause a complete outage. This is a form of Denial of Service (DoS) attack.
To understand the importance of throttling, let's start with a short video.
Ep34 - How do Throttle and Rate limiting Protect You | Laravel API Server
This video from Acadea.io explains what throttling means in the context of web development and why it's a critical defense against Denial of Service (DoS) attacks.
Watch the first 56 seconds of this clip. The key takeaway is understanding that rate limiting is your first line of defense against malicious users trying to overwhelm your application with excessive requests.
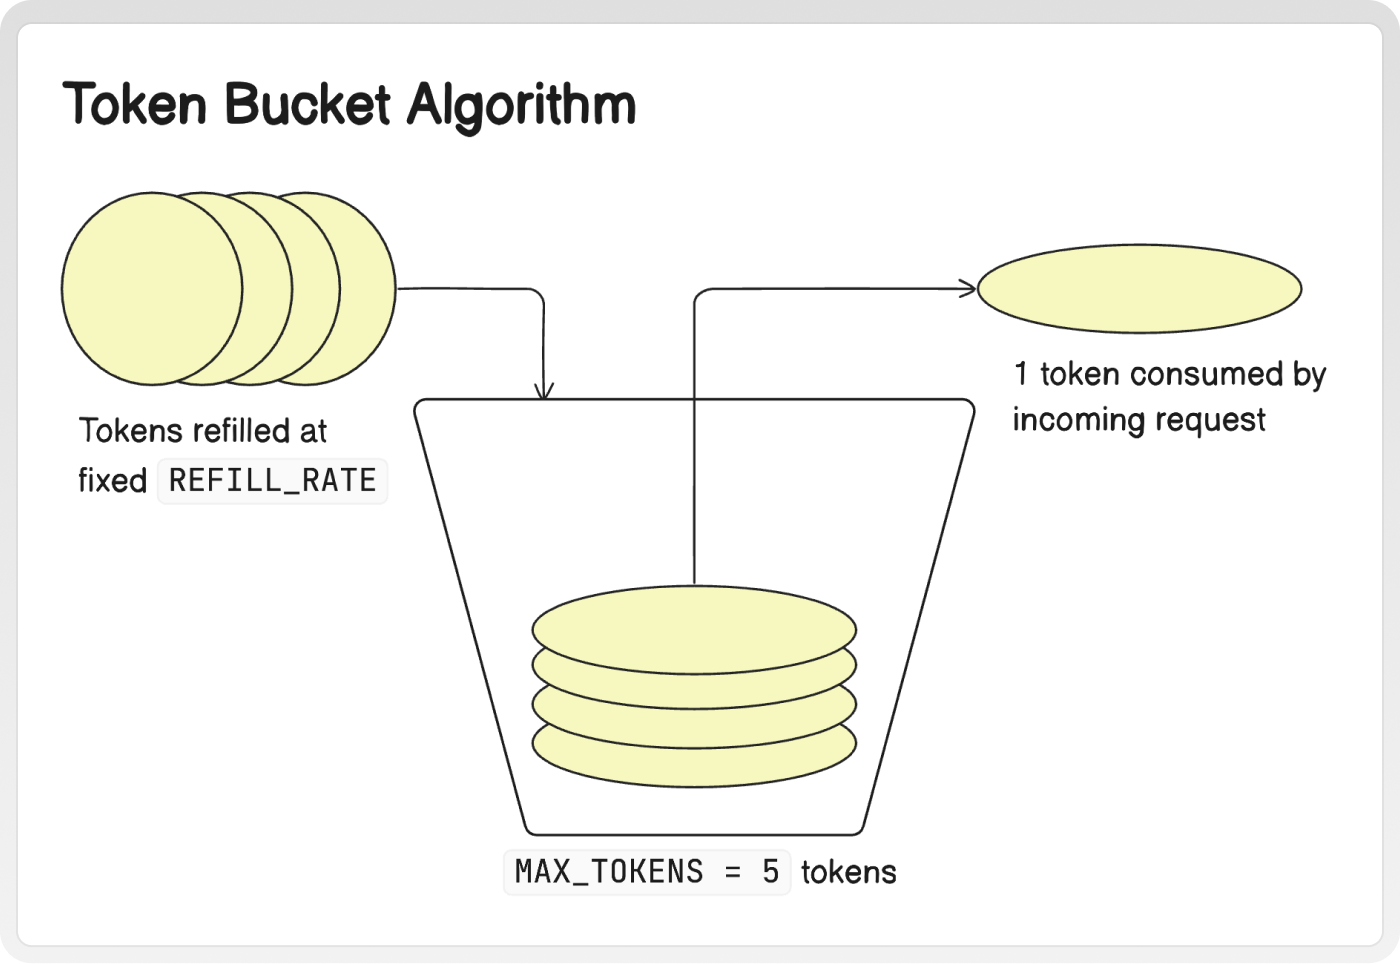
Laravel implements rate limiting using a concept similar to the Token Bucket algorithm. Imagine each potential client (identified by their IP address or user ID) has a bucket with a fixed capacity (e.g., 60 tokens). Each time they make a request, they use one token. The bucket is refilled at a constant rate (e.g., one token per second). If the bucket is empty, the user must wait for a token to be added before they can make another request. Any requests made while the bucket is empty are rejected with a 429 Too Many Requests status code.
2. Basic Implementation with the throttle Middleware
Laravel makes it incredibly easy to apply rate limiting using the built-in throttle middleware. You can apply it in a couple of primary ways.
Applying Limits Directly to a Route
The most direct way to throttle a specific route or route group is by chaining the middleware method and passing the limits as parameters. The syntax is throttle:max_attempts,decay_minutes.
max_attempts: The number of requests allowed.decay_minutes: The time window in minutes.
For example, middleware('throttle:10,1') allows 10 requests per minute.
use Illuminate\Support\Facades\Route;

// This route can only be accessed 5 times per minute from the same IP.
Route::post('/reviews', function () {
    // Logic to store a review
})->middleware('throttle:5,1');
You can find a clear example of this in the "Route-Specific Rate Limiting" section of the Cloudways article you can refer to if you wish.
Global API Throttling
For APIs, it's common to apply a default rate limit to all endpoints. Laravel's default api middleware group is the perfect place for this. Open your app/Http/Kernel.php file. You'll find the api middleware group definition inside the $middlewareGroups property.
By default, it's often set to throttle:api. This api is a reference to a named rate limiter defined elsewhere (which we'll cover next). However, you can also set a simple limit directly here:
// app/Http/Kernel.php

protected $middlewareGroups = [
    // ...
    'api' => [
        'throttle:60,1', // Allows 60 requests per minute for all API routes
        \Illuminate\Routing\Middleware\SubstituteBindings::class,
    ],
];
This single line now protects your entire API with a baseline limit.
To see what happens when a user exceeds this limit, let's watch a quick demonstration using Postman.
Ep34 - How do Throttle and Rate limiting Protect You | Laravel API Server
This clip shows the practical effect of hitting a rate limit. Notice the 429 Too Many Requests status code and the error message.
Watch from 04:21 to 04:56. This visualizes the outcome of the code we've just discussed.
3. Granular Control with Named Rate Limiters
While simple limits are useful, you'll often need more sophisticated logic. For example:
- Giving authenticated users a higher limit than anonymous guests.
- Applying stricter limits to sensitive endpoints like login or registration.
- Offering different limits based on a user's subscription tier (e.g., "free" vs. "premium").
This is where Named Rate Limiters come in. You define these limiters in a service provider, typically app/Providers/RouteServiceProvider.php, and then reference them by name in your middleware.
Let's watch a video from the official Laravel channel that demonstrates this powerful feature.
Exploring Laravel Rate Limiters: Control Traffic & Secure Actions ⛔
This video provides a clear, step-by-step guide on creating a named rate limiter, applying it to a route, and defining dynamic logic based on the user's authentication state.
Watch from the beginning to 03:53. This is a core part of the lesson. Pay close attention to: Using RateLimiter::for() to define a limiter with a name (e.g., 'weather'). Returning a Limit::perMinute() instance from the closure. Using the by() method to segment the rate limit based on the authenticated user's ID or, as a fallback, the request's IP address. This is a best practice. Applying the limiter by its name in the middleware: ->middleware('throttle:weather'). How you can return different Limit instances based on conditions, like whether a user is logged in.
Let's break down the key code snippet shown in the video. This would go inside the boot method of your RouteServiceProvider:
use Illuminate\Cache\RateLimiting\Limit;
use Illuminate\Http\Request;
use Illuminate\Support\Facades\RateLimiter;

// ... inside boot() method

RateLimiter::for('api', function (Request $request) {
    // If the user is authenticated, allow 100 requests per minute.
    // Otherwise (for guests), allow 20 requests per minute.
    return $request->user()
                ? Limit::perMinute(100)->by($request->user()->id)
                : Limit::perMinute(20)->by($request->ip());
});
Here, we define a rate limiter named api.
- The logic checks if a user is authenticated (
$request->user()). - If they are, the limit is set to 100 per minute, and crucially, it's keyed
by()their unique user ID. This means each logged-in user gets their own separate bucket of 100 requests. - If they are a guest, the limit is 20 per minute, keyed
by()their IP address. This means all users from the same IP share a bucket of 20 requests.
You would then apply this to your API routes, either globally in Kernel.php ('throttle:api') or on a specific route group.
Stacking Multiple Limits
You can even apply multiple limits to a single endpoint. This is useful for creating both short-term burst protection and a longer-term quota.
// In a Service Provider
RateLimiter::for('uploads', function (Request $request) {
    return [
        Limit::perMinute(10)->by($request->user()->id), // Max 10 uploads per minute
        Limit::perDay(100)->by($request->user()->id),  // Max 100 uploads per day
    ];
});

// In routes/api.php
Route::post('/upload-file', 'FileUploadController@store')
     ->middleware(['auth:sanctum', 'throttle:uploads']);
In this case, a user will be blocked if they exceed either 10 requests in a minute or 100 requests in a day.
4. Advanced: Programmatic and Production Considerations
Manual Rate Limiting
Sometimes, you need to control access to a piece of logic that isn't a full route, like a costly operation inside a controller method. The RateLimiter facade allows you to do this manually.
Exploring Laravel Rate Limiters: Control Traffic & Secure Actions ⛔
The same Laravel video also demonstrates how to use the RateLimiter facade directly within your code for more granular control over specific actions.
Watch from 03:53 to 06:20. Focus on the use of RateLimiter::tooManyAttempts(), RateLimiter::hit(), and how this pattern gives you fine-grained control inside your application logic, separate from route middleware.
The pattern looks like this:
use Illuminate\Support\Facades\RateLimiter;

public function createTranscript(Request $request)
{
    $key = 'create-transcript:'.$request->user()->id;
    $maxAttempts = 5;

    // 1. Check if the user has already exceeded the limit.
    if (RateLimiter::tooManyAttempts($key, $maxAttempts)) {
        $seconds = RateLimiter::availableIn($key);
        return response('You have made too many attempts. Please try again in '.$seconds.' seconds.', 429);
    }

    // 2. If not, perform the action.
    $this->generateExpensiveTranscript();

    // 3. Manually "hit" the limiter to increment the attempt count.
    RateLimiter::hit($key);

    return response('Transcript created!', 200);
}
Rate Limiting in Scaled Applications (Using Redis)
By default, Laravel's rate limiter uses your application's cache driver. If you're using the file cache driver on a single server, this works fine. However, if your application is deployed across multiple servers behind a load balancer, this approach breaks. Each server will have its own separate file cache and maintain its own separate count, meaning a user could actually make 60 * number_of_servers requests instead of just 60.
The solution is to use a centralized cache store that all your servers can access, like Redis.

Configuring this involves two steps:
- Setting your
CACHE_DRIVERtoredisin your.envfile. - Ensuring your Redis connection details are correctly configured in
config/database.php.
This ensures that no matter which server handles the request, it checks and updates the same central counter in Redis.
Conclusion
You have now mastered a fundamental aspect of API security and stability. By effectively applying rate limiting, you can protect your application from being overwhelmed and ensure a reliable service for your legitimate users.
Key Takeaways:
- Purpose: Rate limiting prevents abuse (like DoS attacks) and ensures fair resource allocation by limiting request frequency.
- Basic Method: Use the
throttle:max_attempts,decay_minutesmiddleware directly on routes or in theapimiddleware group for simple, static limits. - Advanced Method: Define Named Rate Limiters using
RateLimiter::for()in a service provider for dynamic and complex logic (e.g., based on user roles or authentication status). - Best Practice: When limiting, key by the authenticated user's ID (
->by($user->id)) and fall back to the request's IP address (->by($request->ip())) for guests. - Scalability: For multi-server production environments, use a centralized cache like Redis to ensure rate limits are enforced consistently.
Up Next:
This lesson concludes our module on API & Web Application Security. We've secured the perimeter by controlling who can call our API from where (CORS) and how often (Rate Limiting).
In the very next module, we'll move inside the application to focus on Authentication & Authorization. We'll start by implementing secure login systems for both traditional web applications and stateless APIs, using powerful Laravel tools like Breeze and Sanctum.