
Hello! Welcome back to your n8n learning journey.
In our last lesson, we focused on the critical task of securely managing credentials. You learned how to use n8n's encrypted store for API keys, bearer tokens, and even complex OAuth2 flows. This practice is the foundation for building any professional and secure automation.
Today, we'll put those credentials to work. This lesson directly addresses the learning outcome: Connect to services using pre-built integration nodes. We'll explore how these nodes act as powerful, high-level abstractions, much like using a library or SDK in software development, allowing you to interact with hundreds of popular services without writing boilerplate API code.
1. The Workhorses of n8n: Integration Nodes
In n8n, most of your workflow's power will come from its extensive library of pre-built integrations. These are specialized nodes that handle the specifics of communicating with a particular application's API. They fall into two main categories:
- Trigger Nodes: These start a workflow based on an event in an external service (e.g., "On New Email" in Gmail, "On New Row" in Google Sheets).
- Action Nodes: These perform an action in an external service (e.g., "Send a Message" in Slack, "Create a Card" in Trello).
For a clear definition of these fundamental building blocks, the following article provides a concise overview.
The Complete Beginner's Guide to n8n: Your First Workflow
This article from Contabo, 'The Complete Beginner's Guide to n8n', clearly explains the role of Action nodes within a workflow.
Please read the section titled 'Decoding the Node-Based System: Triggers, Actions, and Logic'. Focus on understanding the purpose of 'Action Nodes' as the workhorses that interact with external services.
The key takeaway is that n8n has done the heavy lifting for you. Instead of you needing to read API documentation to figure out the correct endpoint, headers, and request body for creating a task in Asana, you simply use the Asana node, select the "Create Task" operation, and fill in the fields.
To get a sense of the vast number of services available, take a moment to explore the official n8n documentation.
n8n Integrations Documentation
The official n8n documentation is the definitive source for all available integrations. It's worth browsing to see what's possible out-of-the-box.
Follow the link and scroll through the lists under 'Actions' and 'Triggers'. You don't need to read the details for any specific node. The goal here is to see the breadth of integrations available. Look for services you already use, like GitHub, Google products, or popular project management tools.
2. A Practical Walkthrough: Connecting to Services
Let's see this in action. The process for using almost any pre-built integration node follows a consistent pattern:
- Add the Node: Search for the service you want to connect to.
- Select the Operation: Choose the specific action you want to perform (e.g., Get, Create, Update, Delete).
- Connect Credentials: Select the credential you created for that service (as we learned in the last lesson).
- Configure Parameters: Fill in the required fields for the chosen operation, often mapping data from previous nodes.
- Test: Execute the node to ensure it works as expected.
The following video provides a great demonstration of this entire flow, building a simple workflow to get weather data and send an email.
Master 80% of n8n in 36 Minutes
This video from Futurepedia, 'Master 80% of n8n in 36 Minutes', builds a practical weather notification workflow that showcases the use of two distinct integration nodes: OpenWeatherMap and Gmail.
Watch from 02:14 to 07:27. Pay close attention to the repeatable pattern used for both the OpenWeatherMap and Gmail nodes: Finding and Adding the Node (02:50, 05:46): Notice how the node is found by searching from the + button. Connecting Credentials (04:05, 06:12): See how the pre-saved credentials are selected. Choosing an Operation & Setting Parameters (03:56, 05:54): Observe the selection of 'Return Current Weather Data' and 'Send a Message', followed by configuring their respective settings. Mapping Data (06:40): A key skill is dragging and dropping data from a previous node's output into the current node's input fields.
This pattern is fundamental. Whether you're appending a row to Google Sheets, sending a message to Slack, or creating an issue in Jira, the steps are conceptually identical.
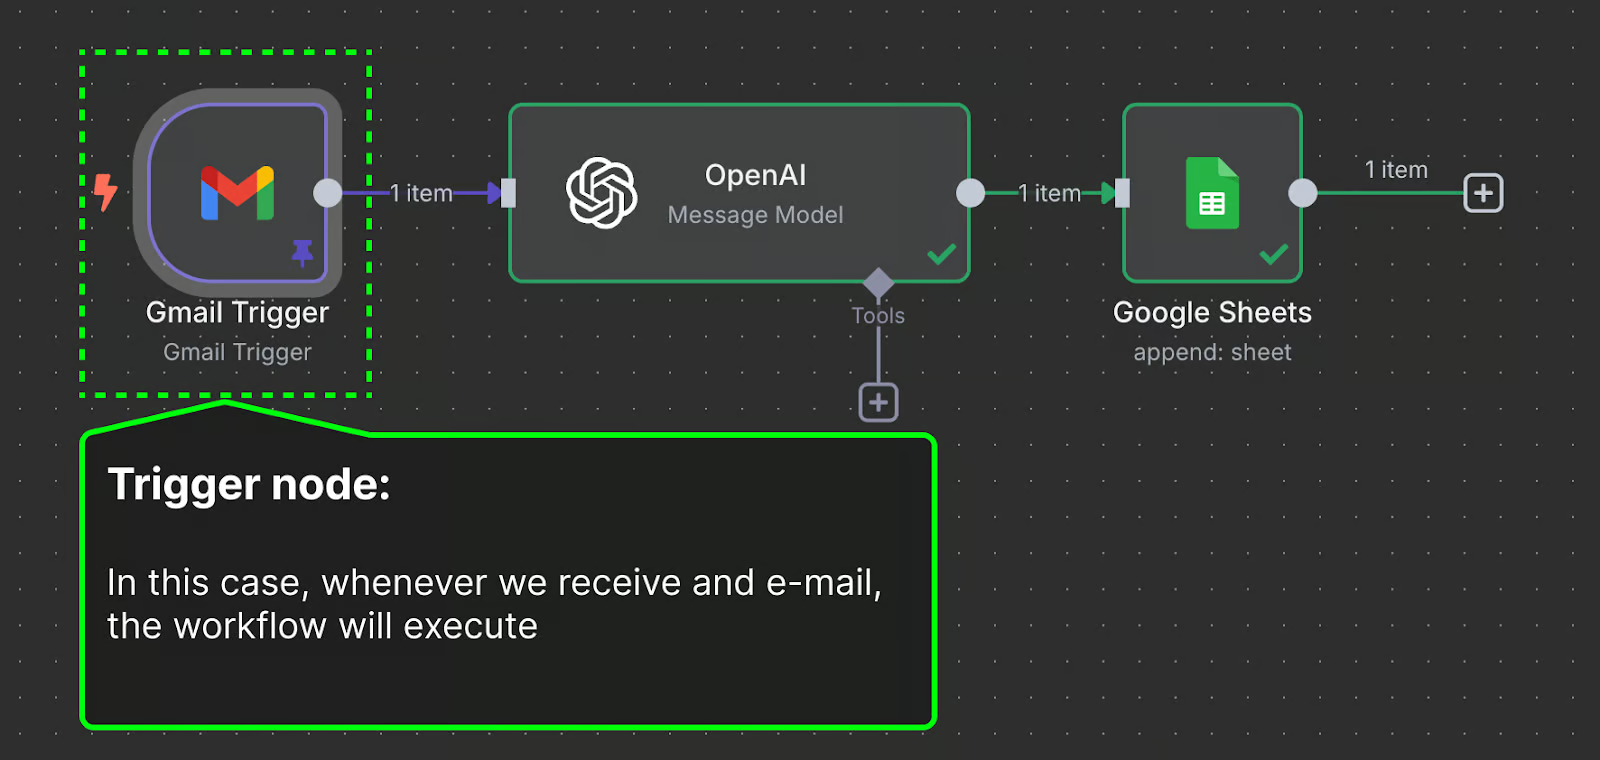
Test your understanding!
Based on the pattern you've just seen, imagine you have data from a form submission (like in the video) and you want to add it as a new row to a Google Sheet. What are the key steps you would take after adding the Google Sheets node to your workflow?
Show answer
- Select the Operation: Choose
Append Rowfrom the 'Operation' dropdown. - Connect Credentials: Select your Google account credential.
- Specify the Target: Provide the URL or ID of the Google Sheet you want to write to, and select the specific sheet name (e.g., 'Sheet1').
- Map the Columns: n8n will fetch the column headers from your sheet. You would then drag the corresponding data fields from the input panel on the left (e.g.,
email,name) into the appropriate column fields in the node's parameters. - Test the step to confirm the row is added correctly.
This exact process is shown in the "Master 80% of n8n" video around the 17-minute mark.
3. Combining Integrations for a Purpose
The true power of n8n emerges when you chain multiple integration nodes together to accomplish a goal. A single action is useful, but an automated, multi-step process is transformative.
Let's look at another common use case: sending a notification to a messaging app like Slack when a certain event happens.
n8n Quick Start Tutorial: Build Your First Workflow [2025]
The official n8n 'Quick Start Tutorial' includes a clear example of configuring a Slack node to send a notification.
Watch from 09:51 to 12:16. This segment focuses entirely on adding and configuring a Slack node to send a message. Note the familiar steps: choosing the node, selecting credentials, picking a channel, and composing a dynamic message using expressions.
By combining triggers and actions from different services, you can build incredibly useful workflows. For example:
- Trigger: GitHub - "On New Pull Request"
- Action: Slack - "Send a message to #dev-team channel"
- Action: Google Sheets - "Add a row to 'PR Tracking' sheet"
All of this can be accomplished without writing a single line of API connection code, thanks to n8n's pre-built integration nodes.
Conclusion
Today you've unlocked the core capability of n8n: connecting services together with ease. By leveraging the vast library of pre-built nodes, you can quickly build powerful automations that orchestrate tasks across your favorite tools and platforms.
Key Takeaways:
- Integration nodes are the primary building blocks for interacting with external services in n8n.
- They come in two forms: Triggers (which start workflows) and Actions (which perform tasks).
- The process for using an action node is standardized: Add Node -> Select Operation -> Connect Credential -> Configure Parameters -> Test.
- Mastering this pattern allows you to quickly automate a wide variety of services, from simple tools like OpenWeatherMap to complex platforms like Google Workspace and Slack.
You now have the skills to connect to hundreds of services "the easy way." But what happens when you need to connect to an internal company API, a niche service without a pre-built node, or an action that the existing node doesn't support?
In our next lesson, we will answer that question by learning how to make custom API calls using the HTTP Request node. This will give you the power to connect to virtually any service with a REST API, providing a universal tool to complement the convenience of pre-built nodes.