
Welcome back. In the previous lesson, you established a repeatable balance baseline using supported weight shifts and, where approved, a supported single-leg stance. Those tasks asked, “Can I control my body position safely under these fixed conditions?”
This lesson asks a related but different question: “Can I organise a simple movement in time with an external rhythm?” You will record a low-impact coordination baseline using seated alternating toe taps to a steady beat. If foot movement is not suitable on a particular day, there is a seated hand-tapping alternative. The point is not speed, athleticism, or getting a perfect score. It is to create a small, repeatable record of timing, sequencing, and movement quality that you can compare with your own later results.
Plan for about 30 minutes, including a 10–12 minute practical baseline.
What this baseline measures—and what it does not
Coordination is the ability to organise movement so that its timing, order, and force fit the goal. A simple alternating tap to a beat involves several processes at once:
- hearing and anticipating the next beat;
- selecting the correct side in the correct order;
- moving the foot with roughly the intended timing;
- sensing whether the movement happened as intended;
- noticing and correcting an error without rushing or tensing unnecessarily.
Researchers call matching a movement to an external beat sensorimotor synchronization. In a laboratory, this can be measured to the millisecond. At home, you do not need that level of precision. Your practical baseline will use two understandable indicators:
| Indicator | Home version |
|---|---|
| Timing accuracy | Did your tap generally land with the beat, or did it tend to be early, late, or variable? |
| Stability | Did you keep the same alternating pattern calmly through the whole trial, or did pauses, doubled taps, or rushed corrections appear? |
This is not a comprehensive test of “coordination” or proprioception. It is one controlled sample. Attention, hearing, fatigue, confidence, pain, and familiarity with the pattern can all affect the result. That is precisely why the conditions need to be recorded and kept stable.
The research procedure below is more elaborate than your home version, but it shows the useful principles: select a movement modality, use a predictable beat, allow a brief familiarisation, and record repeated trials rather than relying on an impression.
This research article describes how rhythmic tapping and stepping can be measured in younger and older adults. Read it for the underlying logic of using a consistent cue and a consistent movement—not to reproduce its laboratory procedure.
In “General procedure and experimental design,” read the study procedure. Notice the distinction between moving with an audible cue and continuing after it stops. Your home baseline will use only the audible-cue portion, which is simpler to record. Then read the opening paragraph of the next section, beginning the movement options. Focus on the practical point that seated finger and foot tapping are legitimate low-impact ways to examine rhythmic coordination.
Why we are not using a fast clinical coordination test
Some clinical lower-limb coordination tests use a seated person, two floor targets, and a timed count of accurate foot touches. The Lower Extremity Motor Coordination Test, for example, asks the person to move the big toe rapidly and accurately between targets for 20 seconds.
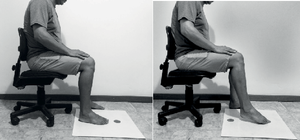
That type of task can be useful in the appropriate clinical setting, but it is not your default home baseline. It adds speed, a larger leg movement, and potentially more knee motion than is necessary for your present aim. The chair shown in the image also has wheels; for any home task, use a stable, non-rolling chair.
We will borrow three sound assessment ideas from such tests:
- Familiarise briefly before scoring.
- Count or describe accurate performance, not merely effort.
- Expect a learning effect: the first attempt can improve simply because the task becomes less unfamiliar.
Lower Extremity Motor Coordination Test (LEMOCOT)
This Physio-pedia overview explains a recognised seated lower-limb coordination test. Read it to see how clinicians separate the task setup, scoring, and familiarisation effects. Do not use its fast target-touching protocol unless a qualified clinician specifically prescribes it.
At the top of the page, read the basic test description. Identify the two elements being considered together: accurate contact and movement quality. Next, find the paragraph immediately before the heading “Obtaining the LEMOCOT Score” and read the scoring discussion. The useful principle for your baseline is that a consistent trial method matters more than pursuing a single impressive attempt. Finally, in the later discussion of validity and research findings, read the learning-effect passage. Keep this in mind when interpreting your first two trials.
Choose your baseline task
Your primary task is seated alternating toe taps to a steady beat. Choose the hand-tapping alternative only if toe lifting is not currently comfortable, permitted, or sensible within your rehabilitation plan.
Once you choose a version, keep it unchanged for future retests. A foot-tapping result and a hand-tapping result are both useful, but they are not directly comparable.
Default: seated alternating toe taps
Use this version only if repeated gentle ankle and foot movement is consistent with your physiotherapist’s instructions.
- Sit on a stable chair with both feet comfortably on the floor.
- Let the knees face forward in a comfortable position; do not force them to a particular angle.
- Keep both heels down and lift only the front of one foot a small amount.
- Lower the toes gently on each beat.
- Alternate right, left, right, left, beginning with the right foot.
- Keep the movement small. This is a timing task, not a range-of-motion or endurance drill.
Alternative: seated alternating thigh taps
Use this if the foot version is not approved or creates symptoms.
- Sit upright in the same stable chair.
- Rest both feet quietly on the floor.
- Tap the right hand lightly on the right thigh on the first beat, then the left hand on the left thigh on the next beat.
- Continue alternating right and left.
For either version, use one steady metronome or ticking source set at 60 beats per minute: one beat per second. The exact source does not matter as much as using the same tempo and source type whenever you retest.
Safety and setup rules
Treat this baseline as part of rehabilitation-compatible coordination practice, not as a challenge to push through.
Before beginning, set these conditions:
| Variable | Record your exact version |
|---|---|
| Chair and location | For example, “firm dining chair on kitchen floor.” |
| Task version | Alternating toe taps or alternating thigh taps. |
| Cue | Metronome or other steady beat at 60 beats per minute. |
| Starting side | Right side first. |
| Trial length | 20 beats, which is about 20 seconds at this tempo. |
| Footwear | Barefoot, trainers, slippers, or another consistent option. |
| Symptoms before starting | A brief factual note, such as “usual stiffness” or “tired after rehabilitation.” |
Keep the following boundaries:
- Use a non-rolling chair; do not perch at its edge.
- Keep the feet facing forward in the toe-tap version. Do not turn, pivot, or slide the foot across the floor.
- Do not make the taps larger or faster to “improve” the score.
- Stop for pain outside your agreed limits, giving-way sensations, increasing discomfort, dizziness, or a need to brace yourself.
- If your knee symptoms or rehabilitation instructions change, pause the task and clarify the appropriate version with your physiotherapist.
A brief pause to settle your position before a trial is fine. Altering your support, tempo, or movement version during a recorded trial means it should be noted as a changed condition.
The 10–12 minute baseline protocol
1. Settle and listen
Sit in your recorded position. Let the steady beat play for four beats without moving. This gives your nervous system a chance to predict the rhythm rather than react late to the first sound.
Take one calm breath. Notice whether you are gripping the chair, holding your breath, or tensing the shoulders. Those details are not failures; they are useful observations about how demanding the task currently feels.
2. Do one unscored familiarisation
Perform eight alternating taps:
- Right side on beat one.
- Left side on beat two.
- Continue alternating until eight beats are complete.
This is not a performance test. Its purpose is simply to establish the rule: one tap per beat, one side at a time, with a small controlled movement.
If you lose the pattern during familiarisation, stop, listen to four beats again, and restart the eight-beat practice once. Do not keep rehearsing repeatedly. A baseline should reflect a task you have understood, not the result of extensive same-session training.
3. Record Trial 1
After a short pause, listen to four lead-in beats. Then complete 20 beats, beginning with the right side.
During the trial, prioritise this order:
- Stay safe and seated steadily.
- Keep the right-left alternation.
- Aim to meet the beat without forcing speed.
- Keep the movement quiet and within the approved range.
If you miss a beat or tap the same side twice, continue with the next beat rather than trying to catch up with a rapid correction. A rushed correction obscures the very information you are trying to collect.
4. Rest briefly and record Trial 2
Rest for roughly 30–60 seconds, or longer if you need it. Record a second trial under the same conditions.
Two trials give you a more trustworthy starting picture than one. The first may be affected by unfamiliarity; the second may be smoother simply because the pattern is clearer. Record both rather than keeping only the better-looking result.
Do not add a third or fourth trial to chase a better outcome. This is a snapshot, not an audition.
Record the result: accuracy, stability, and quality
You do not need to judge whether every tap was exactly on the beat. Instead, make a factual, usable record immediately after each trial.
A phone recording from the side can be helpful if you are comfortable using one: it lets you review obvious missed beats or doubled taps later. It is optional. If you record yourself, position the device securely before starting; do not reach for it mid-trial.
Use a record like this:
| Item | Trial 1 | Trial 2 |
|---|---|---|
| Completed all 20 beats? | Yes / no | Yes / no |
| Alternation errors | Number of missed beats, doubled sides, or wrong-side taps | Number |
| Overall timing | Mostly with beat / often early / often late / variable | Same options |
| Movement quality | Quiet and controlled / occasional rushing or extra movement / needed to stop | Same options |
| Symptoms during or shortly after | Brief factual note | Brief factual note |
Then add one sentence about the pattern. For example:
- “I kept the right-left pattern, but became late during the final six beats.”
- “The rhythm was steady, though I lifted the toes higher than necessary.”
- “I made two doubled right-foot taps when I began to concentrate on timing.”
- “Hand tapping was calm and accurate; toe tapping was not included under today’s rehabilitation limits.”
This sentence matters because it turns a score into information you can use. A total of two errors caused by one brief distraction is different from two errors that appear whenever the left side must move.
How to interpret your first result
A useful baseline is not necessarily a difficult or imperfect one. If both trials are steady and error-free, that does not mean the task was pointless. It tells you that this particular seated, slow, externally cued pattern is currently under control. Later, you may progress coordination practice by changing one feature, but do not alter this baseline yet.
Equally, if the task feels surprisingly difficult, avoid interpreting that as proof that you “have no coordination.” It may reflect the specific demand of synchronising movement to a beat while remembering alternation. This is trainable motor organisation, and the record gives you a sensible place to start.
For now, compare only:
- Trial 1 with Trial 2 under the same conditions.
- Your own future retest with this exact protocol.
Do not compare your result with dancers, gymnasts, online instructors, or published clinical norms. Their tasks, histories, conditioning, and testing conditions differ from yours.
Keep this record with the balance baseline from the previous lesson. Together they provide a starting profile:
| Baseline | Main question |
|---|---|
| Supported weight shift and optional single-leg stance | Can I control position and loading safely with specified support? |
| Seated rhythmic tap | Can I organise a simple alternating movement in time with a predictable cue? |
Key takeaways and next step
- A rhythmic coordination baseline measures your ability to organise a simple movement in time, not your overall worth or athletic potential.
- Use one fixed task: preferably seated alternating toe taps at 60 beats per minute, or seated alternating thigh taps if foot movement is not suitable.
- Keep conditions stable: same chair, cue tempo, starting side, task length, and movement version.
- Complete one short familiarisation, then record two 20-beat trials without chasing a higher score.
- Record errors, broad timing pattern, movement quality, and symptoms—not only whether you completed the task.
- Familiarity can improve performance quickly, so later comparisons must use the same protocol.
Next, you will use your balance and coordination records to set realistic, measurable goals for everyday movement confidence and your eventual return to judo—without using elite movement as the benchmark.
Can't find a good explanation? Sign up and we'll make it for you
Sign up