
Welcome to the fifth lesson in our module on testing strategies. In our previous lesson, we established the "what" and "why" of Consumer-Driven Contract Testing (CDCT). We learned that it's a powerful technique to ensure microservices can evolve independently without breaking each other, providing fast and reliable feedback directly in the CI/CD pipeline.
Today, we transition from theory to practice. Your learning outcome is to write a consumer-driven contract for a REST API using Spring Cloud Contract. We will focus on the role of the provider (or producer) service—the service that exposes an API. You'll learn how to define a contract that specifies your API's behavior and how to automatically verify that your implementation adheres to it. This is a fundamental skill for building resilient microservices and a common topic in senior engineering interviews.
1. The Producer's Role in Contract Testing
As a quick refresher, the "consumer-driven" workflow places the responsibility of defining the contract on the consumer. However, the contract is physically stored and verified within the producer's codebase.
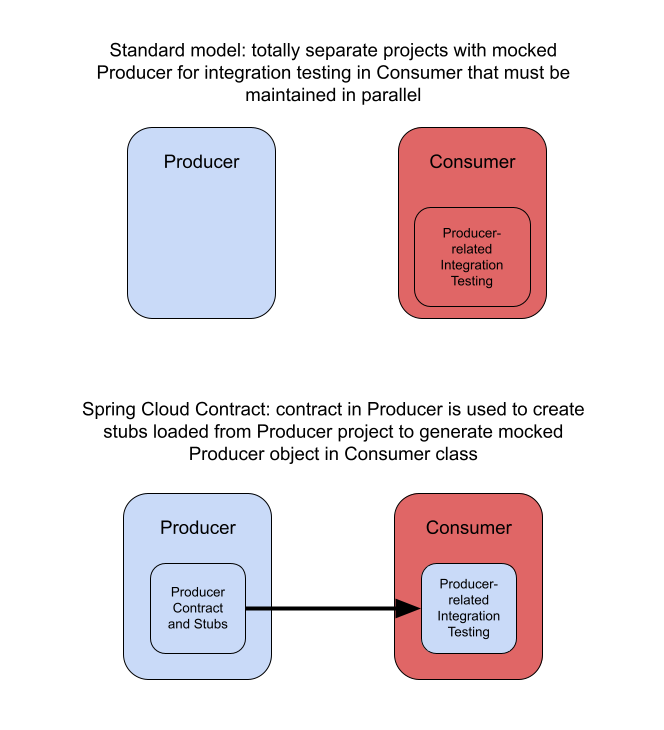
The producer's responsibilities are:
- To host the contract files (typically written by consumer teams or in collaboration with them).
- To run verification tests that prove the API implementation satisfies every contract.
- To publish "stubs" (mock versions of the API) based on the verified contracts, which consumers can then use.
If the producer's verification tests pass, they can deploy with high confidence that they haven't broken any known consumer expectations.
2. Setting Up the Producer Project
To get started on the producer side, you need to add the Spring Cloud Contract Verifier to your Spring Boot project. This involves two key modifications to your pom.xml (if you are using Maven).
-
Add the Verifier Dependency: This library provides the necessary classes for the contract verification logic.
<dependency> <groupId>org.springframework.cloud</groupId> <artifactId>spring-cloud-starter-contract-verifier</artifactId> <scope>test</scope> </dependency> -
Add the Maven Plugin: This plugin is the engine of Spring Cloud Contract. It automatically generates JUnit tests from your contract files during the build process.
<build>
    <plugins>
        <plugin>
            <groupId>org.springframework.cloud</groupId>
            <artifactId>spring-cloud-contract-maven-plugin</artifactId>
            <!-- Add version and configuration -->
            <extensions>true</extensions>
            <configuration>
                <!-- We'll define this base class in the next step -->
                <baseClassForTests>
                    com.example.producerservice.BaseContractTest
                </baseClassForTests>
            </configuration>
        </plugin>
    </plugins>
</build>
The
baseClassForTestsproperty is crucial. It tells the plugin which class the auto-generated tests should extend. This allows us to share setup logic, which we'll see shortly.
3. Writing Your First Contract
Contracts in Spring Cloud Contract are typically written using a Groovy-based Domain-Specific Language (DSL). This DSL provides a clear and readable way to define the expected request and response of an API interaction.
Contracts are placed in src/test/resources/contracts/.
Let's watch how to write a simple contract for an endpoint that returns a list of customers.
This video from the official SpringDeveloper channel demonstrates how to write a contract using the Groovy DSL. It clearly shows the structure and syntax for defining a request and its expected response.
Watch the segment from 23:41 to 26:51. Pay close attention to the structure: the Contract.make block, the request section (defining method and URL), and the response section (defining status, headers, and body).
As you saw, the structure is quite intuitive. Let's break down an example contract file, which we might name shouldReturnAllCustomers.groovy and place in src/test/resources/contracts/.
import org.springframework.cloud.contract.spec.Contract

Contract.make {
    description "Should return all customers"

    // 1. Define the request the consumer will make
    request {
        method 'GET'
        url '/customers'
    }

    // 2. Define the response the producer must return
    response {
        status 200 // HTTP 200 OK
        headers {
            contentType(applicationJson())
        }
        body([
            [
                id: 1L,
                name: "Jane"
            ],
            [
                id: 2L,
                name: "Bob"
            ]
        ])
    }
}
This contract specifies that a GET request to /customers must return an HTTP 200 status with a JSON array containing two specific customer objects.
For a more detailed textual reference on the Groovy DSL and the overall setup, the official Spring guide is an excellent resource.
Getting Started | Consumer Driven Contracts
Let's review the official Spring 'Getting Started' guide, which provides another example of a contract and the surrounding code.
Read the section 'Create the contract of the REST service'. It shows a similar Groovy contract for a /person/1 endpoint. Note how it defines the request and response body.
Test your understanding!
A consumer needs to fetch a single product by its ID. The requirement is:
- Request: A
GETrequest to/products/{id}whereidis a positive number. - Response: An HTTP
200 OKstatus with a JSON body containingproductId(the same ID from the URL),productName(a string), andstock(an integer greater than or equal to 0).
Write the Groovy contract for a successful retrieval of a product with ID 123.
Show answer
A possible contract file, named shouldReturnProductById.groovy, would look like this:
import org.springframework.cloud.contract.spec.Contract
import org.springframework.cloud.contract.verifier.util.ContractVerifierUtil

Contract.make {
    description "Should return a product by its ID"

    request {
        method 'GET'
        // Using a dynamic value for the ID
        urlPath '/products/123'
    }

    response {
        status 200
        headers {
            contentType(applicationJson())
        }
        body(
            productId: 123,
            productName: "Super Widget",
            stock: 100
        )
    }
}
Note: In more advanced contracts, you can use regular expressions and dynamic values from the request in the response to make contracts more flexible, but for now, hardcoded examples are perfectly fine.
4. Creating the Base Test Class
The contract defines what the API should do. Now we need to connect it to our actual Spring Boot application code. This is where the base test class comes in. The auto-generated tests will extend this class, inheriting its setup.
The purpose of the base class is to:
- Start a slice of the Spring application context needed for the test (e.g., just the web layer).
- Mock any dependencies that are not part of the component under test. For a REST controller, this usually means mocking the service or repository layer.
- Provide the mocked data that the controller will return, which should match what's defined in the contract's
responseblock.
The SpringDeveloper video continues by demonstrating how to create this essential base class. This is a critical piece of the puzzle that connects the abstract contract to your real code.
Watch the segment from 26:51 to 30:28. Observe how it uses @MockBean to mock the CustomerRepository and Mockito.when() to define the behavior of the mock, ensuring it returns the data expected by the contract.
Here's an example of what BaseContractTest.java would look like for our customer service scenario. This should feel familiar to how you write standard Spring Boot integration tests for your controllers.
import io.restassured.module.mockmvc.RestAssuredMockMvc;
import org.junit.jupiter.api.BeforeEach;
import org.mockito.Mockito;
import org.springframework.beans.factory.annotation.Autowired;
import org.springframework.boot.test.context.SpringBootTest;
import org.springframework.boot.test.mock.mockito.MockBean;

import java.util.Arrays;

// Tells Spring Boot how to load the application context for the test
@SpringBootTest(webEnvironment = SpringBootTest.WebEnvironment.MOCK)
public abstract class BaseContractTest {

    @Autowired
    private CustomerRestController customerRestController; // The controller we want to test

    @MockBean
    private CustomerRepository customerRepository; // The dependency we want to mock

    @BeforeEach
    public void setup() {
        // Mock the repository call to return the data defined in our contract
        Mockito.when(customerRepository.findAll())
               .thenReturn(Arrays.asList(
                   new Customer(1L, "Jane"),
                   new Customer(2L, "Bob")
               ));

        // Set up RestAssured to make mock MVC calls to our controller
        RestAssuredMockMvc.standaloneSetup(customerRestController);
    }
}
With this in place, the auto-generated test will call the /customers endpoint on customerRestController. The controller will then call customerRepository.findAll(), which—thanks to our mock—will return the exact list of customers we defined. The test then asserts that the HTTP response matches the response block of the contract.
5. Running the Verification and Seeing the Payoff
Now for the magic. You don't write the final test yourself. The plugin does it for you. Simply run your standard build command:
mvn clean install
During the build, the Spring Cloud Contract plugin will:
- Scan
src/test/resources/contracts/. - For each Groovy file, generate a JUnit 5 test class in
target/generated-test-sources/contracts/. - Compile and run these generated tests along with your other tests.
Let's see this in action and, more importantly, see what happens when a contract is broken. This demonstrates the immediate value of CDCT as a safety net.
Watch from 30:28 to 33:12. The presenter first runs a successful build. Then, he intentionally breaks the contract by changing the data in the mock. Notice how the build fails with a clear error message, pinpointing the mismatch between the expected and actual response.
This is the key benefit. If a developer on the producer team accidentally changes a field name, modifies a data type, or alters the response structure in a way that violates the contract, the build fails immediately. This automated check prevents breaking changes from ever being deployed, providing the safety and confidence needed for independent releases.
Conclusion
In this lesson, you've learned the practical steps to implement the producer side of a consumer-driven contract test with Spring Cloud Contract. This is a powerful pattern for building robust and maintainable microservice architectures.
Key Takeaways:
- Setup: You need the
spring-cloud-starter-contract-verifierdependency and thespring-cloud-contract-maven-plugin. - Contract Definition: Contracts are written in a Groovy DSL and placed in
src/test/resources/contracts/. They define therequesta consumer makes and theresponsethe producer must provide. - Base Test Class: An abstract base class is used to set up the Spring test context and mock dependencies (
@MockBean), ensuring the controller returns the data specified in the contract. - Verification: Running
mvn clean installautomatically generates and executes tests that verify your controller's implementation against the contract, failing the build if there's a mismatch.
Next Up
You have now successfully defined and verified a contract on the producer side. The next logical step is to see how this contract is used by the consumer. In the following lesson, we will implement a provider-side verification test based on a contract generated by Spring Cloud Contract, and then we will explore how a consumer can use the generated stubs to test its integration in complete isolation.
Can't find a good explanation? Sign up and we'll make it for you
Sign up