
Hello again. In the previous lesson, you used py --version in PowerShell to confirm that a Python 3 interpreter is available on your Windows computer. That interpreter is the program that actually executes Python code.
This lesson connects that installed Python to VS Code. You will install Microsoft’s official Python extension, then tell VS Code which installed interpreter it should use. Once this is done, VS Code will be ready to assist you as you write and run programs in the next lessons.
Three pieces that work together
It helps to keep these tools distinct:
| Piece | Its job | Already installed? |
|---|---|---|
| VS Code | The editor where you write and organize code | Yes |
| Python extension | Adds Python-aware features to VS Code, such as suggestions, error checking, running, and debugging support | Not necessarily |
| Python interpreter | Runs your .py programs | Yes, if py --version showed Python 3 |
The Python extension is not Python itself. Installing the extension does not install an interpreter; it allows VS Code to find and work with the interpreter you verified in PowerShell.
Read Microsoft’s short explanation of how the selected environment appears and is used in VS Code.
In the “Environments” section of Microsoft’s VS Code documentation, focus on where VS Code shows the active interpreter and why that choice matters when you run Python.
In the Environments section, read the paragraphs beginning “The current environment is shown on the right side of the VS Code Status Bar” and continuing through the explanation that VS Code lists detected environments. Pay particular attention to the status bar guidance, then note that the selected interpreter is also used when VS Code runs or debugs Python in its terminal.
For now, you will select your normal installed Python. Later in the course, you will make project-specific virtual environments; those are useful, but they are not needed for this initial setup.
Install the official Python extension
Open VS Code. On the far-left vertical bar is the Activity Bar. Select the icon that looks like four small squares: Extensions. You can also press Ctrl+Shift+X.
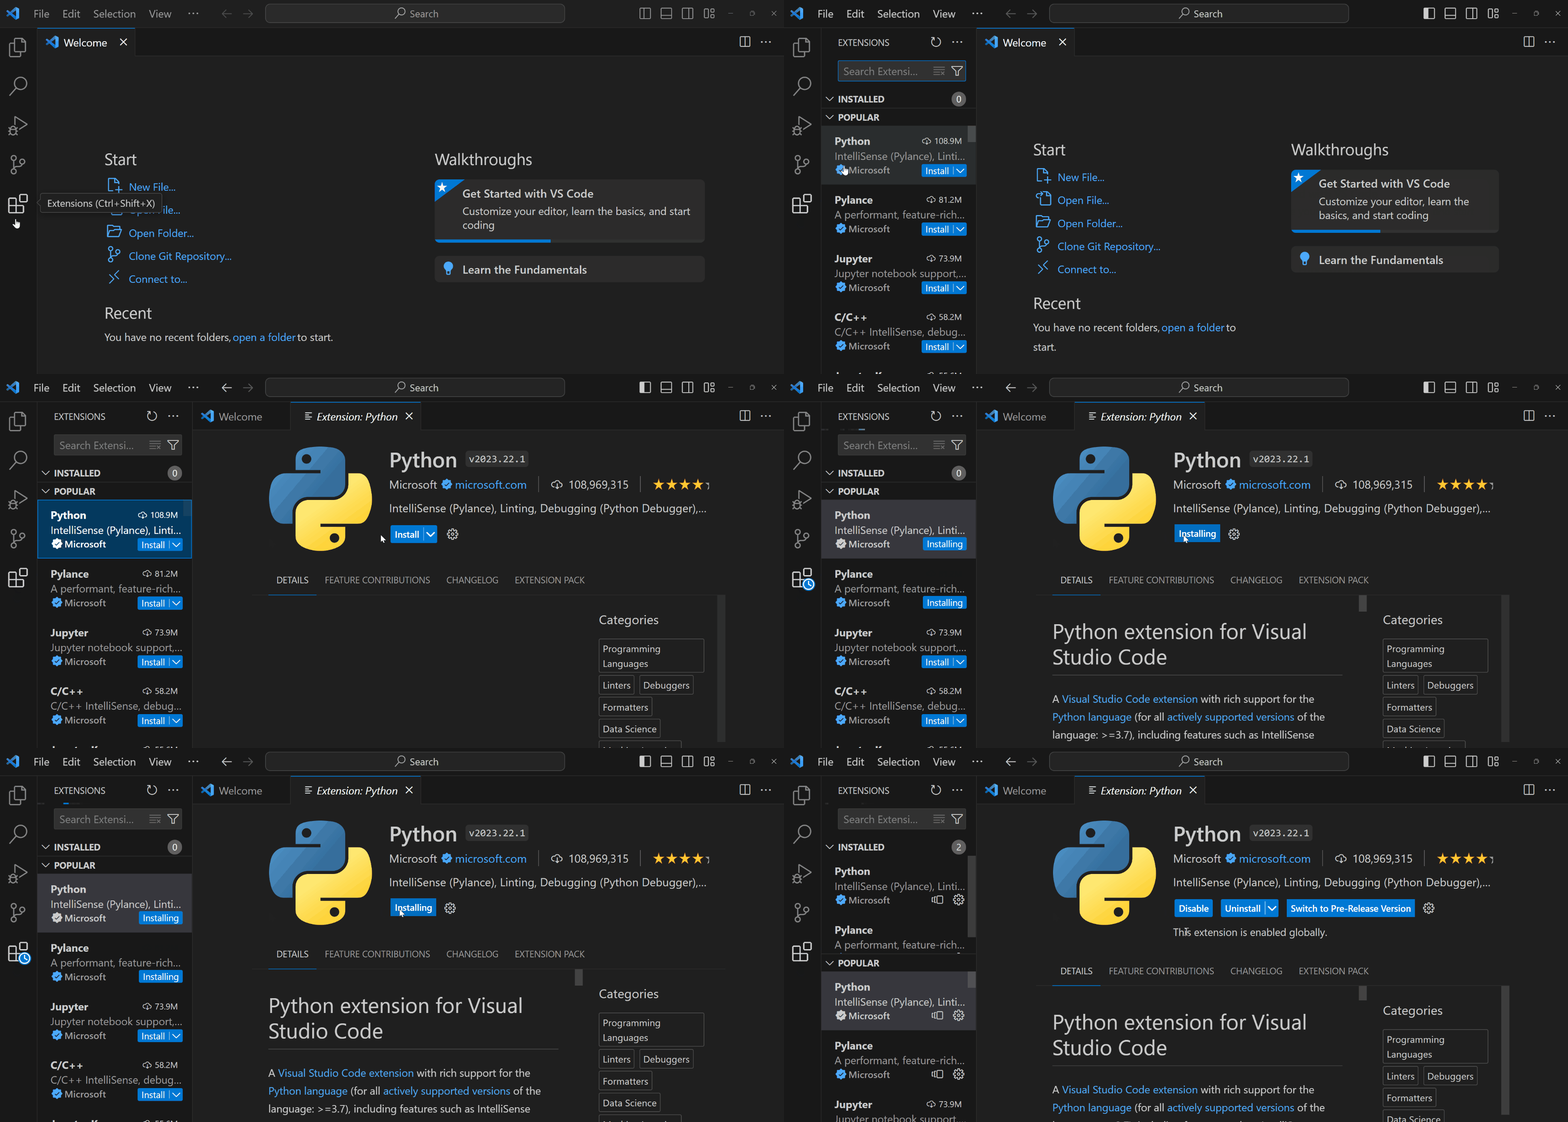
In the Extensions search box:
- Type Python.
- Find the extension named Python whose publisher is Microsoft.
- Select it.
- Click Install.
- Wait for the installation to finish.
Be careful not to install an extension merely because it has a similar name or a high download count. For this course, choose the one explicitly published by Microsoft.
If you see buttons such as Disable or Uninstall instead of Install, the extension is already installed. Leave it enabled.
This short clip shows both the extension search and the interpreter-selection workflow:
Python Tutorial for Beginners with VS Code 🐍
Watch “Python Tutorial for Beginners with VS Code” by Dave Gray for a visual walk-through of locating Microsoft’s Python extension and opening the interpreter picker.
Watch extension installation to see the Extensions view, the search for “Python,” and the Microsoft publisher check. Then watch interpreter selection for the Command Palette approach. On Windows, use Ctrl+Shift+P for the Command Palette; Ctrl+P by itself opens a different search box.
The extension may also install supporting components, such as a debugger, automatically. You do not need to configure those separately today.
Select the interpreter VS Code should use
An interpreter is a particular installation of Python. A computer can have several of them: perhaps different Python versions, a Microsoft Store installation, a Conda installation, or project-specific environments. VS Code needs one explicit choice so that its editor features and future Run button use the intended Python.
Open the Command Palette in either of these ways:
- Press
Ctrl+Shift+P. - Or select View from the top menu, then choose Command Palette.
Type:
Python: Select Interpreter
Choose the command with that exact name. VS Code will show a list of interpreters it detected.
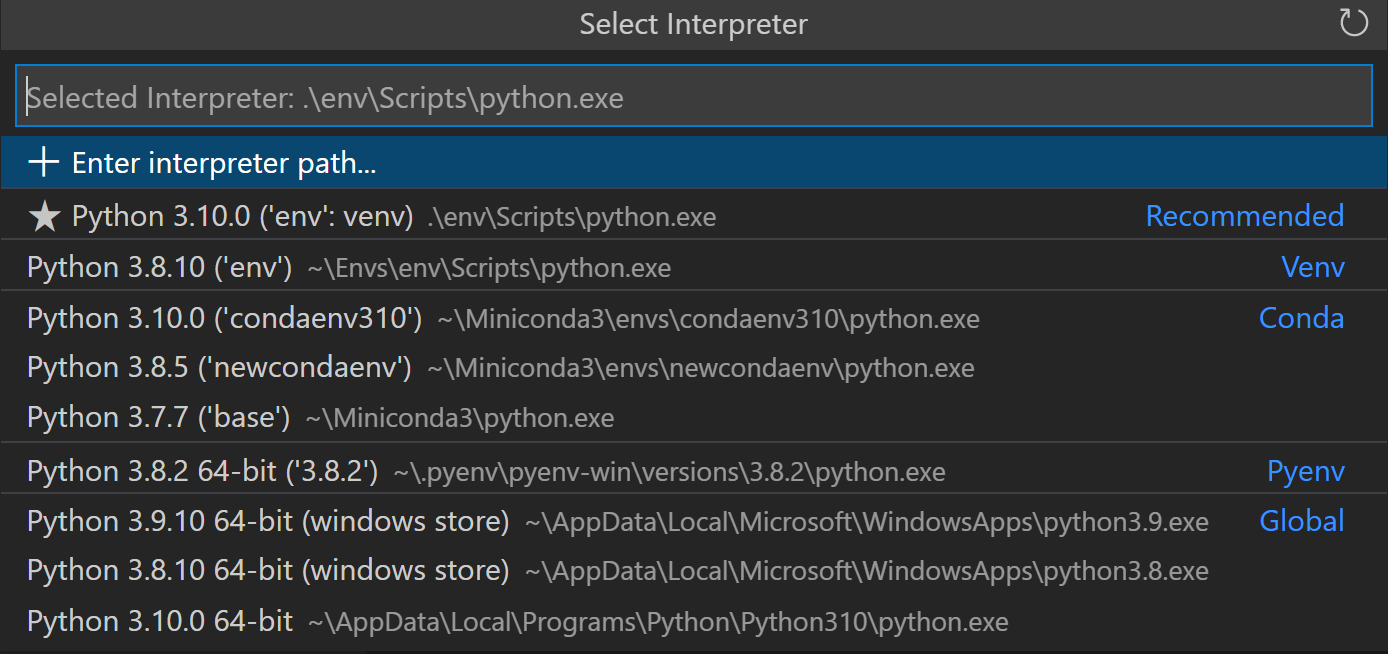
How to choose the correct one
Use the version you saw in the prior lesson as your reference.
For example, if PowerShell showed:
Python 3.13.2
choose an interpreter in VS Code labeled something like:
Python 3.13.2 64-bit
or:
Python 3.13
The displayed path may vary. A standard Python installation on Windows is often located somewhere resembling:
C:\Users\YourName\AppData\Local\Programs\Python\Python313\python.exe
Your username and Python version will differ. What matters is that you are selecting a real python.exe installation whose major and minor version match the version reported by py --version.
At this stage, prefer the ordinary installed Python entry over entries labeled:
venvor.venvConda- an unfamiliar environment name
Those environments can be useful, but you have not created one for a project yet. You will learn to do that in Module 8.
A Recommended label is a helpful suggestion from VS Code, but still check its version and path. If it matches the Python 3 version you verified earlier, it is normally the appropriate choice.
After you click an interpreter, VS Code saves the choice. If a Python file is open later, you can usually see the selected version in the bottom-right area of the VS Code Status Bar. You can change it at any time by clicking that version label or repeating Python: Select Interpreter.
If the interpreter is missing
Sometimes VS Code does not list an interpreter immediately, even when py --version succeeded. Work through these options in order:
| Situation | What to do |
|---|---|
| You just installed the extension | Close and reopen VS Code, then run Python: Select Interpreter again. |
| Your expected Python version is listed | Select it, even if other unfamiliar environments are also listed. |
| The list has no normal Python installation | Choose Enter interpreter path, then choose the browse/find option and select the actual python.exe file from your Python installation folder. |
You cannot find a python.exe file, or py --version did not work in the previous lesson | Python itself needs attention before VS Code can be configured. Keep the exact PowerShell error message for troubleshooting. |
When browsing manually, select the file named python.exe, not the containing folder and not a file named pythonw.exe.
Do not worry if the interpreter picker contains only one sensible Python 3 entry. That is common on a new setup and makes the choice straightforward.
Confirm the setup without writing code yet
You have completed this lesson when all of these statements are true:
- The Python extension published by Microsoft is installed and enabled in VS Code.
-
Ctrl+Shift+Popens the Command Palette. - You can find the Python: Select Interpreter command.
- You selected a Python 3 interpreter that matches the version from
py --version. - VS Code now shows the selected interpreter in its Status Bar when working with Python files, or the command shows your chosen interpreter as selected.
The important idea is not merely “install an extension.” You have configured a connection: VS Code is the place you work, while the selected interpreter is the Python program that will execute your code.
You now have the essential VS Code Python setup in place: Microsoft’s Python extension is installed, and VS Code knows which Python interpreter to use. Next, you will create a project folder and your first .py file inside VS Code.
Can't find a good explanation? Sign up and we'll make it for you
Sign up