
Welcome back. Last time, you learned a short movement sequence by dividing it into chunks, rehearsing slowly, and using one piece of feedback at a time. This lesson keeps that deliberate approach but changes the central problem: instead of remembering a longer pattern, you will practise placing a foot accurately in more than one direction while staying balanced and respecting your current knee restrictions.
For now, “multidirectional” does not mean fast, large, dance-like movement in every possible direction. It means that you can deliberately step forward and sideways, return to a stable starting position, and change direction only after you have regained control. There will be no jumping, pivoting, crossing the feet, or reactive cues today.
By the end, you will have a short, clinician-compatible stepping drill that develops balance, spatial accuracy, and confidence in moving your feet without twisting through the knee.
A direction change is not a pivot
It helps to separate two actions that can look similar from the outside:
- A controlled step means you lift one foot, place it in a chosen location, transfer only as much weight as feels controlled, and return or continue.
- A pivot means you rotate your body while one foot remains planted. This can create twisting through the knee, so it is outside your current restrictions.
Your rule for this lesson is:
Lift, place, settle. Never swivel.
“Settle” means that, after placing the foot, you briefly feel organised enough to identify where your weight is: mostly on the standing leg, shared between both feet, or returning to the original stance. You do not need to make a large transfer of weight. The size of the step should be small enough that you can settle without grabbing, leaning, or rushing.
A useful movement-quality checklist is:
- Feet: Each foot lifts rather than slides or swivels; toes point in the intended direction.
- Knee: The knee follows the general direction of the toes rather than collapsing inward or rotating.
- Trunk: Chest and pelvis remain generally facing the same way; avoid turning to “help” the leg.
- Finish: You can return to a quiet, balanced home position before the next step.
If one of these becomes difficult, reduce the range, increase hand support, or pause. A smaller accurate step is more valuable than a larger unstable one.
Set up a safe movement space
Today’s practice needs a stable countertop, fixed rail, or sturdy work surface. A chair may be useful as a nearby support only if it cannot move, but do not use a light or rolling chair as a handhold while stepping.
Home Exercise Programme: Falls Prevention - Kingston Hospital
Read Kingston Hospital’s practical safety guidance and its assisted side-step instructions. The material reinforces an important principle for this course: support is a sensible training tool, not something to remove prematurely.
First, read the “Staying safe during exercise” section, beginning with the safety guidance. Note its advice on stable supports, footwear, and stopping when concerning symptoms arise. Then go to “Balance exercises” and locate “23. Side steps assisted.” Read the side-step instructions. For your own practice, retain the support level approved by your physiotherapist; do not treat the resource’s harder options as a target for this session.
Wear supportive, non-slip footwear if that is what your rehabilitation guidance recommends. Clear the floor around you. Do not use a mat, cushion, resistance band, or unstable surface: these add difficulty without helping you learn the basic movement map.
Before beginning, check that you are having an appropriate day for standing practice. Follow your physiotherapist’s specific advice first. Stop the drill rather than “working through” pain, catching, a sense of giving way, dizziness, or any symptom that conflicts with your rehabilitation plan.
The basic pattern: home position, step, home position
For the drill, your home position is a comfortable hip-width stance with both feet pointing forward. It is your reference point: the place you return to before you change direction.
The image below shows the essential structure of a supported lateral step. The key detail is not the distance travelled; it is that the person remains upright, steps out with the feet oriented forward, and returns under control.
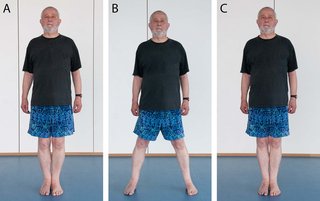
Notice that a side step does not require the body to turn toward the direction of travel. You can face the countertop throughout, with the feet travelling right or left along it. Similarly, a forward step does not require a lunge or a deep knee bend. It is only a short placement of one foot in front of its usual position.
For this lesson, use two directions only:
| Direction | Where you face | What moves |
|---|---|---|
| Forward and home | Alongside a long, stable counter or rail, with support at one side | One foot steps a short distance forward, then returns |
| Side and home | Facing a counter or wall | One foot steps a short distance out to its own side, then returns |
You are deliberately not practising rearward or diagonal stepping today. Those directions make it harder to see foot placement and can increase the balance demand. They can be introduced later, if appropriate, by changing only one variable at a time.
The supported multidirectional stepping drill
Allow about 12–15 minutes. This is coordination practice, not a fitness circuit. Rest whenever you need to regain attention or comfort.
Part 1: Rehearse the home position — 1–2 minutes
Stand at your support with both hands resting on it, or with the amount of contact your clinician has approved. Find your home position.
Shift your attention briefly through this list:
- Both feet feel fully in contact with the floor.
- Your toes point generally forward.
- Your knees are soft rather than locked.
- Your shoulders are not creeping upward.
- Your breathing is easy enough to speak a short sentence.
Then gently shift a little weight to the right foot, return to centre, shift a little to the left foot, and return to centre. This is merely preparation. It tells your nervous system where “centre” feels like before a foot leaves the floor.
Part 2: Forward-and-home stepping — 3–4 minutes
Stand alongside a stable counter or rail, so that you can keep one or both hands in contact as needed. Ensure there is clear floor space in front of you.
- Start in home position.
- Lift the right foot fully, place it a small distance forward, and let it settle quietly.
- Keep the right toes facing forward. Do not turn the pelvis or twist on the left foot.
- Return the right foot precisely to home position.
- Pause, regain even footing, then repeat with the left foot.
Think:
Lift, place, home.
Begin with two controlled repetitions on each side. If the return feels awkward, make the forward distance smaller. You should be able to replace the foot accurately, rather than searching for the floor.
A useful observation after a set is:
“Did my standing leg remain steady while the other foot moved?”
If not, use firmer support and shorten the step. There is no need to transfer your full body weight onto the forward foot at this stage.
Part 3: Side-and-home stepping — 3–4 minutes
Now face the countertop or wall, keeping both feet pointing toward it. Start with both hands on the support.
- Lift the right foot and place it a small distance to the right.
- Keep the right toes facing the counter, not outward.
- Let the foot settle; your weight may shift slightly right, but do not force a large transfer.
- Lift the same foot and return it to home position.
- Pause, then repeat to the left with the left foot.
Think:
Out, settle, home.
Complete two to four repetitions per side, resting between mini-sets if needed. The goal is not to travel along the counter yet. You are learning accurate foot placement in the side direction while keeping your torso and knees organised.
The usual errors are informative:
| If you notice… | Modify by… |
|---|---|
| Your foot drags across the floor | Make the step smaller, but lift the foot clearly before placing it. |
| Your toes turn outward | Reduce the distance and imagine the toes still facing the counter. |
| Your trunk leans heavily sideways | Hold the support more firmly and reduce weight transfer. |
| The knee feels twisted or uncomfortable | Stop that direction and return to the clinician-approved version of your rehabilitation drill. |
| You rush the return home | Add a deliberate pause after the outward placement. |
Part 4: A planned four-step map — 3–4 minutes
When the forward and side versions both feel controlled, combine them into a very short map. This is not a reaction drill: you already know the order.
Using the necessary support and taking a pause in home position between each action:
- Right foot forward and home.
- Left foot side and home.
- Left foot forward and home.
- Right foot side and home.
Say the direction aloud before each repetition if it helps:
“Right forward. Left side. Left forward. Right side.”
Complete only two or three full maps. The pauses are part of the drill, not a sign that you are failing. They let you confirm foot placement, centre your weight, and avoid letting one direction blur into the next.
If changing your physical position from the side of the counter to facing it requires you to reorient yourself, stop first. Reposition using small ordinary steps, with feet lifting from the floor. Do not turn quickly on a planted foot to set up the next direction.
Keep the task at the right challenge level
A coordination drill works best when it is demanding enough to require attention, but not so demanding that each attempt becomes a rescue. You are aiming for mostly accurate repetitions with occasional manageable corrections.
For now, keep these variables stable:
- the same support surface;
- small step distance;
- slow, self-chosen speed;
- the same four planned directions;
- no arm pattern, music, or verbal cue from another person;
- no reduced hand support merely to make the task “harder.”
Progress is more likely to look like smoother movement than dramatic performance. You may notice that you can feel where your foot is landing more clearly, return closer to your original home position, or need fewer spoken reminders. Those are meaningful signs that proprioceptive information, balance control, and motor planning are becoming better coordinated.
A simple practice note can make that progress visible:
| Date | Version used | One successful quality | One adjustment for next time |
|---|---|---|---|
| Example | Forward and side, two hands on counter | “My feet stayed forward during side steps.” | “Make left forward step shorter.” |
Keep the drill unchanged for two or three practice sessions unless your physiotherapist instructs otherwise. A stable task gives you a reliable reference point. Changing distance, speed, direction, support, and repetitions all at once makes it impossible to know what is improving or what caused a problem.
Takeaways
Controlled multidirectional stepping starts with a simple rule: lift, place, settle. A safe step is not a pivot. Keep the feet in their lanes, maintain a forward-facing trunk, return to a known home position, and use as much stable support as you need.
Today you practised forward and lateral directions separately before combining them in a short planned map. That structure protects movement quality: you change direction only after re-establishing balance, rather than attempting to turn or rush through the transition.
Next, you will add simple visual or auditory cues to stepping practice. The goal will not be to move faster at any cost; it will be to respond accurately while keeping the same no-jumping, no-pivot movement rules.
Can't find a good explanation? Sign up and we'll make it for you
Sign up