
Hello! Welcome to the next lesson in your journey to building a secure, private computing environment.
Introduction
In the previous module, we laid the theoretical and practical groundwork by exploring the architecture of Qubes OS and completing the installation. You learned about the core principle of "security by compartmentalization" and the distinct roles of Dom0, TemplateVMs, and AppVMs.
This lesson marks your first step into the daily use of Qubes OS. Our focus will be on the fundamental building blocks of your compartmentalized workflow: AppVMs. The goal is to master their entire lifecycle. By the end of this 60-minute lesson, you will be able to:
- Create a new AppVM, both through the graphical interface and the command line.
- Start and Stop an AppVM.
- Delete an AppVM, understanding the implications of this action.
This practical skill is the foundation upon which all other Qubes OS workflows are built.
The AppVM: An Object-Oriented Approach to Security
Before we begin, let's quickly revisit the relationship between a TemplateVM and an AppVM.
- A TemplateVM contains the base operating system and all installed applications (e.g., Fedora 39 with Firefox, a text editor, etc.). You don't work directly in a TemplateVM.
- An AppVM is an instance based on a specific TemplateVM. It inherits the entire root filesystem from its template, but this is non-persistent. Any changes made outside of specific user directories will be gone when the AppVM is shut down.
- Crucially, each AppVM has its own private, persistent storage, which is mounted at
/home/user,/usr/local, and/rw. This is where your personal files, application settings, and SSH keys for that specific compartment are stored.
Given your programming background, you can think of this relationship as analogous to object-oriented programming: a TemplateVM is like a class, defining the structure and methods, while an AppVM is an object, an instance of that class with its own unique state (its persistent home directory). This design ensures that if one "object" (AppVM) is compromised, the "class" (TemplateVM) and all other "objects" (other AppVMs) remain unaffected.
The Qube Manager: Your Central Control Panel
The primary graphical tool for managing your VMs is the Qube Manager. You can find it in the applications menu, usually under Qubes Tools. It provides a high-level overview of all your qubes, their current state (running or shut down), their resource usage, and the controls to manage them.
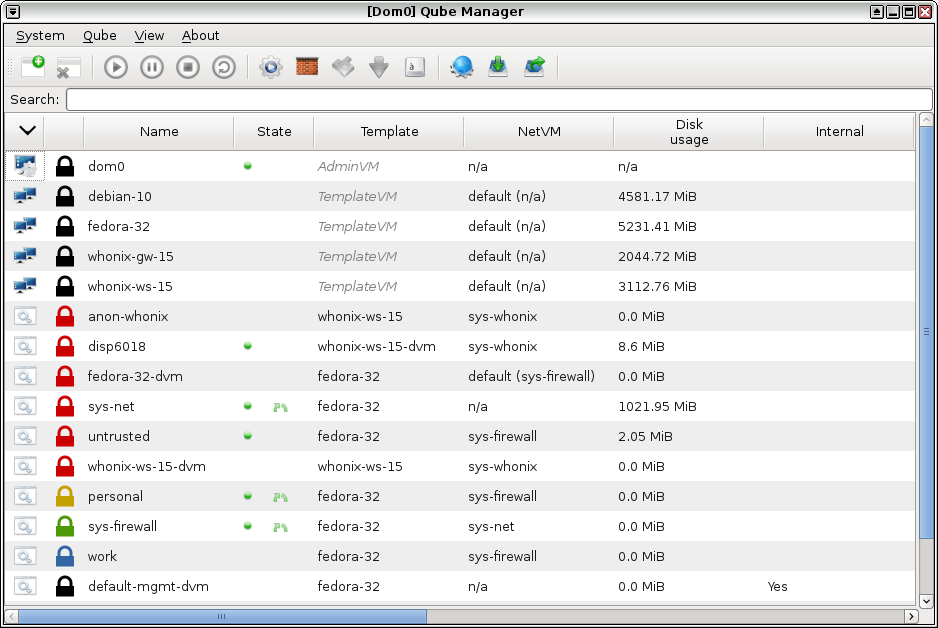
We will now walk through the AppVM lifecycle, using both the Qube Manager and the more powerful command-line tools available in dom0.
1. Creating an AppVM
Upon installation, Qubes provides several default AppVMs like personal, work, and untrusted. Let's create a new one from scratch. We'll make a qube for development work, named dev-sandbox.
The GUI Method
The most straightforward way to create a qube is with the graphical tool. The following video demonstrates this process clearly.
Qubes OS: How it works, and a demo of this VM-centric OS
Watch this segment from the video 'Qubes OS: How it works' by DorianDotSlash to see how to create a new AppVM using the graphical interface.
Watch from 10:24 to 11:16. Pay attention to the key choices you need to make: the name of the qube, its color label, the template it's based on, and its networking configuration.
The Command-Line Method
For more control and for scripting purposes, you can use the qvm-create command in a dom0 terminal. Your technical background makes the command line an efficient and powerful way to manage the system.
Open a terminal in dom0 (Applications Menu > Terminal Emulator).
The blunix.com blog provides an excellent, concise guide to using the command-line tools.
How to Create Qubes OS VMs Using the Command Line
This article, 'How to Create Qubes OS VMs Using the Command Line', details the command-line approach. It's a valuable reference for managing your system efficiently.
Read the section titled 'Creating an AppVM from a Template VM'. Focus on the syntax of the qvm-create command. The article also provides a deep dive into how the persistent storage is structured, which reinforces the concepts we discussed earlier.
PRACTICAL EXERCISE 1: Create Your dev-sandbox AppVM
Now, apply what you've learned.
- Using the GUI or CLI, create a new AppVM with the following properties:
- Name:
dev-sandbox - Class/Type: AppVM
- Template:
fedora-39(or whichever Fedora version is your default) - Label:
green - Networking:
sys-firewall(the default)
- Name:
- After creation, verify it appears in your Qube Manager list.
2. Starting and Stopping an AppVM
An AppVM only consumes resources when it's running. Qubes is designed to manage this process seamlessly.
- Automatic Start: The most common way to start an AppVM is to simply launch an application from its menu (e.g.,
dev-sandbox: Terminal). Qubes will automatically start the VM in the background before launching the application. - Manual Start/Stop: You can also explicitly start or stop a VM using the Qube Manager (select the VM and click the "play" or "stop" buttons) or from the
dom0command line.
The command-line tools for this are:
qvm-start <vm-name>qvm-shutdown <vm-name>
This video from racingmars provides a good demonstration of how AppVMs are started automatically when an application is launched, and how they can be managed via the Qubes VM Manager.
Watch the segment from 16:43 to 19:00. Notice how launching an application in a non-running VM ('Vault') automatically starts it. Also, observe how the VM can be manually shut down from the manager.
PRACTICAL EXERCISE 2: Test the Lifecycle and Persistence
- In the Qubes application menu, navigate to the
dev-sandboxqube and launch its Terminal. You will see notifications that the VM is starting. - The terminal window will appear with a green border. In this terminal, create a test file in your home directory:
echo "This file is persistent." > ~/test_file.txt - Now, stop the
dev-sandboxVM. Use the Qube Manager to do this: selectdev-sandboxand click the "Shutdown qube" button. - Wait for the status indicator to show it is no longer running.
- Start the VM again, this time using the
dom0command line:qvm-start dev-sandbox - Once it's running, launch a terminal in it again.
- Verify that your test file still exists:
You should see the text "This file is persistent." This confirms that thecat ~/test_file.txt/home/userdirectory survives across reboots of the AppVM.
3. Deleting an AppVM
When a compartment is no longer needed, you can delete it to free up disk space and simplify your workspace.
This action is irreversible. Deleting an AppVM permanently destroys its private storage volume, including all files in its /home/user directory. There is no "trash can" or recovery option.
- GUI Method: In the Qube Manager, select the qube and click the "Delete qube" button (often a trash can icon).
- CLI Method: In a
dom0terminal, use the commandqvm-remove <vm-name>.
You will always be asked for confirmation before the deletion proceeds.
Qubes OS: How it works, and a demo of this VM-centric OS
This final clip from DorianDotSlash's video shows the deletion process and correctly emphasizes its permanence.
Watch from 20:35 to 21:14. Note the confirmation step, which forces you to type the name of the qube you are about to destroy.
PRACTICAL EXERCISE 3: Remove the Sandbox
- Ensure the
dev-sandboxAppVM is shut down. Qubes will not let you delete a running VM. - Using either the Qube Manager or the
qvm-remove dev-sandboxcommand indom0, delete thedev-sandboxAppVM. - Confirm the action when prompted.
- Verify that it has disappeared from the Qube Manager list.
Conclusion
Congratulations, you have now mastered the fundamental lifecycle of an AppVM. You can create isolated environments on demand, use them, and securely destroy them when they are no longer needed.
Key Takeaways:
- The AppVM lifecycle consists of Creation, Starting/Stopping, and Deletion.
- These actions can be performed through the user-friendly Qube Manager (GUI) or the powerful and scriptable
qvm-*commands (CLI) indom0. - AppVMs are instances of TemplateVMs, but they have their own persistent private storage for user files (
/home/user). - Deleting an AppVM is a permanent action that destroys all associated data.
In our next lesson, we will build directly on this foundation. Now that you can create AppVMs, the next logical step is to learn how to manage the software within them. We will explore the relationship between TemplateVMs and AppVMs in more detail to understand how to install, update, and manage applications across your various compartments.
Can't find a good explanation? Sign up and we'll make it for you
Sign up