
Welcome back. In the previous lesson, you created an annotated Git tag and a GitHub Release so that a tested source state can be identified as something meaningful, such as v0.1.0. That gives a team a reliable answer to “what version was released?”
This lesson moves one step earlier in that delivery process: how a proposed change earns the right to reach main. You will use a short-lived branch, open a GitHub pull request (PR), inspect its changes, and participate in a review. This is the lightweight workflow used by many teams before CI/CD, Terraform plans, and production deployments make the same feedback loop more automated.
A pull request is a change proposal and a review record
Git itself provides commits, branches, and merges. A pull request is a GitHub collaboration feature built around those Git objects. It says:
“Please consider merging the commits on this branch into that shared branch.”
A PR has two essential branch roles:
| Role | Meaning in this lesson | Typical value |
|---|---|---|
| Base branch | The shared destination branch | main |
| Compare (head) branch | The branch containing the proposed change | docs/add-pr-checklist |
The source branch remains separate while the PR is open. GitHub shows the difference between it and the base branch, records discussion, displays automated checks when they exist, and retains the review history after the change is merged.
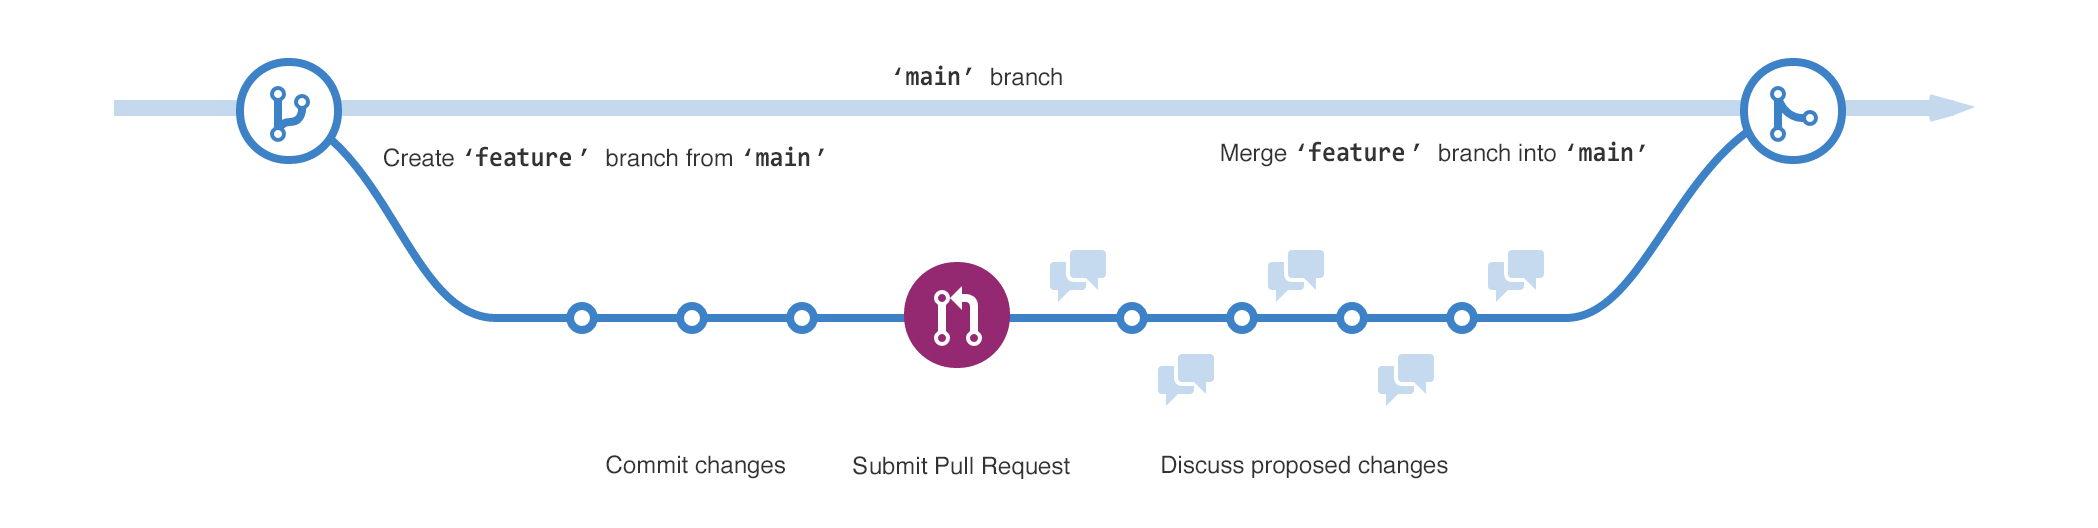
The core GitHub Flow cycle is deliberately small:
- Start from an up-to-date
main. - Create one descriptive branch for one coherent change.
- Make focused commits and push the branch.
- Open a PR with enough context for a reviewer.
- Review the actual diff, checks, and operational consequences.
- Address feedback through further commits on the same branch.
- Merge only when the change meets the team’s requirements.
A PR is not merely a button before merging. It is a feedback boundary. In operations work, the equivalent question is not only “will this command run?” but also “is this safe, understandable, reversible, and appropriate for the intended environment?”
How to create a pull request in 4 min | GitHub for Beginners
Watch GitHub’s “How to create a pull request in 4 min | GitHub for Beginners.” It gives a concise visual walkthrough of the relationship between branches, the PR form, and effective PR habits.
Begin with the PR concept to distinguish the source branch from the target branch. Then watch the creation workflow, focusing on the base and compare branch selectors. Finish with the PR practices: keep changes small, self-review first, and give reviewers useful context.
Why small PRs matter
A narrow PR is easier to understand, easier to test, and easier to reverse. A review that combines unrelated edits, such as a README rewrite, a Bash refactor, a Dockerfile update, and an IAM policy change, creates an avoidable problem: the reviewer must reason about several risks at once.
For a DevOps workflow, aim for a PR that answers one clear question:
- “Does this add a health-check script with safe defaults?”
- “Does this Terraform change add the requested S3 lifecycle rule?”
- “Does this GitHub Actions workflow run validation on pull requests?”
- “Does this documentation change explain the tested rollback procedure?”
Avoid titles such as “updates,” “fix stuff,” or “changes.” They do not help a reviewer, future incident responder, or interviewer examining your portfolio understand intent.
Create a focused branch and proposed change
You have already worked with branches, pushed branches to GitHub, and merged changes earlier in this module. Here, the focus is using that branch as the source of a reviewable PR rather than merging it immediately.
In your primary service-check clone, start by synchronizing main:
cd ~/devops-labs/service-check
git switch main
git pull --ff-only
git status
git status should report a clean working tree. Now create a short-lived branch for a small documentation change:
git switch -c docs/add-pr-checklist
Create a lightweight checklist that you can reuse for future changes:
mkdir -p docs

cat > docs/pull-request-checklist.md <<'EOF'
# Pull Request Checklist

- [ ] I reviewed the changed files and kept the change focused.
- [ ] I described what changed and why.
- [ ] I recorded how I validated the change.
- [ ] I considered the operational risk and rollback path.
EOF
Inspect exactly what you are about to commit:
git status
git diff -- docs/pull-request-checklist.md
Then commit and publish the branch:
git add docs/pull-request-checklist.md
git commit -m "docs: add pull request checklist"
git push -u origin docs/add-pr-checklist
The -u option sets origin/docs/add-pr-checklist as this local branch’s upstream. Later, while you remain on the branch, plain git push and git pull will know which remote branch to use.
Before opening the PR, perform a quick author-side check:
git status
git log --oneline origin/main..HEAD
git diff --check origin/main...HEAD
These checks establish three useful facts:
- Your working tree is clean.
- Your branch has the expected commits beyond
main. - Git found no whitespace errors in the proposed diff.
At this stage, you have not changed main. You have only created and published a proposal branch.
Open the pull request
GitHub normally displays a Compare & pull request banner after you push a new branch. Select it. If the banner is no longer visible, open the repository’s Pull requests tab and choose New pull request.
Read GitHub Docs’ “Creating a pull request” for the exact web-interface sequence. It is especially useful for confirming that the shared destination is the base branch and your topic branch is the compare branch.
In the “Creating the pull request” section, follow steps 1 through 5, from opening the repository through writing the PR description. Then read the final step on ready versus draft PRs. For this lab, create a normal PR ready for review.
Confirm the branch direction carefully:
base:    main
compare: docs/add-pr-checklist
Reversing them is a common mistake. If GitHub’s file list shows that you would remove existing main content or merge main into your tiny documentation branch, stop and correct the selectors.
Use this title:
docs: add pull-request checklist
Use a description that answers the reviewer’s practical questions:
## Why
Add a repeatable checklist for author-side pull-request review.

## What changed
- Added `docs/pull-request-checklist.md`
- Included checks for scope, validation, risk, and rollback

## Validation
- Read the rendered Markdown on GitHub
- Ran `git diff --check origin/main...HEAD`

## Risk and rollback
Documentation only. Revert this pull request if the checklist is not suitable.
A useful PR description distinguishes what changed from why it changed, and it states what evidence supports the change. For an infrastructure or deployment PR later in the course, the validation section might include a Terraform plan, a test run, a container scan, or a staging deployment result.
Draft PRs versus review-ready PRs
A draft PR is useful when you want early feedback but are not asking for approval yet. For example, an incomplete Terraform module might be ready for an architecture discussion but not ready for a reviewer to validate line by line.
Use a regular review-ready PR when:
- the change is reasonably complete;
- you have self-reviewed the diff;
- validation has been performed or its absence is explicitly stated;
- the PR description gives enough context for someone else to begin review.
Do not call a PR “ready” simply because you want it merged quickly. A reviewer should not have to discover basic missing context, unfinished work, or obvious mistakes.
CLI alternative: create the PR with GitHub CLI
Because you are already comfortable operating through a terminal, GitHub CLI is worth knowing. If it is installed and authenticated, verify that first:
gh auth status
Then create the PR interactively:
gh pr create --base main --head docs/add-pr-checklist
GitHub CLI will prompt for the title, body, and whether to open the PR in a browser. You can also open the correctly scoped PR form in your browser with:
gh pr create --base main --head docs/add-pr-checklist --web
The PR itself is identical whether you create it through the browser or CLI. The browser remains the best place to inspect the diff and participate in line-by-line discussion.
If GitHub says there is nothing to compare, check the branch state rather than repeatedly clicking the UI:
git status
git log --oneline origin/main..HEAD
git push -u origin docs/add-pr-checklist
Usually the cause is that the commit was made on main, the change was never committed, or the topic branch was not pushed.
Read a pull request as a reviewer
A technically correct review is more than looking for typos. It asks whether the proposed change does what the author claims, fits the system safely, and contains evidence that it was checked.
Open the PR and inspect these areas in order:
- Conversation: Read the title and description. Is the problem, scope, validation, risk, and rollback information clear?
- Commits: Check whether the commits are focused and understandable.
- Files changed: Read the diff itself. The diff, not the PR description, is the source of truth for what will be merged.
- Checks: Examine automated test, lint, security, or deployment results if the repository has them.
- Review discussion: Read all comments and confirm whether any requested changes remain unresolved.
Your current repository may not yet have automated checks. Do not present “no checks are configured” as “all checks passed.” In a real review, state validation honestly. Later modules will add GitHub Actions checks, container scanning, and Terraform validation so that PRs contain stronger automated evidence.
For this documentation PR, a good review might ask:
| Review dimension | Example reviewer question |
|---|---|
| Scope | Does this PR add only the checklist, without unrelated edits? |
| Accuracy | Does the checklist describe actions an author can actually perform? |
| Operational safety | Does it remind authors not to expose passwords, API keys, tokens, or private keys? |
| Validation | Did the author verify the rendered Markdown and the diff? |
| Maintainability | Is the checklist clear enough to use for a future script, workflow, or Terraform PR? |
For a Bash automation change, replace those questions with more technical ones: Are variables quoted? Are failure conditions handled? Is the command destructive? Is a credential accidentally printed to logs? The underlying review habit is the same: read the change in its actual operational context.
A typical GitHub workflow // what to expect
Watch the review portion of “A typical GitHub workflow // what to expect” from Kahan Data Solutions. It demonstrates reviewer selection, inline comments, pending reviews, and the difference between approval and requesting changes.
Watch reviewer setup to see where reviewers, commits, checks, and changed files appear. Then study inline comments, particularly the distinction between a standalone comment and starting a review. Finish with review decisions to see how comments are bundled and submitted as an approval or a request for changes.
Inline comments and review decisions
In Files changed, move the pointer over a changed line and select the blue + icon. This opens a line-level comment. Line comments are valuable because they anchor feedback to the exact behavior, wording, or configuration that prompted it.
For several related comments, choose Start a review rather than immediately posting each one. GitHub keeps those comments pending until you submit the review, allowing you to organize your feedback and avoid sending a stream of partial notifications.

Use the review outcomes precisely:
| Outcome | Meaning | Appropriate use |
|---|---|---|
| Comment | Feedback or a question without a merge decision | A suggestion, clarification, or non-blocking observation |
| Approve | The PR is acceptable based on the review and available evidence | The intended change is correct, risks are understood, and no blocker remains |
| Request changes | Specific changes are required before the PR should merge | Incorrect behavior, missing validation, security risk, inadequate rollback information, or a necessary documentation correction |
A request for changes must be actionable. “This looks wrong” is weak feedback. Prefer:
Please add a checklist item confirming that no passwords, tokens, API keys, or private keys appear in the changed files or PR description. This checklist is intended to support operational changes, where accidental secret exposure is a material risk.
That comment identifies the problem, explains why it matters, and states the expected correction.
An approval is not a guarantee that production will be safe. It means the reviewer believes the change meets the applicable standard based on the diff and evidence available. Good teams still use automated tests, protected branches, staged deployment, monitoring, and rollback planning.
Lab: complete an author-reviewer feedback cycle
A PR author cannot perform a meaningful independent approval of their own work. To experience the full review workflow, use a trusted colleague who has access to your repository, or pair with another learner. If you do not currently have an eligible reviewer, complete the author-side self-review now and arrange the short reviewer portion when a collaborator is available.
Phase A: author self-review
Before requesting review, open your PR’s Files changed tab and read every changed line as though you did not write it. Check that:
- only
docs/pull-request-checklist.mdis included; - the title and description match the actual diff;
- the validation statement is truthful;
- no sensitive values appear in the content, commit message, branch name, or PR body;
- the change has a clear rollback statement.
This habit catches a surprising number of defects before another person spends time reviewing them.
Phase B: submit a focused review
Ask your collaborator to open the PR, inspect the description and diff, and leave the secret-handling feedback described above as a line comment on the checklist. Because adding this item is necessary for the checklist’s intended use, they should select Request changes and submit.
The reviewer should not modify main directly. Their role is to explain the required result; the author owns the branch and implements the correction.
Phase C: address feedback through a new commit
As the author, make the requested change on the same feature branch:
git switch docs/add-pr-checklist
Add this checklist item:
- [ ] No passwords, API keys, tokens, or private keys appear in the change or PR description.
Then inspect, commit, and push:
git diff
git add docs/pull-request-checklist.md
git commit -m "docs: include secret review check"
git push
Do not open another PR. A PR tracks the branch, so GitHub automatically adds this new commit and updates the existing diff. Reply to the reviewer explaining what you changed, then ask them to re-review.
This is an important operational property of PRs: feedback produces an auditable sequence of additional commits rather than an unrecorded edit to shared production history.
Phase D: approve and merge only when ready
Once the reviewer confirms the new item is present and the PR remains focused, they can submit an approval. If your repository has no branch-protection rules, GitHub may allow merging before approval; treat that as a repository configuration detail, not permission to bypass review.
After the appropriate review and validation are complete, merge the PR in GitHub. For this small, linear change, the repository’s default merge method is acceptable. Choose Delete branch in GitHub after merging.
Update your local repository and remove the now-merged local branch:
git switch main
git pull --ff-only
git branch -d docs/add-pr-checklist
git fetch --prune
Finally, confirm that the change reached main:
git log --oneline --decorate -n 6
git show --stat HEAD
Key takeaways
A pull request is GitHub’s structured proposal to merge a source branch into a target branch. It combines the diff, commits, discussion, check results, review decisions, and eventual merge record in one place.
For a lightweight branching workflow:
- Use one short-lived branch per coherent change.
- Set
mainas the base branch and the feature branch as the compare branch. - Write a PR description that explains why, what, validation, and risk or rollback.
- Self-review before asking someone else to spend time on the change.
- Review the diff, not just the description.
- Use comments, approvals, and change requests deliberately.
- Address feedback through new commits pushed to the same branch.
- Merge only when the relevant evidence and review requirements are satisfied.
You now have a practical collaboration loop: branch, commit, push, propose, review, revise, and merge. In the next lesson, you will learn how to recover safely when a faulty change has already entered history, choosing appropriately among restore, revert, and reset.
Can't find a good explanation? Sign up and we'll make it for you
Sign up