
Welcome back. In our previous session, we established the formal process for managing engineering changes, distinguishing between a Request (ECR), an Order (ECO), and a Notice (ECN). We also discussed the cross-functional Change Control Board that scrutinizes every proposed modification. You now understand the workflow that prevents uncontrolled changes from disrupting production.
Today, we move from the process to the specific artifact: the Engineering Change Order document itself. Our objective is to interpret an ECO document to identify its scope, rationale, and affected components in an interior trim assembly. As an engineer, you don't just execute tasks; you must first understand the 'why' and 'what' behind them. Misinterpreting an ECO can lead to significant errors in design, tooling, and cost. This lesson will equip you to dissect these critical documents with precision.
The Anatomy of an Engineering Change Order
An ECO is not merely a suggestion; it is a formal directive. To act on it correctly, you must be able to parse its contents. We will break this down into three fundamental questions:
- Why is this change happening? (Rationale)
- What is changing and which items are involved? (Scope & Affected Components)
- How big is the impact of this change? (Classification)
The Rationale: Understanding the "Why"
Every change is driven by a specific need. This justification is the core of the business case for the ECO and is the first thing you should identify. Common drivers for change in the automotive industry are varied.
Engineering Change Order: Definition, Classification and How It Works
This article from Tractian provides a concise list of the typical business or technical reasons that trigger an ECO.
Please read the section titled "Common Reasons for Issuing an ECO." As you read, think about which of these you might encounter most frequently when designing interior trim parts.
As the article notes, changes aren't arbitrary. They are responses to concrete events:
- Corrective Action: A part is failing in the field or during testing (e.g., a snap-fit breaks).
- Regulatory Compliance: A new safety or environmental standard is mandated.
- Supplier Issues: A component's source material becomes obsolete.
- Performance Improvement: An opportunity to enhance the product's function or appearance.
- Cost Reduction: A value-engineering proposal to reduce material or manufacturing costs without sacrificing quality.
The rationale is usually stated clearly at the beginning of the ECO form. It sets the context for all subsequent technical work.
The Scope and Affected Components: The "What" and "Which"
Once you understand why a change is needed, your next task is to determine precisely what needs to be changed and which items are affected. This is the most critical part of your analysis, as missing a single affected item can break the entire change process.
Let's look at the key elements that define the scope.
Engineering Change Order: Definition, Classification and How It Works
This article details the specific fields found in a standard ECO document. Understanding these fields is essential for accurately identifying the full scope of your work.
Read the section titled "Key Elements of an ECO Document." Pay close attention to the definitions of Affected items, Effectivity, and Disposition instructions.
Now, let's see how these theoretical elements appear on a real-world automotive document.
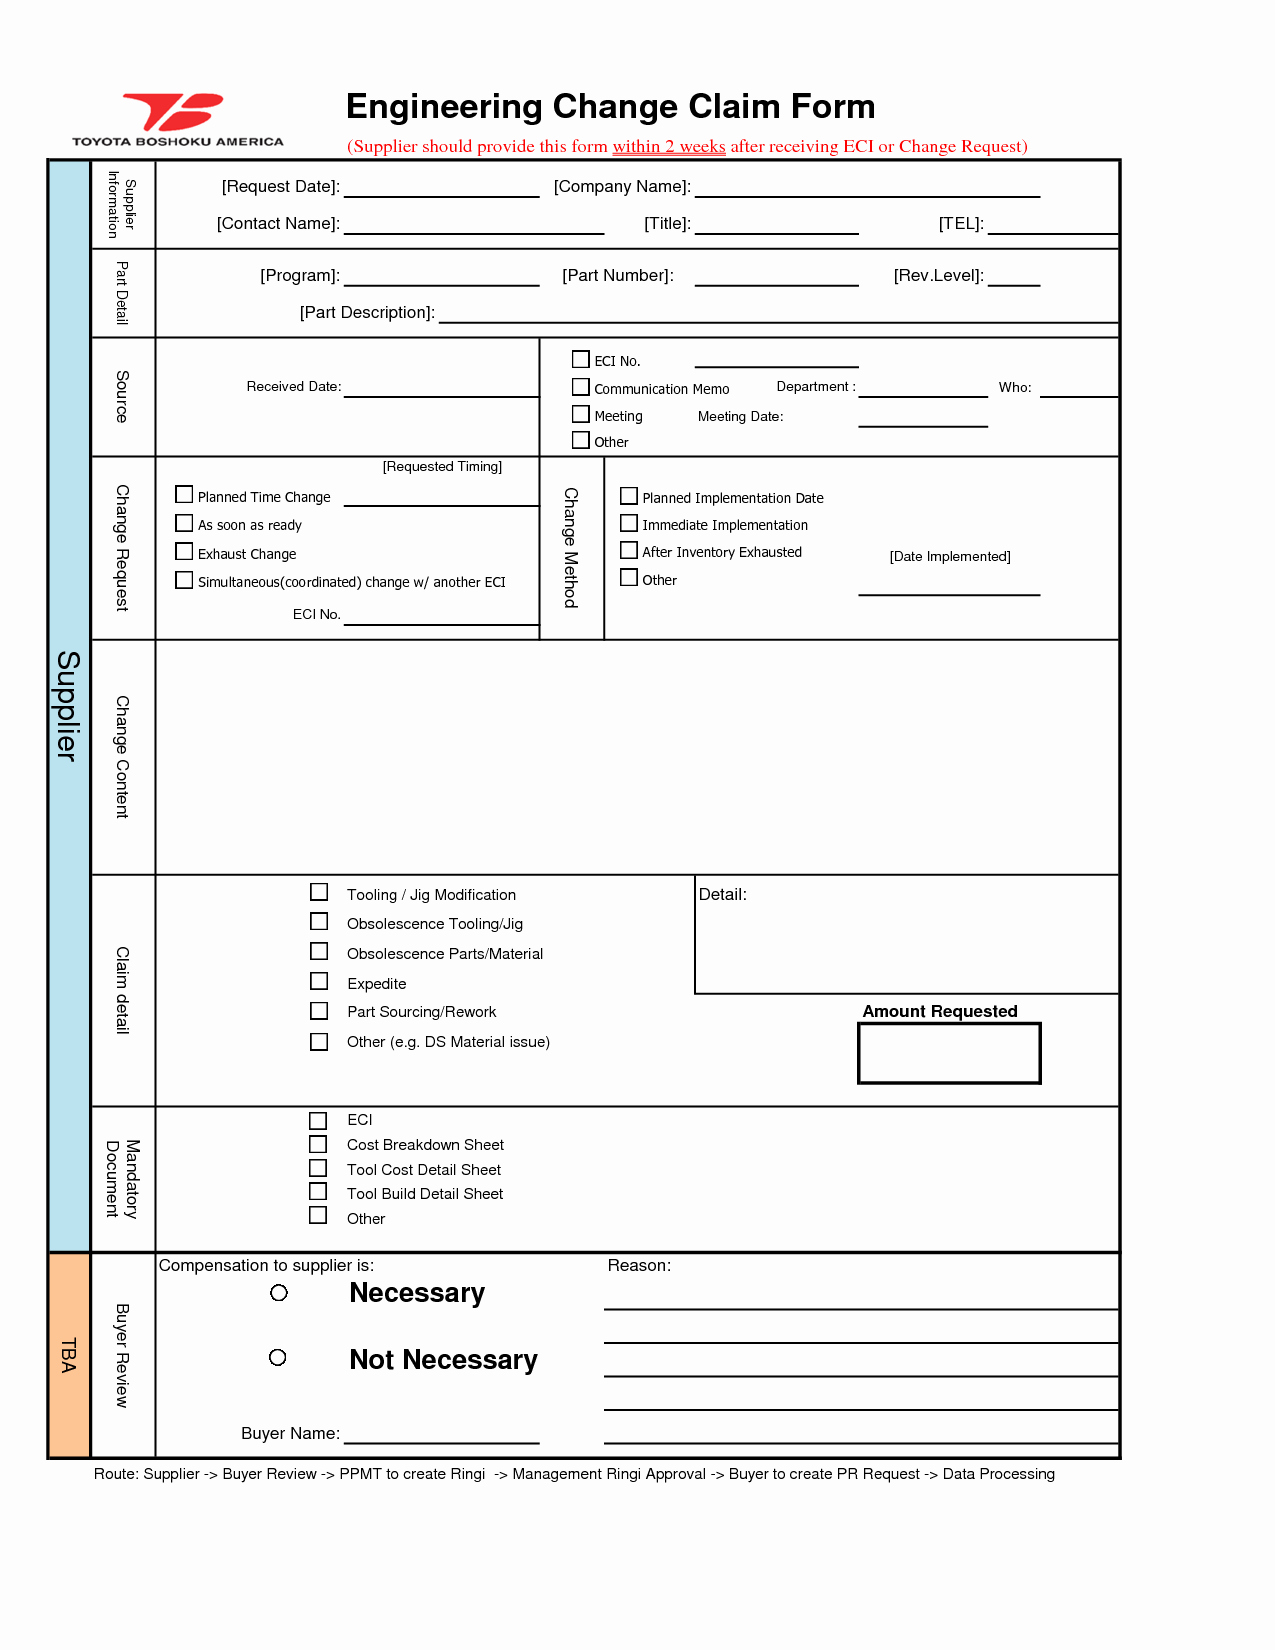
Using the Toyota form as our guide, you can see how to extract the scope:
- Affected Items: The form explicitly asks for "Part No.," "Part Name," and "ECI No." (Engineering Change Instruction). A complex change may list multiple part numbers, drawing numbers, and even specifications or work instructions that need updating. Your primary responsibility is to identify every single document and file associated with these part numbers.
- Scope Description: The "Content of Change" section, often supported by "Before" and "After" sketches, is your core instruction. This is where the technical change is described (e.g., "Add rib to improve stiffness," "Change material from PC-ABS to PP-GF20," "Modify surface for new texture pattern").
- Effectivity: This crucial piece of information tells you when the change becomes active. It can be a specific date, a vehicle serial number (VIN), or a production lot number. This determines whether the change applies to new production only or requires retrofitting vehicles already built.
- Disposition Instructions: The ECO must state what to do with the inventory of the old part. Can it be used as-is until stock runs out? Does it need to be reworked to the new specification? Or must it be scrapped? This decision has major financial implications.
Classification: The "How Big"
Not all changes are created equal. The final step in your interpretation is to understand the change's magnitude, which is formalized through classification.
Engineering Change Order: Definition, Classification and How It Works
This section explains the most common system for classifying ECOs, which dictates the required approval level and potential impact.
Read the section "ECO Classification: Class I and Class II" and study the table comparing the two classes.
To summarize:
- Class I (Major Change): The change affects the part's form, fit, or function. The new part is not interchangeable with the old one. This type of change requires extensive validation and approval from all stakeholders, sometimes including the final customer (the OEM). A material change, for example, is almost always Class I because it affects strength, durability, and processing parameters.
- Class II (Minor Change): The change does not affect form, fit, or function. The part is fully interchangeable. This could be a minor dimensional tweak for process stability or a correction to a drawing note that doesn't alter the physical part. These changes typically only require internal engineering and quality approval.
As the design engineer, correctly identifying the class is vital. Classifying a major change as minor can lead to bypassing necessary validation and causing significant quality or assembly issues downstream.
The ECO Within the PLM System
These ECO documents don't exist in a vacuum. They are digital artifacts within a Product Lifecycle Management (PLM) system, which orchestrates the entire approval workflow.
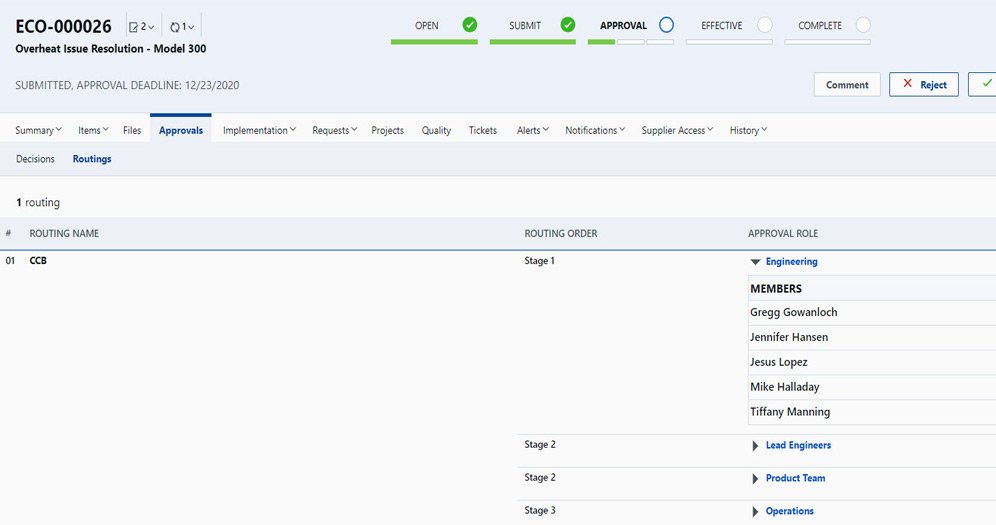
When an ECO is assigned to you, it appears as a task in your PLM work queue. The ECO document (like the Toyota form) will be an attachment, and the system will have direct links to all affected items (the CATIA V5/V6 Part files, drawings, etc.). Your job is to:
- Interpret the ECO as we've just discussed.
- Check out the affected CAD data from the PLM vault.
- Execute the design changes in CATIA.
- Check in the new revisions of your models and drawings.
- Promote the ECO task to the next stage in the workflow, sending it to the next reviewer (e.g., a Manufacturing Engineer or your Lead Engineer).
This structured process, managed by the PLM system, ensures complete traceability.
Application: Interpreting a Scenario
Let's apply this. Imagine the Toyota Boshoku form (LINK) has just landed in your work queue.
- Part Name: DOOR TRIM, UPPER, RH
- Part Number: 67751-xxxxx
- Nature of Request: The "Immediate Implementation" box is checked.
- Content of Change: The description reads: "Cost reduction initiative. Change material from PC/ABS to PP-T20. See attached analysis report. Tooling modification required for shrinkage adjustment."
Based only on this information, answer the following questions for yourself:
- Rationale: Why is this change being made?
- Affected Items: What specific files and documents will you need to find and update?
- Scope: In one sentence, what is your primary design task?
- Classification: Is this a Class I or Class II change? Why?
Click to reveal the analysis
- Rationale: Cost reduction. This is explicitly stated.
- Affected Items: At a minimum: the 3D model for
67751-xxxxx, the 2D drawing for67751-xxxxx, the material specification document, and the Bill of Materials (BOM) for the door assembly. - Scope: To update the part model and drawing to reflect the new material (PP-T20) and any necessary geometric changes to account for different material shrinkage properties.
- Classification: This is definitively a Class I (Major) change. A material change directly impacts the part's functional properties (strength, thermal performance) and its form (due to different mold shrinkage). The new part is not interchangeable with the old one without re-validation.
Conclusion
You now have the skills to read and understand an Engineering Change Order. This interpretive ability is the foundation for executing a change correctly. Before modifying any geometry, a proficient engineer must first become a detective, piecing together the full picture from the provided documentation.
Key Takeaways:
- An ECO document is a structured set of instructions that must be carefully interpreted.
- The three key elements to identify are the rationale (why), the scope (what/which), and the classification (how big).
- The rationale provides the business case, often driven by cost, quality, or regulatory needs.
- The scope is defined by the list of affected items, the effectivity date, and instructions for disposition of old stock.
- Class I (Major) changes affect form, fit, or function and require extensive review, while Class II (Minor) changes do not and have a simpler approval path.
- The entire process is managed and documented within a PLM system.
In our next lesson, you will move from interpretation to execution. We will be given an ECO that requires a change to a visible interior trim panel. You'll use your CATIA GSD skills to evaluate and modify its Class-A surfaces to meet stringent automotive quality standards.
Can't find a good explanation? Sign up and we'll make it for you
Sign up