
Hello! Welcome to the next lesson in your n8n journey.
In our last session, we explored how to use the Wait node to pause a workflow for a fixed duration. This is perfect for managing rate limits or waiting for slow services. Today, we will unlock a far more dynamic and interactive capability of the Wait node, which is central to building robust, human-centric automations.
This lesson directly addresses the learning outcome: Implement a manual approval step using the Wait node with a webhook resume URL. You'll learn the architectural pattern known as "Human-in-the-Loop" (HITL), which allows you to pause a workflow indefinitely until a person or another system gives it the green light to continue. This is a critical skill for creating automations that are safe, reliable, and can handle tasks requiring human judgment.
1. What is a "Human-in-the-Loop" (HITL) Workflow?
Before diving into the mechanics, let's establish the concept. A "Human-in-the-Loop" workflow is one where an automated process deliberately pauses at a critical juncture to seek input, feedback, or approval from a person. This ensures that you maintain oversight and quality control, which is especially important when AI is generating content or a workflow is about to take an irreversible action.
n8n has some built-in nodes that provide a simplified HITL experience. To see what that looks like, the following video offers a good introduction.
The Secret to Making AI Agents 100% Reliable - Human in the Loop (n8n)
Watch this segment from Nate Herk to see a demonstration of n8n's dedicated 'Human in the Loop' nodes. Notice how the workflow pauses to wait for a user to approve, decline, or provide text feedback.
Watch from 01:15 to 03:29 to see the simple approval/decline flow, and then from 09:13 to 11:48 to see how text-based feedback and revisions work with these nodes. Pay attention to the user experience in Telegram and the browser form that opens.
As you saw, these built-in nodes are convenient for simple cases. However, they can be restrictive. The pattern you'll learn today, using the Wait node with a webhook, gives you complete control over the user experience and allows for much more complex and seamless integrations, avoiding the need for the user to open a separate browser tab to submit their feedback.
2. The Core Mechanism: Wait Node + Webhook Resume
The foundation of any custom approval flow is the Wait node configured in a special mode. Let's break down the architecture.
n8n Human‑in‑the‑Loop: Approval Flows That Work
This article from Roland Softwares provides a clear, developer-focused explanation of the core building blocks for approval flows. It's an excellent conceptual primer for the pattern we're about to build.
Please read the section titled 'Core building blocks'. Focus on understanding how the 'Wait with webhook resume' works and how the $execution.resumeUrl variable is used to create one-click approval links.
To summarize the key points from the article, the pattern works as follows:
-
Pause: You insert a
Waitnode into your workflow at the point where you need approval. Instead of setting it to "After Time Interval," you set its Resume mode to On Webhook Call. -
Generate URL: When the workflow execution hits this node, it pauses and generates a unique, temporary webhook URL. This URL is specifically tied to this single execution. It's accessible within the workflow via the variable
$execution.resumeUrl.
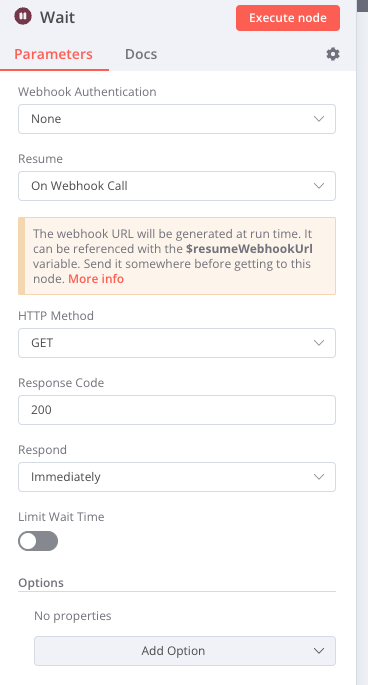
-
Notify: Your workflow then sends this resume URL to the approver. This could be inside an email, a Slack message, or, as we'll see, as buttons in a Telegram message. For example, you might construct two links:
- Approve:
{{ $execution.resumeUrl }}?decision=approve - Reject:
{{ $execution.resumeUrl }}?decision=reject
- Approve:
-
Wait: The workflow now waits indefinitely (or until a configured timeout). Its state is saved to your database, so it can wait for hours or days without consuming server resources.
-
Resume: When the user clicks one of the links, their browser makes an HTTP
GETrequest to the unique resume URL. TheWaitnode receives this call, captures any query parameters (likedecision=approve), and the workflow resumes execution right where it left off. The data from the webhook call becomes the output of the Wait node, available for the next nodes to use.
This separation of concerns is powerful. One workflow can pause itself, and a completely separate process—even just a user clicking a link—can resume it.
3. A Practical Implementation with Two Workflows
Now, let's see how this architecture is implemented in a sophisticated, real-world example. The following video demonstrates a system where one workflow generates content and asks for approval via Telegram, and a second workflow listens for the user's response to resume the first one.
This approach is highly flexible and aligns well with your background in software development, as it mirrors event-driven, decoupled services.
How I build 100% Reliable AI Automations in n8n (Human in the Loop 2.0)
This video by Mike Pekka demonstrates an advanced, two-workflow approval system. We'll focus on the core mechanism of how the Wait node is configured and triggered.
First, watch from 06:37 to 07:51 to see exactly how the Wait node is configured for 'resume on web hook call'. Then, watch from 07:51 to 08:54 to understand the concept of the second 'handle approval events' workflow. Finally, watch from 08:54 to 12:12 to see how a button click in Telegram triggers the second workflow, which in turn calls the resume webhook of the first workflow, passing back the approval decision.
As you saw, the magic happens when the handle approval events workflow makes an HTTP Request to the resumeUrl of the main workflow. This cleanly decouples the "waiting" logic from the "approving" logic.
Test your understanding!
In the two-workflow pattern shown in the video, Workflow A is paused at a Wait node. A user clicks "Approve" in a Telegram message sent by Workflow A.
What is the sequence of events that leads to Workflow A resuming?
Show answer
- The Telegram button click is a "callback query" event.
- Workflow B, which is triggered by Telegram callback queries, starts executing.
- Workflow B processes the event data, determining which execution to resume and what the decision was ("approve").
- Workflow B uses an
HTTP Requestnode to make a call to the uniqueresumeUrlthat was generated by Workflow A. It passes the approval data in the request. - The
Waitnode in Workflow A receives the HTTP request, and the workflow resumes, using the data from the request as its output.
4. Security: Hardening Your Approval Webhooks
Since the resumeUrl is a public-facing URL that can trigger actions in your system, securing it is not optional; it's a requirement for any production workflow. As a developer, you know that any unauthenticated endpoint is a potential vulnerability.
The same video provides excellent, practical advice on how to secure this endpoint.
How I build 100% Reliable AI Automations in n8n (Human in the Loop 2.0)
Let's continue with the same video to learn how to secure the resume webhook. These steps are crucial for preventing unauthorized access.
Watch from 18:02 to 22:08. Pay close attention to the two security measures implemented: adding a 'Webhook Suffix' to make the URL unguessable, and setting up 'Header Auth' to require a secret token for the webhook to be successfully called.
The two key security practices are:
- Add a Webhook Suffix: Appending a long, random string (like a UUID) to the resume URL makes it impossible for an attacker to guess or "enumerate" execution IDs to find active workflows.
- Use Authentication: The
Waitnode's webhook can be configured to require authentication, such as a static secret token sent in an HTTP header (Header Auth). The workflow that calls the resume URL must then provide this secret, ensuring that only your own trusted workflows can resume executions.
5. A Written Alternative
To reinforce these concepts, here is a blog post that walks through a similar HITL workflow in writing. It provides another perspective on building the approval URLs and handling the response.
Ultimate Guide to AI Automation and AI Workflows with n8n
This guide from Passionfruit provides a full, step-by-step tutorial for creating a human-in-the-loop workflow. It's a great written companion to the video demonstrations.
Read through section '4.1 Example 1: Summarize a Web Page with AI, Reviewed by a Human'. Pay attention to how it describes configuring the Wait node and constructing the approval/rejection URLs for the Slack node. Also, note the 'Crucial Setup' instructions at the end, which reinforce the two-workflow pattern.
This guide illustrates the same fundamental pattern. One small detail to note is that its example URL construction uses executionId={{ $workflow.id }}. This is slightly incorrect; to get the dynamic ID for the current run, you should use {{ $execution.id }}. However, the overall principle of passing an identifier to a second workflow that then resumes the first is perfectly illustrated.
Conclusion
You have now learned one of the most powerful and flexible patterns in n8n. By moving beyond fixed-time delays and embracing dynamic, webhook-driven pauses, you can build automations that intelligently collaborate with human users.
Key Takeaways:
- The Wait node's On Webhook Call mode is the key to building custom manual approval flows.
- This pattern typically involves two workflows: a main workflow that pauses, and a listener workflow that receives the approval signal and calls the resume URL.
- The
$execution.resumeUrlvariable provides the unique, single-use URL to resume a specific workflow execution. - Data can be passed back to the waiting workflow via query parameters or the request body of the resume call.
- Securing your resume webhooks with an unpredictable suffix and authentication is essential for production use.
In this module, we've focused on advanced methods for controlling the flow of your workflows. In the next module, we'll turn our attention to what happens when things go wrong. We will begin by learning how to interpret error messages to identify common workflow failure points, the first step in building resilient and debuggable automations.