
Hello! Welcome to your third lesson.
In our previous session, we did a comprehensive tour of the n8n Editor UI. You now have a mental map of the Canvas, the Node Panel, and the Execution Panel. This foundation is essential, as these are the tools you'll use in every workflow you build.
Today, we transition from theory to practice. The goal of this lesson is to guide you through building your very first automation. We will cover the entire basic development lifecycle: creating the workflow, executing it to see it run, and saving your work. By the end, you will have built a simple "Hello, World!" workflow, a rite of passage for learning any new system.
The "Hello, World!" Workflow
In software development, a "Hello, World!" program is the simplest possible application that produces a tangible output. It confirms that your environment is set up correctly and you understand the basic syntax. We'll apply the same principle in n8n.
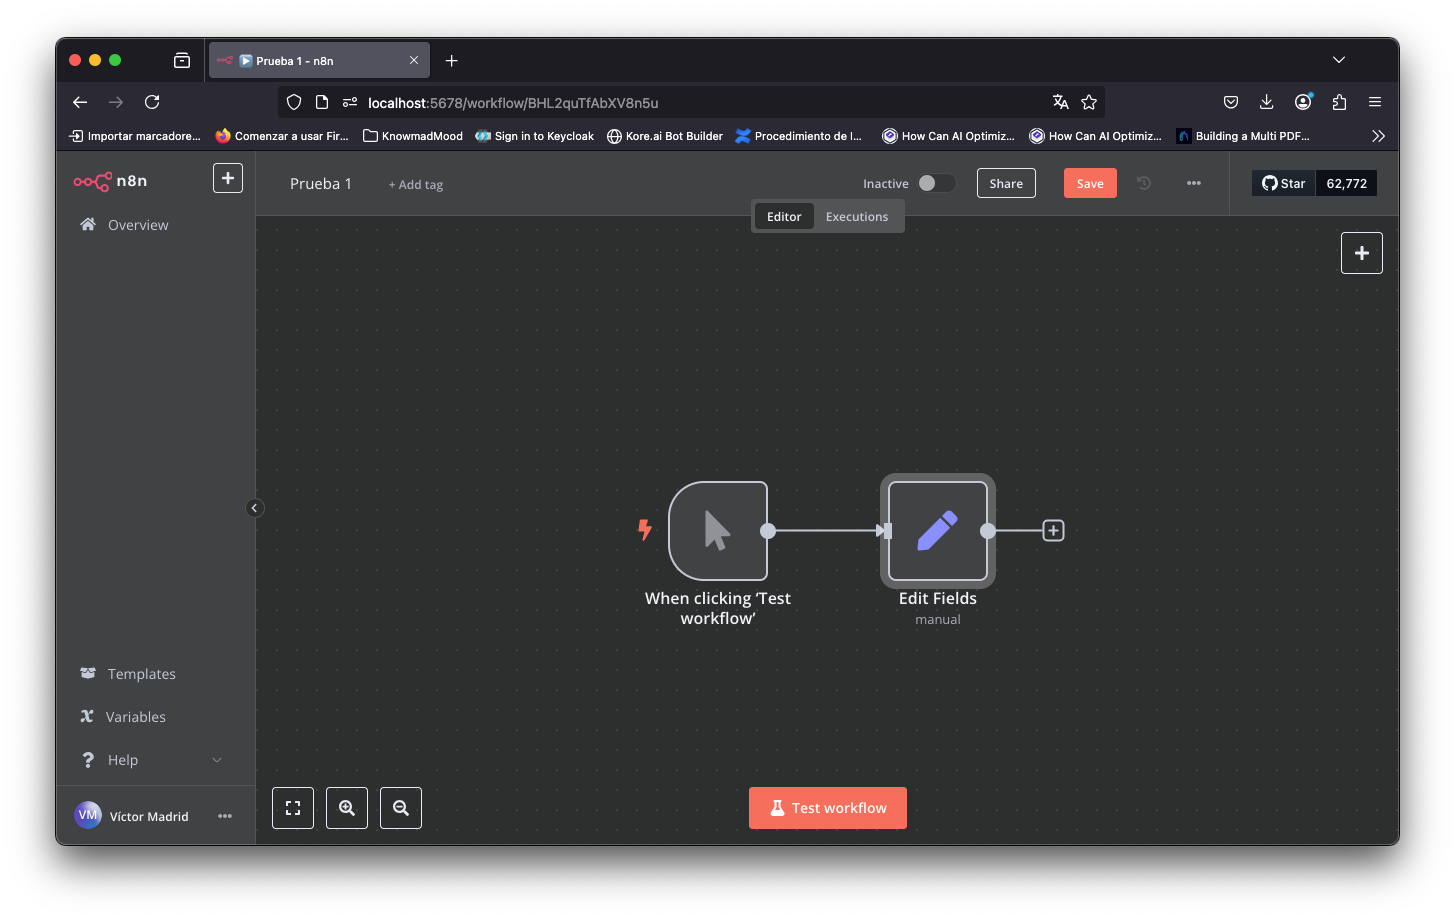
Our first workflow will consist of two nodes:
- A trigger node to start the process.
- An action node to generate a "Hello, World!" message.
Let's begin.
Step 1: Create and Name Your Workflow
First, create a new workflow from your n8n dashboard by clicking Start from scratch. The first thing you should always do is give your workflow a descriptive name.
For tips on naming, saving, and adjusting initial workflow settings like the time zone, the following short video provides a good overview.
How to Build Your Very First Workflow in n8n | n8n Tutorial
This video by Leon van Zyl covers the initial housekeeping steps for any new workflow.
Watch the first minute and a half (00:00 to 01:33). Focus on how to rename the workflow, add tags for organization, and save your progress. You can apply these steps to your own new workflow now.
Step 2: Build a Minimalist Workflow
Now, let's add the nodes to the canvas.
-
Add a Trigger: Every workflow needs a trigger. For development and testing, the Manual trigger is perfect. It allows you to start the workflow on demand, just like clicking a "run" button in an IDE.
- Click the
+icon on the canvas. - Search for and select the Manual trigger (it may also be named
StartorWhen clicking 'Test workflow'). Add it to your canvas.
- Click the
-
Add an Action: Now, we need a node to perform an action. The Set node is a fundamental building block used to create or modify data fields. Think of it as declaring and assigning a variable.
- Click the
+icon that appears when you hover over theManualtrigger node. - Search for and select the Set node. It will be automatically connected to the trigger.
- In the
Setnode's configuration panel, ensure Keep Only Set is turned off. This makes the node add new data to the incoming data, rather than replacing it. - Under Values to Set, click Add Value.
- Choose String.
- For the Name, enter
message. - For the Value, type
Hello, World!.
- Click the
Your canvas should now show a simple two-node workflow: Manual -> Set.
Step 3: Execute and Inspect
Now, let's run it.
- Click the Test Workflow button in the top-right of the canvas.
- After a moment, both nodes should show a green checkmark, and the Execution Panel will appear on the right, displaying the output of the selected
Setnode.
You should see the following in the JSON view:
[
  {
    "message": "Hello, World!"
  }
]
Congratulations! You have successfully created and executed your first n8n workflow. You've provided no input data, and the Set node has created a single item containing an object with your message.
A More Interactive Example: A Form Trigger
The manual workflow is great for testing, but most real-world automations are triggered by an external event. Let's create a slightly more complex "Hello, World!" that starts when a user submits a web form. This will show you how input data from a trigger flows through the workflow.
We will use the official n8n quick-start video to guide this process.
First, let's replace our Manual trigger with a form. You can delete the Manual trigger and add an On Form Submission trigger in its place.
n8n Quick Start Tutorial: Build Your First Workflow [2025]
This video from n8n will guide you through adding and configuring a form trigger node. This is a common way to start workflows that require user input.
Watch from 00:53 to 02:51. Follow the steps to add an 'On Form Submission' trigger to your canvas. Configure it with a title and a simple field, like 'Your Name' (using a Text type). You can skip the 'Install Date' field for now.
Now that you've configured the form, the next step is to test it. This is where you'll see the direct connection between user input and the JSON data inside your workflow.
n8n Quick Start Tutorial: Build Your First Workflow [2025]
After configuring the form, you need to test it. This clip shows how to run a test execution and, crucially, how to inspect the data that the form submission generates.
Watch from 02:51 to 03:51. After watching, try it yourself: click 'Test step' on your form trigger node, fill out the test form, and submit it. Then, look at the output in the Execution Panel. Notice how the field you defined in the form now appears as a key in the output JSON.
Test your understanding!
You've just tested your form trigger with a single field named userName and see the following JSON output:
[
  {
    "userName": "Alex"
  }
]
If you connect the Set node from our first example (which adds a message field with the value Hello, World!) after this trigger, what would the final output JSON of the Set node look like?
Show answer
The Set node would add its new field to the existing item passed from the trigger. The output would be:
[
  {
    "userName": "Alex",
    "message": "Hello, World!"
  }
]
This demonstrates how nodes chain together, passing data from one to the next and augmenting it along the way.
Step 4: Saving and Activating Your Workflow
So far, you've been working in a temporary, test environment. To make your workflow "live" and ensure your work is not lost, you need to save and activate it.
- Saving preserves the workflow's structure (the nodes and their settings).
- Activating enables the trigger to run automatically in production. For a form trigger, this means its public-facing URL becomes active.
n8n Quick Start Tutorial: Build Your First Workflow [2025]
The final step is to save your progress and understand the difference between a test run and a live, 'activated' workflow. This clip explains how to save, activate, and access the production version of your form.
Watch from 12:30 to 13:52. Pay attention to the 'Save' button, the 'Inactive/Active' toggle switch, and the difference between the test URL and the production URL.
Remember to save your workflow now!
Conclusion
You have now successfully built, tested, and saved your first n8n workflow. You've experienced the fundamental development loop: adding nodes, executing them, inspecting the data, and making adjustments.
Key Takeaways:
- All workflows start with a trigger node (e.g.,
Manual,On Form Submission). - Action nodes (e.g.,
Set) receive data from previous nodes, process it, and pass it on. - The Test Workflow button is for development; the Activate toggle makes a workflow live.
- Saving your workflow frequently is essential to preserve your work.
- Inspecting the JSON output in the Execution Panel is the key to understanding and debugging your automations.
In our next lesson, we will delve deeper into the most critical building blocks of any workflow: trigger nodes and action nodes. We'll explore the different types of triggers and clarify their role in defining how and when your automations run.