
Welcome back. In the previous lesson, you created Core Escape Greybox and learned where to find the Scene View, Hierarchy, Inspector, Assets panel, and launch controls. You now have a project workspace; the next practical skill is arranging objects within it.
Today you will use simple 3D shapes—called primitives—to learn the three parts of an entity’s transform:
- Position: where it is.
- Rotation: which way it faces.
- Scale: how large it is.
These are the basic tools of greyboxing. Before a level has art, it needs readable space: floors that establish the play area, walls that define routes, and objects that make locations memorable. By the end, you will have a small transform study in your scene and be able to adjust each entity precisely.
The transform: an entity’s place, orientation, and size
A 3D scene uses three coordinate axes:
- X: left and right
- Y: up and down
- Z: forward and backward across the ground
An entity’s transform stores three values for each property:
| Transform property | What its values control | Example use in Core Escape |
|---|---|---|
| Position | Location on X, Y, and Z | Place a wall along the northern edge of an area. |
| Rotation | Turning around X, Y, and Z | Angle a barrier to guide the player around it. |
| Scale | Size along X, Y, and Z | Stretch a box into a floor or a long wall. |
A useful physical rule is that primitives are positioned from their center, not from their base. If a box is one unit tall and you want its bottom to sit on a floor at , its center should be at . If you scale that box to two units tall, its center should be at .
This small bit of spatial reasoning will prevent one of the most common greyboxing problems: walls and props appearing half-sunk into the floor or floating slightly above it.
PlayCanvas represents the three axes consistently in its gizmos:
- Red handle: X axis
- Green handle: Y axis
- Blue handle: Z axis
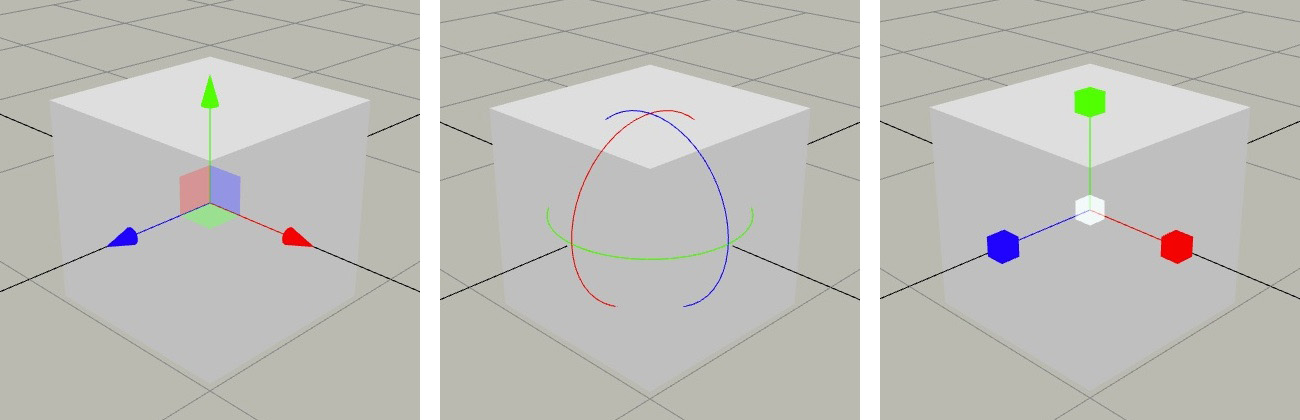
The official Viewport guide is a concise reference for these tools.
Viewport | PlayCanvas Developer Site
Read the “Gizmos” subsection of the official PlayCanvas Developer Site guide. It establishes what the three gizmo modes do and how their visual handles differ.
In the “Gizmos” subsection, read the gizmo explanation. Notice the visual cue for each mode: arrows for Translate, rings for Rotate, and cubes for Scale. The preceding “Cameras” subsection is also worth skimming: its description of Top, Front, and other orthographic views will help when you need exact alignment.
Two ways to transform an entity
You can edit a transform in two complementary ways.
Gizmos: fast visual layout
Select an entity in the Hierarchy or Scene View. A colored gizmo appears around it. Choose the appropriate tool in the left toolbar:
- Translate moves the entity.
- Rotate turns it.
- Scale resizes it.
Drag one colored handle to constrain the change to that one axis. This is ideal when you are blocking out a room and want to see the relationship between objects immediately.
Inspector fields: exact, repeatable values
With an entity selected, the Inspector shows its Position, Rotation, and Scale fields. Type values directly when precision matters. This is especially useful for floors and walls: tidy numbers such as , , , and make a level much easier to understand, modify, and debug later.
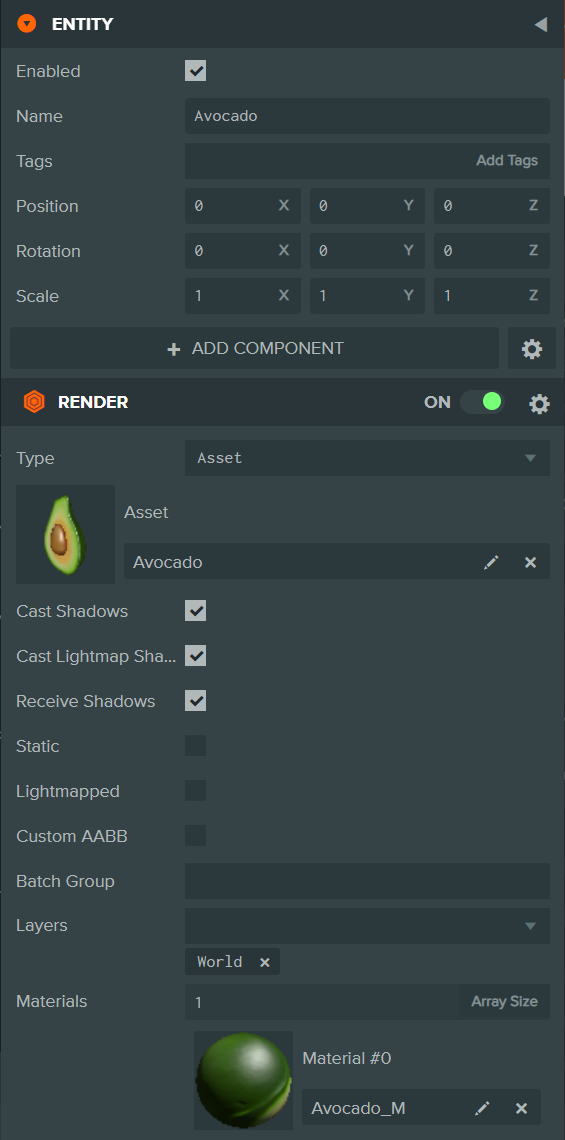
The Inspector and gizmo are not competing methods. They alter the same transform data. If you drag a box upward with the green Translate arrow, its Position Y value changes in the Inspector. If you enter a new Scale X value in the Inspector, the box widens in the Scene View.
For visual work, use the gizmo first and then clean up the values in the Inspector. For deliberately measured level geometry, enter values first and use the Scene View to confirm that the result looks right.
The Inspector documentation describes this connection directly.
Inspector Panel | PlayCanvas Developer Site
Read the official Inspector Panel guide to connect the properties you see on the right with the objects you manipulate in the Scene View.
In the opening explanation, read from numeric fields and viewport editing. Focus on the idea that dragging a gizmo is another way of changing the same entity attributes shown in the Inspector.
A short guided demonstration
Watch Daniel Wood’s demonstration once before building. It shows the complete loop: add a box, select it, move it with the Translate gizmo, rotate it, scale it, and inspect the values.
PlayCanvas Tutorial 1 - Getting started with PlayCanvas
Watch “PlayCanvas Tutorial 1 – Getting started with PlayCanvas” by Daniel Wood for a hands-on demonstration of primitive transforms in the editor.
Watch adding and viewing to see a box appear in both the Hierarchy and Scene View, plus the basic viewport navigation. Then watch the transform tools. Pay particular attention to the link between each colored gizmo handle and the corresponding Position field, and to the center Scale handle that changes all three dimensions together.
A few details from the demonstration are worth carrying into your own work:
- Translation simply means moving an object to another location.
- A single-axis scale handle changes only one dimension. This is what turns a cube into a thin wall or a wide floor.
- The central scale handle changes all dimensions together. Use it for a large cube-shaped prop; avoid it when making a floor or wall, because those usually need different dimensions.
- If a change is clearly wrong, undo it immediately. In most Chromebook browsers, Ctrl+Z performs Undo.
For the rest of this lesson, you will create a deliberately small group of primitives. These are not your finished level. They are a controlled way to learn transforms while producing a few useful starting pieces for the next lesson’s movement test space.
Build a compact transform study
Open Core Escape Greybox in the PlayCanvas Editor. If your blank scene already contains a Camera and Directional Light, leave them unchanged. You will add four primitive entities.
Use the Entity menu or the add-entity control near the Hierarchy to create a Box primitive. The exact label can vary slightly with editor updates, but look for the primitive options such as Box, Sphere, Cylinder, and Plane.
1. Make a floor reference
Create a Box and rename it Floor Guide. In its Inspector, enter these transform values:
| Property | X | Y | Z |
|---|---|---|---|
| Position | 0 | -0.5 | 0 |
| Rotation | 0 | 0 | 0 |
| Scale | 12 | 1 | 12 |
This starts as a cube and becomes a broad, thin platform. Its scale makes it 12 units wide along X, one unit high along Y, and 12 units deep along Z.
Why use a Position Y value of ? Since the floor is one unit high and centered at , its top surface sits at . That gives you a clean reference level. Subsequent walls can stand on this surface rather than intersecting it.
Select Floor Guide, choose the Scale tool, and look at the handles. Drag an individual axis handle slightly, then press Undo. This is a quick way to confirm which direction each handle controls without changing the intended floor dimensions.
2. Turn a box into a pillar
Create another Box and rename it Pillar. Enter:
| Property | X | Y | Z |
|---|---|---|---|
| Position | -4 | 1.5 | -3 |
| Rotation | 0 | 0 | 0 |
| Scale | 1 | 3 | 1 |
This entity is three units tall. Its center is therefore at , which puts the base at , exactly on top of Floor Guide.
Use this object to practice Translate:
- Select Pillar.
- Activate the Translate tool.
- Drag the red handle a small distance.
- Watch Position X change in the Inspector.
- Type into Position X to restore the planned location.
The point is not to memorize the number . It is to see that a visual drag and a numeric correction are part of one workflow.
3. Turn a box into a rotated barrier
Create a third Box named Angled Barrier. Enter:
| Property | X | Y | Z |
|---|---|---|---|
| Position | 3 | 1 | -2 |
| Rotation | 0 | 25 | 0 |
| Scale | 5 | 2 | 0.5 |
This is the most level-design-relevant transform combination:
- Scale X makes the box long.
- Scale Y makes it tall enough to read as a barrier.
- Scale Z makes it thin.
- Rotation Y angles it across the ground plane.
For a top-down game, Rotation Y is usually the rotation you will use most often. Turning around Y changes which horizontal direction a wall, doorway, player, or prop faces. Rotation X and Rotation Z tilt objects upward or sideways, which is occasionally useful for ramps and decoration but less common for ordinary upright walls.
Activate Rotate and drag the green ring to experiment. Then restore Rotation Y to in the Inspector. Look at the barrier from a slightly higher viewpoint; a wall can appear correct from one camera angle yet overlap another object when viewed from above.
4. Add a sphere as a landmark marker
Create a Sphere and rename it Core Marker. Enter:
| Property | X | Y | Z |
|---|---|---|---|
| Position | 2 | 0.75 | 4 |
| Rotation | 0 | 0 | 0 |
| Scale | 1.5 | 1.5 | 1.5 |
A sphere is visually simple, but it establishes an important greybox convention: a contrasting shape can represent a future gameplay object before you have final art. In this prototype, Core Marker is a stand-in for an energy core or another point of interest.
Unlike the floor and barrier, this uses uniform scale: all three Scale values match, so the sphere remains spherical. Use the center Scale gizmo if you want to resize it visually; then confirm that all three scale fields still have the same value.
At this point, orbit the Scene View and inspect your result from more than one direction. You should see a broad floor, an upright pillar, an angled barrier, and a sphere marker. The arrangement is intentionally modest. What matters is that every object has a reason for its position, rotation, and scale.
Make transforms readable and reliable
Greyboxing is not only about putting shapes in space. It is about making later changes cheap and understandable. Use these habits from the beginning.
Use values that communicate intent
Compare these two possible wall positions:
- Position X: , Position Z:
- Position X: , Position Z:
The first is usually easier to reason about, align with other geometry, and discuss during playtesting. Decimal values are sometimes necessary, but avoid accidental imprecision from repeated dragging. Use snapping when you are building a grid-based layout, then refine with Inspector values when needed.
Check the center point
When a wall seems to be inside the floor, ask:
- What is the object’s Scale Y?
- Where is its center, Position Y?
- Where should its bottom edge be?
For an upright box whose bottom should rest at , a useful starting rule is:
For example, Angled Barrier has Scale Y of , so its Position Y is . This rule applies because the primitive is centered on its own origin. Later, imported models may have differently placed origins, so always inspect the result rather than assuming.
Use the right view for the decision
Perspective view is useful for judging height and overall composition. But if you want to line up walls or compare horizontal distances, switch the editor camera to a Top orthographic view. Orthographic views remove perspective distortion, so two parallel walls remain visually parallel and their spacing is easier to judge.
When you lose sight of an entity:
- Select it in the Hierarchy.
- Use the editor’s Focus command, often the F key.
- Confirm its transform values in the Inspector before moving it.
Do not “fix” an off-screen object by making random changes. Find it, inspect it, then make one intentional correction.
Completion check
Before ending the session, confirm the following in your own editor:
- You can create a Box or Sphere primitive entity.
- You can select an entity in either the Hierarchy or Scene View.
- You can use Translate, Rotate, and Scale gizmos.
- You know that red, green, and blue correspond to X, Y, and Z.
- You can enter an exact Position, Rotation, or Scale value in the Inspector.
- Floor Guide has a top surface at approximately .
- Pillar and Angled Barrier visibly stand on the floor rather than floating or sinking through it.
- Angled Barrier has a nonzero Rotation Y value.
- Your scene remains saved after refreshing or reopening the editor.
Key takeaways
Every visible object in a 3D greybox needs a transform: Position places it, Rotation orients it, and Scale sets its dimensions. Gizmos support fast visual layout, while the Inspector provides precise numeric control; effective scene building uses both.
You also practiced a central greyboxing technique: stretching primitive boxes into meaningful level geometry. A wide thin box becomes a floor, a long tall thin box becomes a wall, and a sphere can mark a future collectible or landmark.
Next, you will use these skills to build a simple 3D test space designed specifically for later movement and collision experiments.
Can't find a good explanation? Sign up and we'll make it for you
Sign up