
Hello again! Last time, you made a sensible checklist for the theatre test room: first-person looking, walking, sprinting, crouching, and one door are the important features. Before building the room, you need to know your workshop: the PlayCanvas editor.
This lesson introduces the four editor areas you will use constantly:
- the viewport, where you see and arrange your 3D world;
- the hierarchy, where you find the objects in the current scene;
- the inspector, where you change the selected object’s settings; and
- the asset panel, where your reusable project files live.
By the end, you should be able to look at the editor and say not just what each panel is called, but when you would use it while creating the theatre test room.
The editor is your game-building desk
A PlayCanvas scene is one game environment: for this project, it will become your one-room theatre test space. In that scene you will place objects such as a floor, walls, a camera, lights, and eventually a door.
PlayCanvas calls the objects placed in a scene entities. An entity can be something visible, such as a wall block, or something that has no visible shape of its own, such as a light or a camera.
Look at the highlighted editor layout below. The exact colours, buttons, and panel sizes may look a little different in your own browser, especially as PlayCanvas updates its editor. But the important jobs of the four panels stay the same.
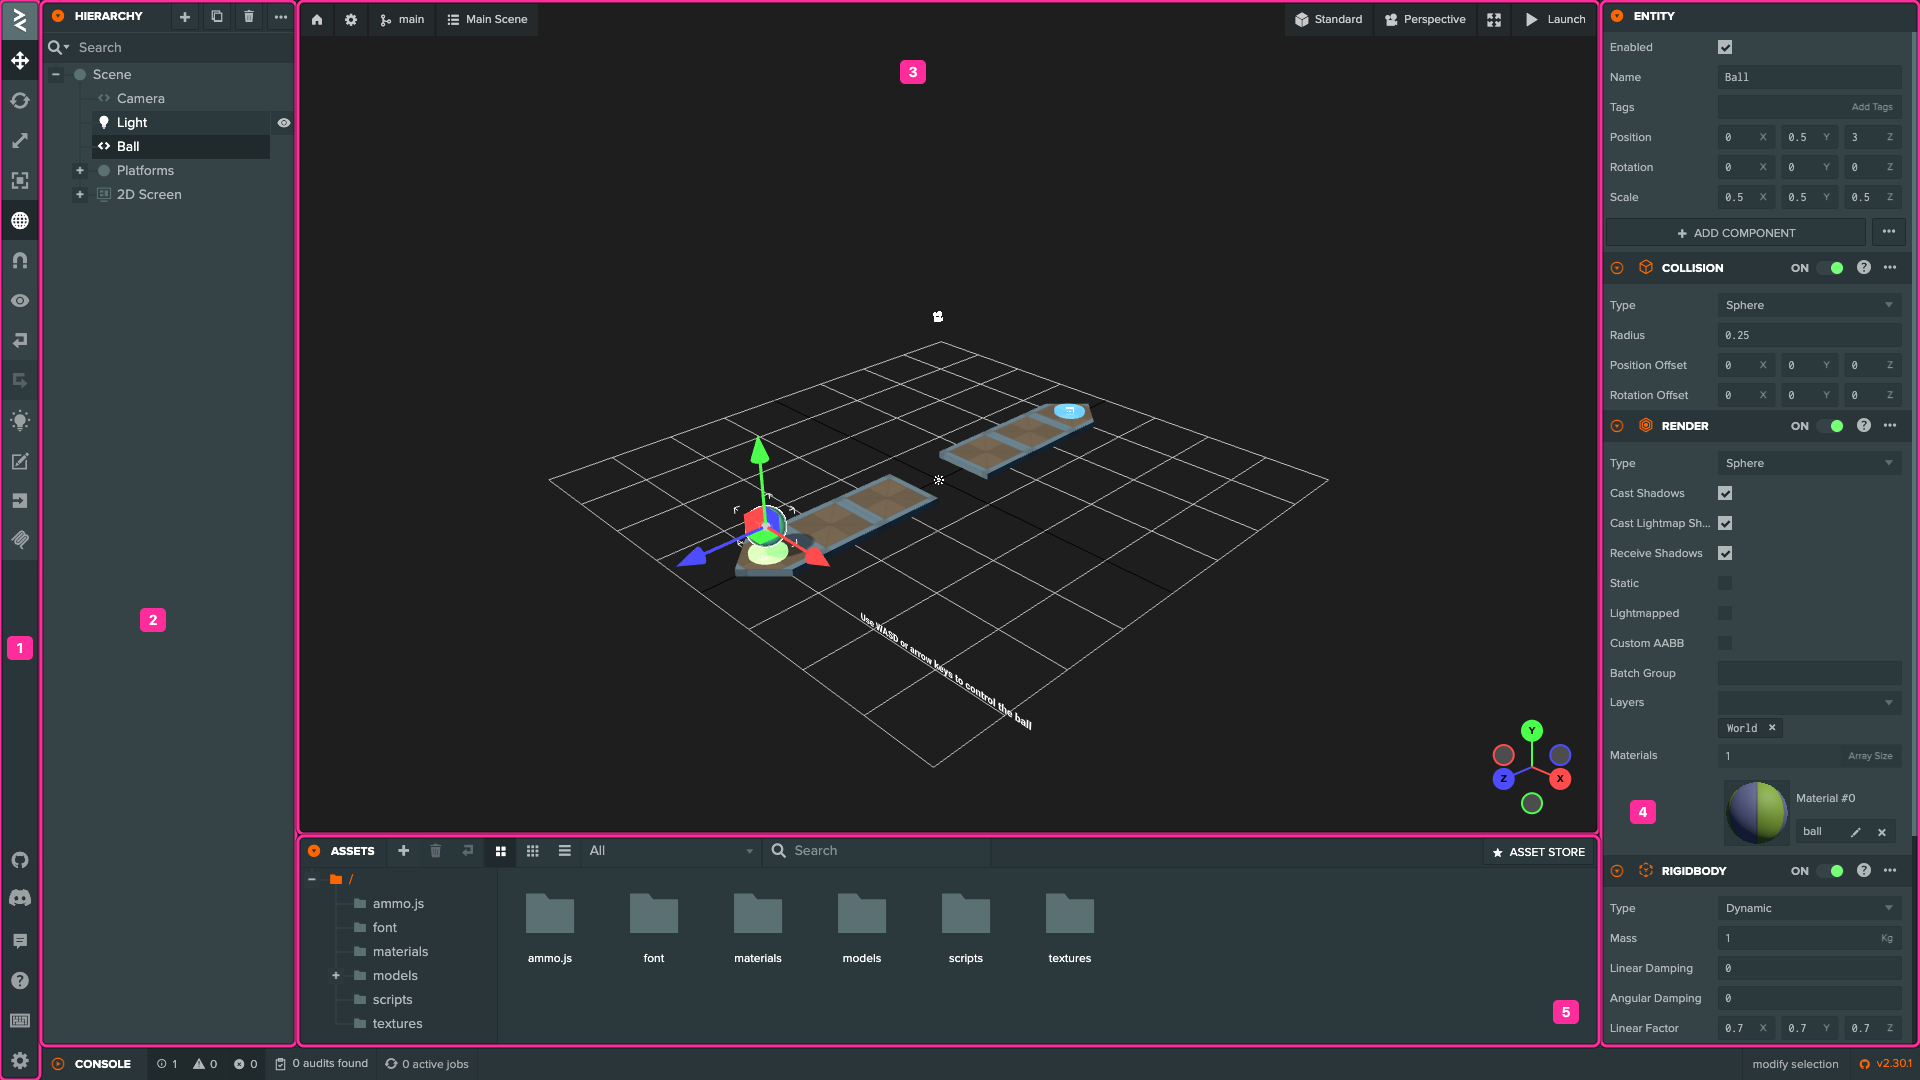
Notice one important idea in the picture: the same selected object appears in several places at once. The Ball is listed in the hierarchy, visible in the viewport, and has its properties shown in the inspector. These panels are not separate worlds. They are different ways of working with the same scene.
The following short video gives you a guided tour of all four areas. Do not worry about understanding every button shown; focus on the big question: Where would I go to see, find, edit, or store something?
PlayCanvas Tutorial 1 - Getting started with PlayCanvas
Watch “PlayCanvas Tutorial 1 – Getting started with PlayCanvas” by Daniel Wood for a quick visual tour of the editor’s central workspace and its four main panels.
Watch the scene view to see the viewport described as the game’s 3D world. Then watch the hierarchy, the assets panel, and the inspector. Pause after each part and name one thing from your theatre room that you would expect to work with there.
The viewport: where you shape the room
The large middle area is the viewport. Think of it as the model-making table for your 3D scene. It shows the scene as currently rendered in the editor, and lets you view it from different angles while you build.
When you create a wall, you will use the viewport to check questions such as:
- Is the wall actually standing up?
- Does it meet the floor instead of floating above it?
- Is there a gap where the doorway should be?
- Is the low passage low enough to require crouching later?
The viewport is not automatically the player’s view. At first, you move an editor camera around freely to inspect your work. Later, your actual in-game camera will be attached to the player. Keeping those two ideas separate avoids a common beginner confusion:
| View | Purpose |
|---|---|
| Editor camera in the viewport | Lets you inspect and edit the scene from any useful angle. |
| Game camera | Shows what the player sees when the project is launched. |
In the viewport’s camera menu, Perspective view makes near objects appear larger, like normal human vision or a movie camera. This is useful for getting a natural sense of your room. The Top, Front, Side, and other orthographic views remove perspective, making them useful when you need to line walls up accurately.
When an entity is selected, you may see a coloured control attached to it. This is called a gizmo. It helps you transform the entity:
- Translate moves it to a different place.
- Rotate turns it.
- Scale changes its size.
You do not need to master those controls today. For now, recognize the viewport as the place where the change becomes visible. In the next few lessons, you will use these tools to make floor and wall blocks into an actual room.
Viewport | PlayCanvas Developer Site
Read the official PlayCanvas guide to confirm the viewport’s main job, learn why it has different camera views, and identify the three gizmo types you will use for blockout work.
In the “Cameras” section, read the viewport introduction. Focus on the difference between Perspective and the orthographic views such as Top and Front. Then, in the “Gizmos” section, read the gizmo explanation. Notice which visible shape belongs to Translate, Rotate, and Scale.
A useful design habit is to switch viewpoints when you are unsure. If a wall looks fine in Perspective view but is accidentally sideways, a Front or Side view will reveal the mistake quickly.
The hierarchy: the scene’s cast list
On the left is the Hierarchy panel. It lists every entity that is currently part of the open scene. If the viewport is the physical theatre stage, the hierarchy is the cast-and-props list that tells you what is on that stage.
A simple version of your future test room might look like this:
Scene
├── Camera
├── Directional Light
├── Room
│   ├── Floor
│   ├── Ceiling
│   ├── Wall_Back
│   ├── Wall_Left
│   ├── Wall_Right
│   └── Doorway_Frame
└── Door
This is a tree, not just a random list. An entity can be a parent, with other entities as its children underneath it. In this example, Room is the parent of the floor, ceiling, and walls.
Parenting is useful because moving or rotating a parent also moves or rotates its children. If you made an entire doorway frame from three block entities, you could place them beneath a parent named Doorway_Frame. Then you can move the complete frame together instead of moving three pieces one at a time.
For now, the hierarchy has three main purposes:
- Find an entity. Click
Wall_BackorCamerain the list even if it is difficult to see in the viewport. - Select an entity. Once selected, its settings appear in the Inspector.
- Understand and organize relationships. Indentation shows which entities belong beneath a parent.
The hierarchy becomes more valuable as your scene grows. Names like Box 17 and Box 18 soon become impossible to remember. Names such as Wall_Left, Low_Passage, and Door_Hinge tell you what each object is supposed to do.
Hierarchy Panel | PlayCanvas Developer Site
Read the official guide’s explanation of how the Hierarchy represents a scene and why parent-child relationships make groups of entities easier to handle.
Start with the “Hierarchy Panel” introduction and read the tree-view explanation. Then continue into “Organizing the Hierarchy” and read the parent-child explanation. Picture a doorway frame or a group of room walls as the example group.
The inspector: the selected object’s control panel
The Inspector panel is usually on the right. It answers this question:
“What is this selected thing, and what can I change about it?”
The inspector always depends on what you selected. Click an entity in the hierarchy or viewport, and the inspector displays that entity’s details. Click an asset in the Assets panel, and it displays information about that asset instead.
For a scene entity, the top of the inspector commonly includes its:
- Name, such as
Wall_Right; - Position, which says where it is;
- Rotation, which says which way it faces;
- Scale, which says how large it is.
These are often called an entity’s transform values. PlayCanvas uses three directions, , , and , to describe positions, rotations, and scale. You do not need to memorize which direction each letter represents yet. When you make the room, you will learn them by using them.
The Inspector also shows an entity’s components. Components give entities particular abilities or data. For example, a future wall entity will need a visual appearance, and it will eventually need collision so the player cannot walk through it. A camera entity has camera settings; a light entity has light settings.
Do not try to add components yet. The key point is simpler:
- Hierarchy: “Which entity do I want?”
- Inspector: “What settings does that entity have, and what should I change?”
For example, suppose your wall is too short. You could select Wall_Back in the hierarchy, then find its Scale values in the inspector and make it taller. You would watch the viewport to make sure the result looks right. That three-panel teamwork is how much of level building works.
The Assets panel: your reusable file library
The Assets panel runs along the bottom of the editor. It stores the files and resources belonging to the whole project: materials, textures, 3D models, audio files, and later, JavaScript scripts.
This leads to a very important difference:
| Term | Meaning in your theatre project |
|---|---|
| Entity | An object placed in the current scene, such as Floor, Door, or Camera. |
| Asset | A reusable project resource, such as a grey wall material, a wood texture, or a door script. |
Imagine you create one faded-red curtain material. The material asset lives in the Assets panel. You can then assign that same material to several curtain entities in the scene. The material is reused; it does not need to be remade for every curtain.
At this stage, you will probably have very few assets. That is fine. Later, keeping them in folders will prevent your project becoming messy. A sensible future structure could be:
Assets
├── materials
├── models
├── scripts
└── textures
The Assets panel is not where you position walls in the room. It is where you store the pieces you may use again. The hierarchy tracks entities currently in the scene; the Assets panel tracks reusable resources available to the project.
Put the four panels together
Here is a realistic building moment. You are creating a block for the left wall of the theatre room.
- In the Hierarchy, you choose the entity named
Wall_Left. - In the Inspector, you give it an exact position and make it tall and thin.
- In the Viewport, you look around the room to check that the wall meets the floor and does not block the doorway.
- In the Assets panel, you later choose a material asset to give the wall a readable colour.
Each panel has a different responsibility, but they support one action: building and checking the scene.
When you feel lost, use this quick diagnosis:
| If you are wondering… | Go to… |
|---|---|
| “What does the room look like from here?” | Viewport |
| “Where is the camera, light, or wall I made?” | Hierarchy |
| “How do I rename, resize, or change settings on this object?” | Inspector |
| “Where are my materials, textures, models, and scripts?” | Assets panel |
A good first exploration session is to open a blank PlayCanvas scene, click its Camera and Light in the hierarchy, and watch the Inspector change. Then click around in the viewport and notice that selection stays connected across the editor. You are only exploring, so there is nothing to “finish” yet.
Key takeaways
You now have a map of the PlayCanvas editor:
- The viewport is the visual 3D workspace where you inspect and arrange the scene.
- The hierarchy is the tree list of entities in the current scene, including parent-child groups.
- The inspector displays and edits settings for whichever entity or asset you selected.
- The Assets panel stores reusable project files, not just the objects currently placed in the room.
- The same entity can be selected through the viewport or hierarchy, then edited through the inspector.
Next, you will begin organizing the project properly by using clear names for entities and folders for assets. That will make the room much easier to build once it has more than a few blocks.
Can't find a good explanation? Sign up and we'll make it for you
Sign up