
Hello, and welcome to the course. Over the next ten weeks, you will build an iPad-first DaVinci Resolve workflow for short films, YouTube videos, and promotional edits—including projects using AI-generated footage. We will use the free version of Resolve and treat your Apple Pencil as the primary editing tool, with the keyboard and trackpad available when they genuinely save time.
This first lesson gives you a physical map of Resolve: where to assemble and trim footage in the Cut workspace, where to inspect and later correct its image in the Color workspace, and how touch and the Apple Pencil behave in each. You are not expected to make a finished edit yet. The goal is to be able to enter either workspace, identify its major regions, move confidently around a project, and bring up the right controls without accidental edits.
A first map of Resolve on iPad
When Resolve opens, you will either see a project or the Project Manager. If you are at the Project Manager, use the Home icon to return there whenever you need to see projects. For today, open any existing project or make a disposable practice project such as Resolve_Navigation_Practice. We will configure real project settings properly in the next lesson.
Your M4 iPad Air has enough power for serious work, but the important adjustment is conceptual: Resolve is not a simplified phone editor. It is a professional editor redesigned for direct manipulation. The screen has several regions, and what an action does depends on the region you touch.
At the bottom of the interface, locate the workspace or page buttons. Depending on your Resolve version, you may see additional pages, but for this course the two essential destinations are:
- Cut: choose shots, build a sequence, arrange clips, and refine edits.
- Color: correct exposure and colour, compare clips, and create a visual style.
The two pages show the same project, but organise the screen around different decisions. Think of the Cut page as the place where you decide what the audience sees and when. Think of the Color page as the place where you decide how that chosen image looks.
DaVinci Resolve iPad Tutorial - How To Edit Video On iPad!
Watch “DaVinci Resolve iPad Tutorial - How To Edit Video On iPad!” by Justin Brown - Primal Video for a fast visual orientation to the Project Manager, Cut page, and Color page.
Watch project setup to see where the Home button, Project Manager, new-project control, Cut page, and Color page sit in the iPad interface. Then jump to Color layout for a first view of the Color page’s clip strip, nodes, scopes, and tool palette. Do not try to learn the grading controls yet; just identify the regions on your own screen.
A version difference is normal: page icons, panel locations, and the number of available pages can change as Blackmagic updates Resolve. Use the purpose of the region, not a screenshot’s exact pixel position, as your guide.
Your Apple Pencil gesture vocabulary
Resolve accepts both finger touch and Apple Pencil input. A useful default division of labour is:
- Use your Apple Pencil when you need precision: selecting a small edit point, dragging a playhead, moving a clip, adjusting a node, or handling on-screen controls.
- Use your finger for broad navigation, opening panels, and direct adjustments that do not demand precision.
- Use your trackpad or keyboard when it feels faster, but do not make them a dependency. This course will teach a complete touch-and-Pencil workflow.
The core gestures are simple, but each has a distinct meaning.
| Gesture | Typical result | Practical caution |
|---|---|---|
| Tap | Selects a clip, activates a button, chooses a page or tool | A selected clip is not necessarily being moved; selection is safe. |
| Tap and drag | Moves the item or control you started on | Begin the drag deliberately on the clip, node, handle, or playhead—not empty space. |
| Swipe across a timeline area | Navigates through the sequence or scrubs, depending on the control | Watch the viewer and red playhead to confirm whether you are moving through time or repositioning an item. |
| Long-press | Opens a context-sensitive menu, similar to right-click | Keep the Pencil still briefly; moving it turns the action into a drag. |
| Double-tap a setting label | Often resets that parameter | Useful after experimentation, but check what has reset before continuing. |
The key idea is context sensitivity. A long-press on a clip can produce clip-specific commands. The same long-press in empty Media Pool space can offer organisational or import actions. In the Color page, long-pressing a node produces node-related commands. There is no universal “right-click menu”; Resolve offers the menu relevant to the thing under your Pencil.
Everything You Need To Know: Using Apple Pencil in DaVinci Resolve iPad
Watch “Everything You Need To Know: Using Apple Pencil in DaVinci Resolve iPad” by Daniel Kovacs. It demonstrates the small set of Pencil gestures that you will repeatedly use throughout the course.
First watch core gestures. Notice the difference between dragging a clip or playhead and holding the Pencil in place for a contextual menu. Then skip to context controls to see how a long-press changes in the Media Pool and Color page, and how Pencil dragging can connect nodes. For now, concentrate on recognising the interactions rather than memorising each menu command.
Orientation drill — about 5 minutes. With your practice project open, make only these reversible actions:
- Tap Cut, then tap Color, then return to Cut.
- Tap a clip in the timeline, then tap empty timeline space. Observe the selection outline appear and disappear.
- Long-press once on a timeline clip. Read the menu, then tap away to dismiss it without choosing anything.
- Drag the red playhead to three different moments in the timeline. Do not drag the clip itself.
- In the Color page, select a clip thumbnail in the clip strip, then tap its node once.
This is deliberately modest. The habit to build now is to pause after every action and notice: What region did I touch? What did Resolve select? What changed in the viewer?
Navigating the Cut workspace
Open the Cut page. It is designed for quick editorial decisions and becomes your main working environment through the next several modules.
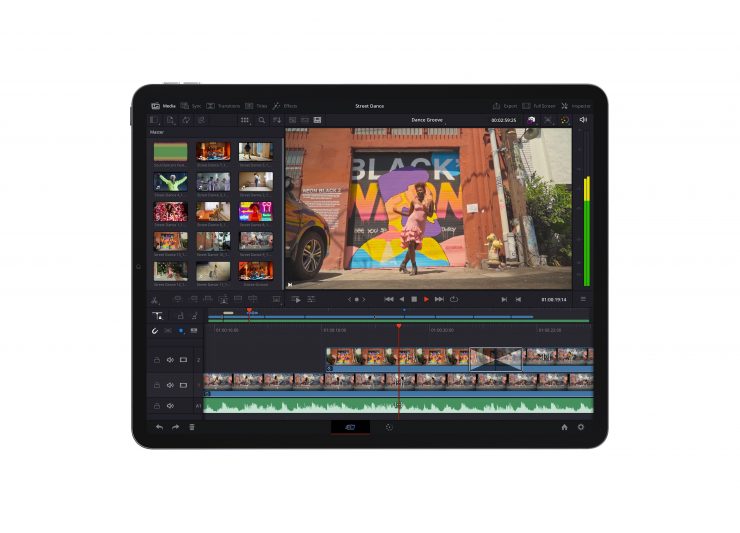
Although panel positions may vary slightly with screen layout, find these functional areas:
-
Media Pool
This is the project’s collection of media: video clips, audio, stills, and later graphics. It is where you locate source material. Importing and organisation are next module’s focus, so for now simply recognise it as the place footage begins. -
Viewer
The large image area displays the current frame. It may show a source clip you are reviewing or the result of your timeline edit. If the picture changes when you move the playhead, you are viewing the timeline’s current position. -
Controls beneath the viewer
These include playback and navigation controls. The timeline playhead tells Resolve which frame is current. Moving it changes what you see and hear; it does not change your edit. -
Timeline overview
This compact strip gives you a high-level view of the whole sequence. Its job is navigation. Drag the small playhead or indicator here when you need to jump quickly from the beginning of a long project to a later section. -
Detailed timeline
This is the lower, more precise representation of clips, tracks, edits, and audio waveforms. It is where you will make most editorial adjustments. In the coming lessons, every cut, trim, transition, title, and music cue will ultimately be visible here.
The overview and detailed timeline solve different navigation problems. In a 30-second social video, the detailed timeline may be all you need. In a ten-minute YouTube piece, the overview lets you travel rapidly across the edit, while the detailed timeline lets you work accurately around a single spoken word or cut.
Move through time without moving your edit
A novice error is to confuse moving the playhead with moving a clip. The difference is fundamental:
- Moving the playhead changes the frame you are watching.
- Moving a clip changes when that media appears in your finished video.
Use the narrow red playhead and the viewer as your feedback. If you intended to navigate but a clip has shifted, immediately use Resolve’s Undo control or your keyboard shortcut, then try again with the Pencil placed on the playhead rather than the body of the clip.
To navigate a timeline on touch:
- Drag the playhead left or right for intentional, frame-conscious movement.
- Swipe horizontally in the appropriate timeline navigation area to travel through the sequence.
- Use the upper overview indicator when you need a fast, broad jump.
The following image makes the relationship between the clip timeline and the color workspace visible. The important point is that pages do not create separate copies of your edit. Selecting a moment or clip in one workspace carries through to the other.
What the Cut page is for—and what it is not yet for
The Cut page is where editorial structure takes shape. In the next modules you will use it to review footage, mark useful ranges, assemble a sequence, remove weak material, preserve continuity, control pacing, build hooks, and combine A-roll with B-roll.
For this first encounter, resist the impulse to press every button. Resolve exposes many editing tools because different editorial situations require different operations. You will learn those operations one at a time. Today, you only need a reliable route through the interface:
- Need footage? Look to the Media Pool.
- Need to see the current image? Look to the Viewer.
- Need to travel through your edit? Use the overview or playhead.
- Need to alter the order or duration of clips? Work in the detailed timeline.
- Need a command for a particular item? Select or long-press that item.
A useful safety rule: before you drag anything, ask whether you intend to manipulate time, media, or a setting. Time means the playhead; media means a clip; a setting means a control or value. That short check prevents many accidental changes.
A controlled exploration: Inspector and viewer handles
When a clip is selected, Resolve can display settings in the Inspector. You will use it later for reframing vertical videos, adjusting clip properties, and more. The Pencil works particularly well here:
- Drag horizontally over a numerical field to change its value.
- Double-tap a parameter label to reset that parameter when supported.
- Activate on-screen transform controls to manipulate a clip directly in the viewer with handles.
For example, dragging on a position or zoom value is an adjustment to a setting; dragging a visible transform handle is an adjustment to the image. Both can accomplish related tasks, but the first is more numerical and the second is more visual. For a future vertical social-media reframe, the visual handles will often be the faster starting point.
Do not change framing on footage you care about during this lesson. Use a practice clip, make a noticeable adjustment, reset it, and verify that it returns to its original state.
Navigating the Color workspace
Now tap Color. It initially looks denser than the Cut page because colour work needs several kinds of evidence at once: the image itself, the clips around it, the correction structure, and numerical scopes.
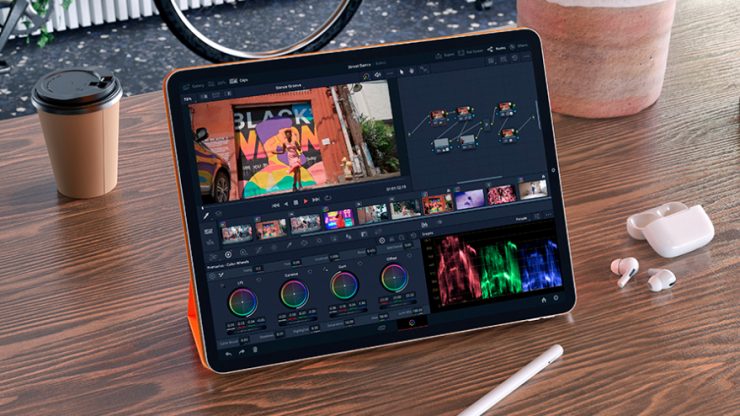
Find these areas before trying to alter a shot:
| Area | What it answers |
|---|---|
| Viewer | “What does the selected shot look like right now?” |
| Clip strip or thumbnail timeline | “Which shot am I correcting, and what shots sit beside it?” |
| Node graph | “What corrections are being applied, and in what structure?” |
| Tool palette | “Which type of correction tool am I using?” |
| Scopes | “What do brightness and colour measurements say, beyond what my screen seems to show?” |
For now, the most important concept is the selected clip. In Cut, you normally think across time and arrange many clips. In Color, you usually choose one shot from the clip strip and examine or adjust that shot. Tap a thumbnail to select it, then confirm that the viewer and the node graph correspond to that choice.
Nodes: a compact visual history of corrections
A node is a processing step. It receives the image, applies whatever adjustment is inside it, and passes the result onward. A fresh clip commonly begins with a simple node connected to the output.
You do not need to grade a node today. Just learn to navigate it:
- Tap a node to select it.
- Drag it to rearrange the graph visually; this changes its position on screen, not the look of the clip.
- Long-press it for node-specific options.
- With the Pencil, connections can be drawn between nodes by dragging from a node’s connection point to another appropriate connection point.
This node-based structure matters later because it lets you keep technical correction separate from creative style. In the color module, you will correct white balance and exposure on one node, then build a restrained look on a different node. For now, simply recognise a node graph as a map of image-processing steps, not as a timeline.
Tool palettes and scopes: recognise them, do not master them yet
Across the Color page’s tool ribbon are several families of tools. The primary color wheels are a sensible first destination later because they contain broad tonal and colour adjustments. Curves, qualifiers, windows, tracking, and other tools are available for more specific work.
The coloured graphs at the lower part of the Color page are scopes. A waveform reports the distribution of image brightness, while an RGB parade separates the red, green, and blue channels. They are objective measurement tools: particularly valuable because a bright room, a dim room, or a display setting can make your eyes misjudge an image.
In this lesson, only practise showing and hiding the scope panel if it is visible in your layout. Do not attempt to interpret it yet. The color module will begin by teaching exactly what its patterns mean.
A repeatable page-switching routine
Whenever you begin a real project, use this lightweight routine to avoid getting lost:
- Open Cut and locate the Media Pool, viewer, overview, and detailed timeline.
- Navigate to the part of the sequence you want to inspect.
- Select the relevant timeline clip.
- Switch to Color.
- Confirm the intended clip in the thumbnail strip and viewer before changing anything.
- Return to Cut when you need to make decisions about clip order, duration, or transitions.
The principle is simple: edit decisions happen on the Cut page; image decisions happen on the Color page. You will occasionally cross between them, but keeping that distinction clear prevents a cluttered, unfocused workflow.
Ten-minute navigation practice
Use any short, non-critical footage or a temporary project. Without making a permanent edit:
- Start at the beginning of the sequence and use the overview to jump near the end.
- Use the detailed timeline to return to a specific visible cut.
- Select a different clip in the timeline and confirm it changes in the viewer.
- Switch to Color, then select two different clip thumbnails in the clip strip.
- Tap the node for the selected clip, long-press it, and dismiss the menu.
- Return to Cut and verify that the same portion of the sequence is still selected.
If a gesture behaves unexpectedly, slow down rather than pressing harder. On a touch interface, precision usually comes from a clean initial touch and a deliberate short pause before a drag or long-press.
Wrap-up
You now have a working map of DaVinci Resolve on your iPad:
- The Cut page is your workspace for footage, timelines, assembly, and editorial decisions.
- The Color page is your workspace for selected shots, color tools, nodes, and scopes.
- Tap selects, drag manipulates the specific control you begin on, long-press opens a context-dependent menu, and the playhead changes viewing position without changing the edit.
- The most reliable habit is to identify whether you are manipulating time, media, or a setting before you move the Pencil.
Next lesson, you will configure a project for a specific delivery format. You will set timeline resolution and frame rate deliberately, then make sure your media-storage choices support the kind of YouTube, short-film, and promotional work you want to deliver.
Can't find a good explanation? Sign up and we'll make it for you
Sign up