Hello! Welcome back to our course on designing high-load distributed systems.
In our last lesson, we established high availability for a single Redis master using Redis Sentinel. This ensures automatic failover, but it doesn't address the challenge of scaling a dataset that exceeds the memory capacity of a single server. For that, we need to partition, or shard, the data across multiple nodes.
Today, we will address this limitation. The learning outcome for this lesson is to configure Redis Cluster for horizontal sharding and analyze partition distribution. You will learn how Redis natively partitions data, how to set up a multi-master cluster from scratch, and how to analyze and modify the data distribution by adding nodes and rebalancing the cluster.
This lesson moves us from single-node high availability to multi-node scalability, a fundamental requirement for the large-scale systems you manage and build.
1. Redis Cluster Sharding Model
Unlike Redis Sentinel, which manages a single master-replica set, Redis Cluster creates a truly distributed system where the dataset is split across multiple master nodes. This provides both scalability and high availability, as each master can have its own replicas.
The core of Redis Cluster's sharding mechanism is not consistent hashing, which you might have encountered in other systems. Instead, it uses a concept called hash slots.
To understand this mechanism, please read the following section from the official Redis documentation.
Scale with Redis Cluster | Docs
This document explains the fundamental data sharding model of Redis Cluster, based on hash slots. It's crucial for understanding how keys are distributed across the cluster.
Read the section 'Redis Cluster 101', focusing on 'Redis Cluster data sharding'. Pay attention to the total number of hash slots, the CRC16 algorithm, and the concept of hash tags.
As you've read, the key concepts are:
- 16384 Hash Slots: The entire keyspace is divided into 16384 slots.
- Key-to-Slot Mapping: Each key is mapped to a single slot using the formula
slot = CRC16(key) % 16384. This mapping is deterministic and permanent for any given key. - Slot Distribution: The 16384 slots are distributed among the master nodes in the cluster. Each master is responsible for a subset of the slots.
The following images illustrate this architecture. The first shows how a client request is routed to the correct master based on the key's hash slot.

The second image shows a complete cluster with masters, replicas, and their assigned slot ranges.
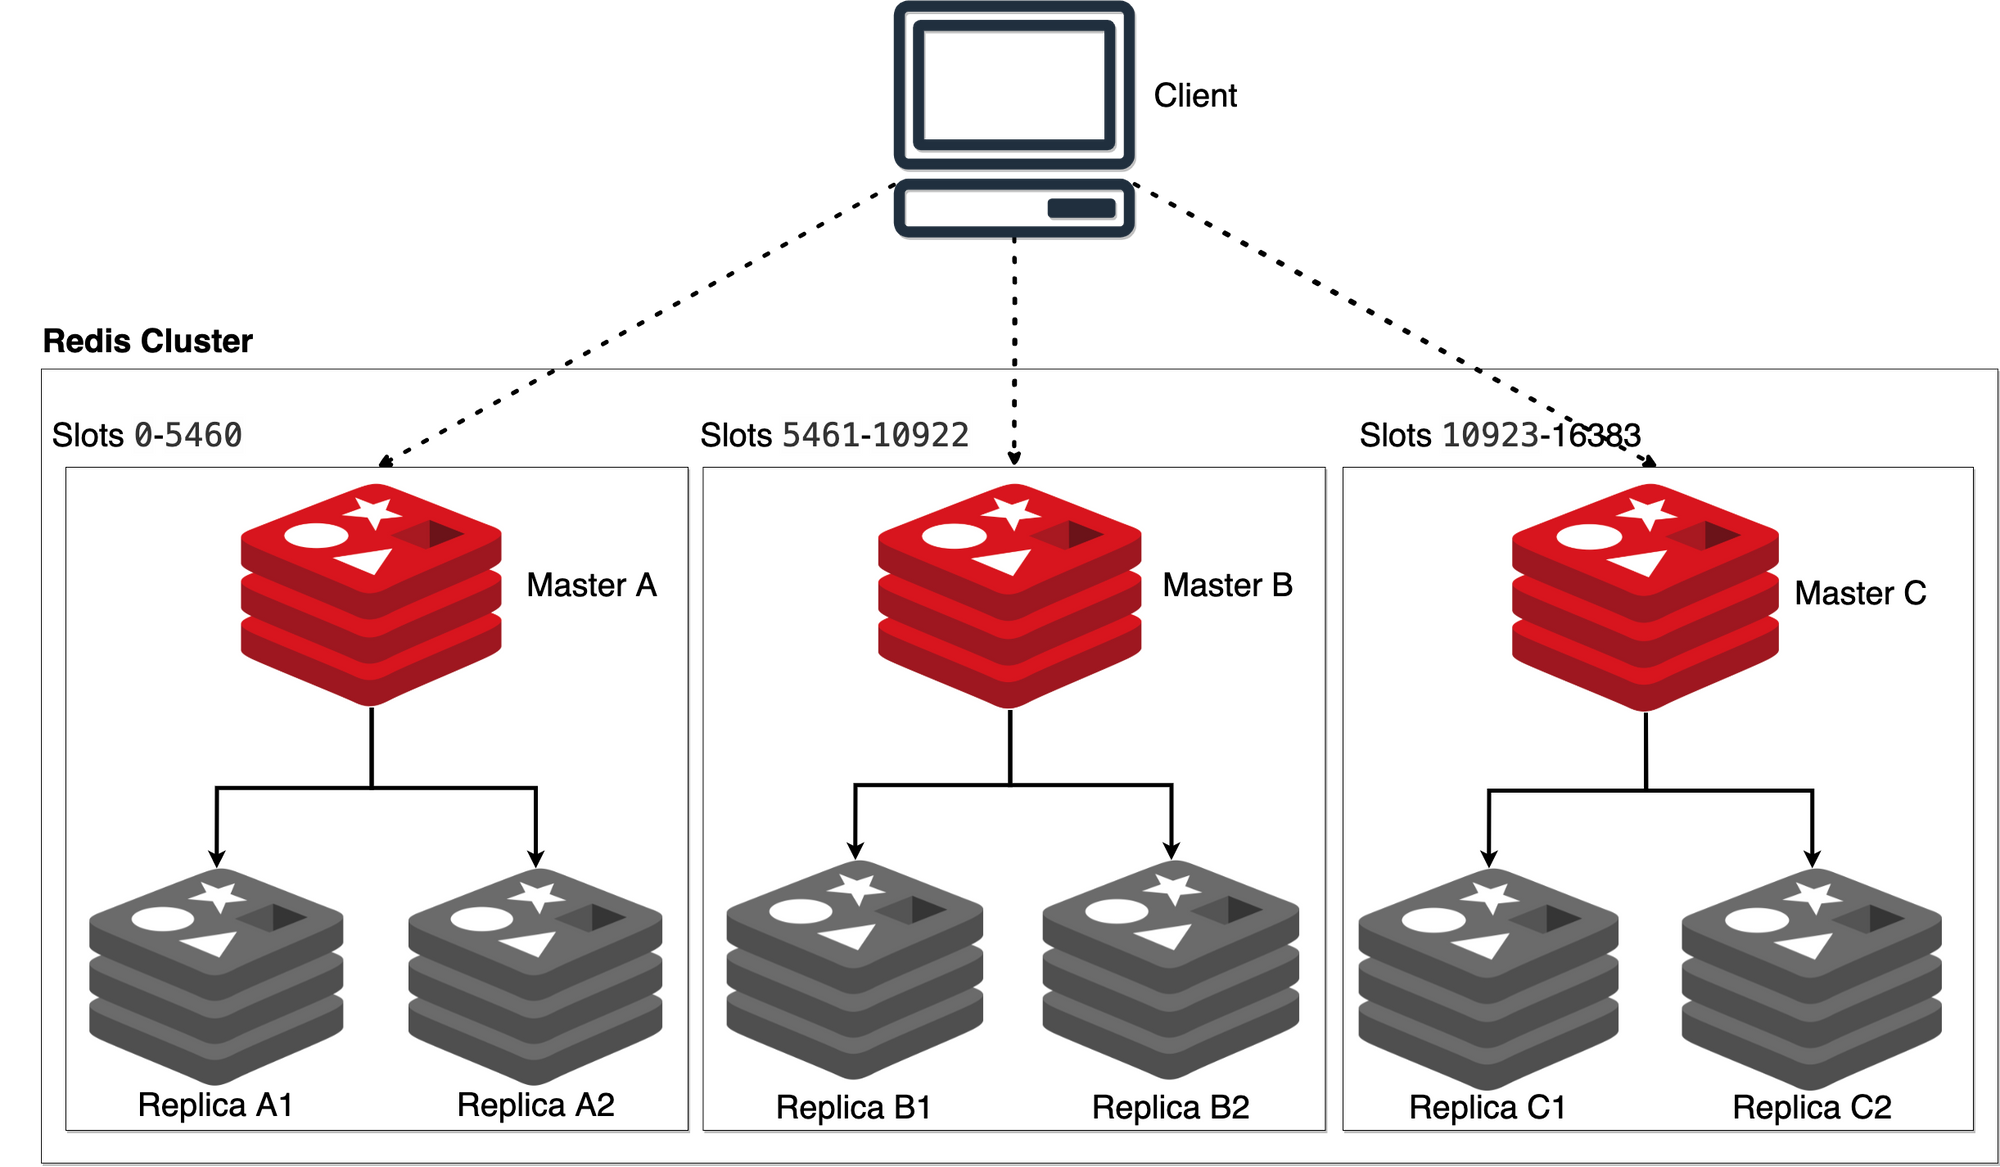
A critical practical consideration mentioned in the reading is hash tags. By default, keys like user:1000:profile and user:1000:session will likely hash to different slots and reside on different nodes. This prevents multi-key operations (like transactions or Lua scripts) on them. By using hash tags, e.g., user:{1000}:profile and user:{1000}:session, you force Redis to hash only the part within the curly braces (1000), guaranteeing that both keys land in the same slot. This is a vital technique for data modeling in a sharded Redis environment.
2. Configuring and Creating a Redis Cluster
To create a cluster, you first need to start several Redis instances, each configured to run in cluster mode.
Configuration
The configuration for a cluster node is minimal. The key directive is cluster-enabled yes.
4.1 Exercise - Creating a Redis Cluster
This exercise guide from Redis provides a concise look at the minimal redis.conf file needed for a cluster node.
Review 'Step 1' to see the minimal configuration file. The important directives are cluster-enabled, cluster-config-file, and cluster-node-timeout.
A minimal redis.conf for a cluster node on port 7000 would be:
port 7000
cluster-enabled yes
cluster-config-file nodes-7000.conf
cluster-node-timeout 5000
appendonly yes
cluster-enabled yes: Starts the instance in cluster mode.cluster-config-file: This file is managed by Redis, not you. It stores the cluster state (node identities, slot assignments, etc.) and is used to recover the configuration on restart. Each node needs a unique file.cluster-node-timeout: The time in milliseconds a node must be unreachable to be considered failing. This is analogous to thedown-after-millisecondssetting in Sentinel.
Cluster Creation
Once you have multiple instances running in cluster mode, you use the redis-cli utility to orchestrate them into a functioning cluster. The create command handles node handshakes and distributes the hash slots among the designated masters.
The following resources walk you through the practical steps of starting the instances and creating the cluster.
4.1 Exercise - Creating a Redis Cluster
This tutorial provides the commands to set up the necessary directories and configuration files for a 6-node cluster and then initialize it.
Read through 'Step 2' to 'Step 5'. Focus on the structure (creating separate directories for each instance) and the redis-cli --cluster create command. The --cluster-replicas 1 option automatically assigns one replica for each master.
The key command is:
redis-cli --cluster create 127.0.0.1:7000 127.0.0.1:7001 \
127.0.0.1:7002 127.0.0.1:7003 127.0.0.1:7004 127.0.0.1:7005 \
--cluster-replicas 1
redis-cli will propose a slot distribution plan. Once you accept, it configures the nodes, and you will see the message [OK] All 16384 slots covered, indicating the cluster is live.
3. Analyzing and Managing Partition Distribution
With the cluster running, you can now inspect and manage how the data partitions (hash slots) are distributed.
Inspecting the Cluster
You can connect to any node in the cluster to get a global view of the topology.
CLUSTER NODES: This command gives a detailed list of all known nodes in the cluster, their roles (master/replica), their unique IDs, and the hash slots they serve.CLUSTER SLOTS: This provides a more concise, nested array format showing slot ranges and the master/replica addresses for each range. This is often what client libraries use to build their internal routing table.
When you interact with the cluster using a cluster-aware client (or redis-cli -c), you can issue a command for any key to any node. If that node doesn't own the slot for that key, it will respond with a MOVED redirection error, pointing the client to the correct node. Smart clients cache this slot mapping to avoid redirection on subsequent requests.
Scale with Redis Cluster | Docs
This section demonstrates how redis-cli in cluster mode (-c) handles redirection when a command is sent to the wrong node.
Review the 'Interact with the cluster' section to see the -> Redirected to slot [...] messages. This illustrates the client-side effect of partition distribution.
Resharding: Modifying Partition Distribution
A key operational task is rebalancing the cluster, typically after adding new nodes to increase capacity. This process is called resharding. It involves moving hash slots (and all the keys within them) from existing nodes to others.
The redis-cli --cluster reshard command provides an interactive tool for this. Let's review the process of adding a new master node and then resharding the cluster to utilize it.
4.1 Exercise - Creating a Redis Cluster
This exercise demonstrates the complete workflow for scaling out a cluster: adding a new empty master node and then using the reshard command to move slots to it.
Read through 'Step 6' to 'Step 10'. This covers: Starting new Redis instances for the new shard (master + replica). Using add-node to join the new master to the cluster (it will initially hold no slots). Using reshard to interactively specify how many slots to move, which node will receive them (the new master), and which nodes will be the source (all).
The resharding process highlights the dynamic nature of partition management:
- Add Node: You first add a new, empty master node to the cluster with
redis-cli --cluster add-node <new_node_addr> <any_existing_node_addr>. At this point, the partition distribution is unchanged; the new node simply joins the cluster gossip protocol. - Reshard: You then run
redis-cli --cluster reshard <any_node_addr>. The tool will ask you:- How many slots to move.
- The ID of the receiving node (the new master).
- The source node(s) (you can specify
allto take slots proportionally from all other masters).
- Execute:
redis-clithen performs the slot migration. For each slot, it tells the source and destination nodes about the change and moves any keys within that slot. This is done live, without downtime.
After resharding, running CLUSTER NODES again will show the new master holding its assigned range of slots, confirming the change in partition distribution.
Conclusion
In this lesson, you've learned how to horizontally scale Redis beyond the limits of a single machine using Redis Cluster.
Key Takeaways:
- Redis Cluster provides horizontal scaling by sharding the dataset across multiple master nodes. It also offers high availability by allowing each master to have replicas.
- Sharding is based on 16,384 hash slots. Every key is deterministically mapped to a slot, and slots are distributed among master nodes.
- Cluster creation is managed by
redis-cli. Thecreatecommand initializes the cluster and performs the initial slot distribution. - Partition distribution is dynamic. You can analyze the current slot distribution with
CLUSTER NODESand modify it live usingredis-cli --cluster reshardto add capacity or rebalance the cluster. - Hash tags (
{...}) are a crucial data modeling tool to ensure related keys are stored on the same node, enabling multi-key operations.
Preview of the Next Lesson:
We have now covered Redis for caching, high availability, and sharding. We will now shift our focus to a different, but equally critical, component of modern distributed architectures: event streaming. In the next lesson, we will begin our exploration of Apache Kafka, starting with its fundamental log-based architecture and its durability guarantees.