Hello! Welcome back to our module on API & Web Application Security.
In the last lesson, we explored how Laravel's core components—the Eloquent ORM and the Blade templating engine—provide powerful, automatic defenses against SQL Injection and Cross-Site Scripting (XSS). We learned that by following standard Laravel practices, you are already well-protected against two of the web's most common vulnerabilities.
Today, we continue our journey by focusing on another critical security threat: Cross-Site Request Forgery (CSRF). While SQLi and XSS involve injecting malicious data into your application, CSRF is about tricking a legitimate, authenticated user into unknowingly submitting a malicious request. This lesson will explain what CSRF is, how the attack works, and most importantly, how you can implement Laravel's built-in protection for your web routes.
1. Understanding the CSRF Vulnerability
If you've ever built a form in Laravel, submitted it, and been greeted by a 419 Page Expired error, you've already encountered Laravel's CSRF protection. Let's start by understanding the problem this error is designed to solve.
30 Days to Learn Laravel, Ep 16 - Forms and CSRF Explained (with Examples)
To begin, let's watch a short segment from a Laracasts video that demonstrates the exact 419 error that occurs when a form is submitted without CSRF protection.
Watch from 00:10:13 to 00:10:55. This sets the stage for why CSRF protection is necessary.
That 419 error isn't a bug; it's a security feature. It means Laravel stopped a request because it couldn't verify that the request was intentionally sent by the authenticated user from your application.
So, what exactly is a Cross-Site Request Forgery? It's an attack that forces an end user to execute unwanted actions on a web application in which they're currently authenticated. The "cross-site" part means the malicious request originates from a different site than the one it targets.
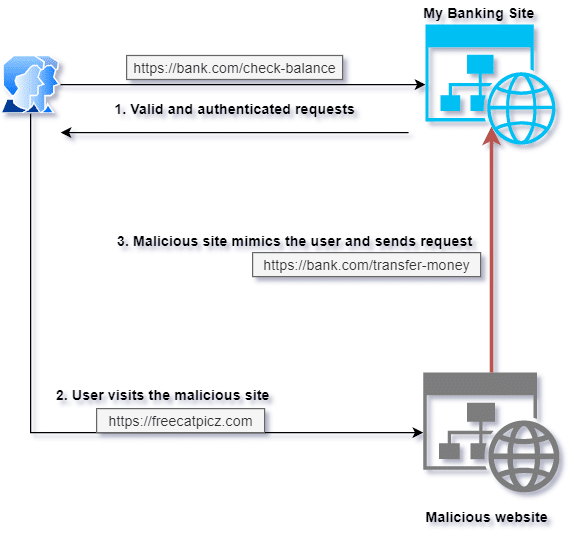
To make this concept perfectly clear, let's watch an excellent explanation that uses a simple story about a bank website.
30 Days to Learn Laravel, Ep 16 - Forms and CSRF Explained (with Examples)
The same Laracasts video provides a brilliant, easy-to-understand explanation of how a CSRF attack works in practice. This will help you understand the 'why' behind the protection.
Watch from 00:10:55 to 00:15:34. The presenter uses a simple analogy to explain how a malicious website can trick your browser into performing an action on your behalf on another site where you are logged in.
As the video explained, the core of the vulnerability lies in how browsers handle sessions. When you're logged into your-app.com, your browser stores a session cookie. If you then visit malicious-site.com, and that site has a hidden form that submits to your-app.com/delete-account, your browser will dutifully send your session cookie along with that request. Your application sees a valid session and, without CSRF protection, proceeds to delete the account.
2. Implementing Laravel's CSRF Protection
The solution to CSRF is to require a secret, unique value in the request that a malicious site cannot guess or access. This is known as the Synchronizer Token Pattern.
Laravel handles this for you automatically. Here's how it works:
- Laravel generates a unique CSRF "token" for every active user session.
- This token is stored on the server-side in the user's session.
- Your application must include this token in every state-changing request (forms using
POST,PUT,PATCH,DELETE). - When a request comes in, the
VerifyCsrfTokenmiddleware (part of thewebmiddleware group) intercepts it and compares the token from the request with the one stored in the session. - If they match, the request proceeds. If they don't match (or if the token is missing), Laravel throws a
419error.
Adding the CSRF Token to Your Forms
Implementing this protection in a standard Laravel form is incredibly simple. You just need to add the @csrf Blade directive inside your <form> tags.
30 Days to Learn Laravel, Ep 16 - Forms and CSRF Explained (with Examples)
Let's see exactly how to add the @csrf directive and what it does behind the scenes.
Watch from 00:15:34 to 00:17:25. This section shows you how to add the @csrf directive to a form, inspect the hidden input it creates, and see the difference between a successful request (with the token) and a failed one (with a mismatched token).
As you saw, the @csrf directive expands to a hidden input field:
<input type="hidden" name="_token" value="a_long_random_string_of_characters">
This ensures the unique token is sent along with your form data, allowing the VerifyCsrfToken middleware to validate the request's authenticity.

For a deeper dive into the documentation, you can review the official Laravel docs.
CSRF Protection - Laravel 12.x
The official Laravel documentation provides a concise reference for CSRF protection, including the @csrf directive and the underlying middleware.
Read the sections 'Introduction', 'An Explanation of the Vulnerability', and 'Preventing CSRF Requests'. This will reinforce the concepts we've just covered.
3. Critical Security Best Practices
While @csrf is your primary tool, there are two other crucial concepts you must understand to ensure your application is fully protected.
A. Never Use GET Requests for State-Changing Actions
The VerifyCsrfToken middleware in Laravel only inspects POST, PUT, PATCH, and DELETE requests. It ignores GET requests. This is because GET requests are intended to be idempotent—that is, they should be for retrieving data, not changing it.
If you create a route that modifies data using a GET request, you completely bypass CSRF protection. An attacker can easily trick a user into visiting a URL like http://your-app.com/posts/1/delete, and the action will be performed without any token check.
This video provides a stark warning and a clear demonstration of why using GET requests for actions is a massive security hole.
Watch from 00:07:28 to 00:09:19. This is one of the most important parts of the lesson. Pay close attention to how changing a route from POST to GET renders the CSRF protection useless.
Golden Rule: Always use the appropriate HTTP verb for your actions.
GET: Retrieve data.POST: Create a new resource.PUT/PATCH: Update an existing resource.DELETE: Delete a resource.
B. Excluding Routes from CSRF Protection
Occasionally, you may need to exclude a URI from CSRF protection. The most common use case is for webhooks from external services like Stripe, GitHub, or any other API that needs to send data to your application. These services won't know your user's CSRF token, so their requests would be blocked.
You can define these exceptions in the bootstrap/app.php file.
// In bootstrap/app.php

->withMiddleware(function (Middleware $middleware) {
    $middleware->validateCsrfTokens(except: [
        'stripe/*', // Exclude all routes starting with 'stripe/'
        'webhooks/github',
    ]);
})
You should be very deliberate about which routes you add to this list. Only add routes that are specifically designed to be accessed by external, server-to-server services.
CSRF Protection - Laravel 12.x
The official documentation clearly explains how to configure these exclusions.
Review the section 'Excluding URIs From CSRF Protection' for the official guidance on this topic.
Conclusion
You've now added another essential layer of security to your developer toolkit. By understanding and correctly implementing CSRF protection, you ensure that actions taken within your application are initiated only by the users who intend to perform them.
Key Takeaways:
- CSRF Attack: A malicious site tricks an authenticated user's browser into sending an unwanted request to your application.
- Laravel's Defense: Laravel uses a synchronizer token system. A unique token is generated per session and must be included in all state-changing requests.
- Implementation: Add the
@csrfBlade directive to all your forms that usePOST,PUT,PATCH, orDELETEmethods. - Critical Rule: Never use
GETrequests to modify data. This completely bypasses CSRF protection. - Exceptions: You can exclude specific URIs (like webhooks) from CSRF protection in your
bootstrap/app.phpfile, but do so with caution.
Up Next:
We've focused on protecting your web routes, which are typically stateful and session-based. But what about when you are building an API that might be consumed by a single-page application (SPA) or a mobile app from a different domain? This introduces a new set of browser security rules. In our next lesson, we will explore Cross-Origin Resource Sharing (CORS) and learn how to configure your Laravel API to securely handle requests from different origins.