
Welcome back! In our previous lesson, we successfully navigated the Android signing process, generating a release-ready Android App Bundle (AAB). We have now officially created the package for one half of our target market. It's time to do the same for the other half: the Apple ecosystem.
This lesson focuses on the iOS equivalent of what we just did for Android. We will move from a development-ready Xcode project to a finalized, signed application archive ready for submission to the App Store. By the end of this session, you will have used Xcode to archive a release build of your app and initiated its upload to App Store Connect, ensuring it is correctly signed for distribution.
1. The iOS Signing Philosophy: A Brief Detour
Before we dive into Xcode, it's worth contrasting the iOS signing model with the Android one you just mastered. With Android, you created a private key (.keystore file) on your own machine. This key is your identity, and you are solely responsible for it.
Apple's approach is more centralized. While you still generate a key pair on your Mac, Apple acts as the certificate authority.
- Development Certificate: Proves you are a trusted developer allowed to run apps on your own test devices.
- Distribution Certificate: Proves you are a trusted developer allowed to submit apps to the App Store or distribute them for testing via TestFlight.
This system ensures that only registered, paying members of the Apple Developer Program can publish apps. In the past, managing these certificates and their related "provisioning profiles" was a complex, manual process. Today, Xcode's "Automatically manage signing" feature handles almost all of this for us, which is the path we'll be taking.
iOS App Store Submission Tutorial
For a deeper understanding of the concepts behind iOS signing, this section from a freeCodeCamp.org tutorial provides an excellent explanation of the different types of certificates and their purposes.
Watch the segment from "two different types of certificate". This will give you a solid conceptual foundation for what Xcode will be doing automatically for us in the next steps. The video distinguishes clearly between development and distribution certificates.
2. Preparing for the Archive
Just as with Android, preparation is crucial. We must ensure our final web build is included in the package.
- Create a Production Web Build: Run the build script for your React SPA.
bun run build - Sync with Capacitor: Copy the new web assets and update the native projects.
bunx cap sync - Open Xcode:
bunx cap open ios
Once Xcode is open, there are a few pre-flight checks to perform:
- Set the Target Device: In the scheme menu at the top of the Xcode window, change the run destination from a specific simulator or physical device to Any iOS Device (arm64). This tells Xcode you are building a generic, distributable archive, not a debug build for a specific device.
- Check Version and Build Numbers: Select the top-level project in the Navigator, then select your app's Target and go to the "General" tab.
- Version: This is the public-facing version string (e.g.,
1.0.0). It's what users see in the App Store. - Build: This is an internal, unique, and incrementing number (e.g.,
1,2,3). Every build you upload to App Store Connect for a given version must have a unique build number. For our first upload,1is perfect.
- Version: This is the public-facing version string (e.g.,
3. Creating the Application Archive
With our preparations complete, we can now create the archive. This process compiles your Swift/Objective-C code, links the Capacitor plugins, and packages your web assets into a single bundle that Xcode can then sign for distribution.
How To Upload Your App to the App Store (Xcode & App Store Connect)
This short video by Cederic Schmid provides a very clear and concise visual walkthrough of the archiving and distribution process we are about to undertake.
Watch the section from "time to archive". This clip demonstrates navigating the Product > Archive menu, validating the app, and starting the distribution process, which we will now do step-by-step.
In Xcode, with "Any iOS Device (arm64)" selected, navigate to the top menu bar and select Product > Archive.
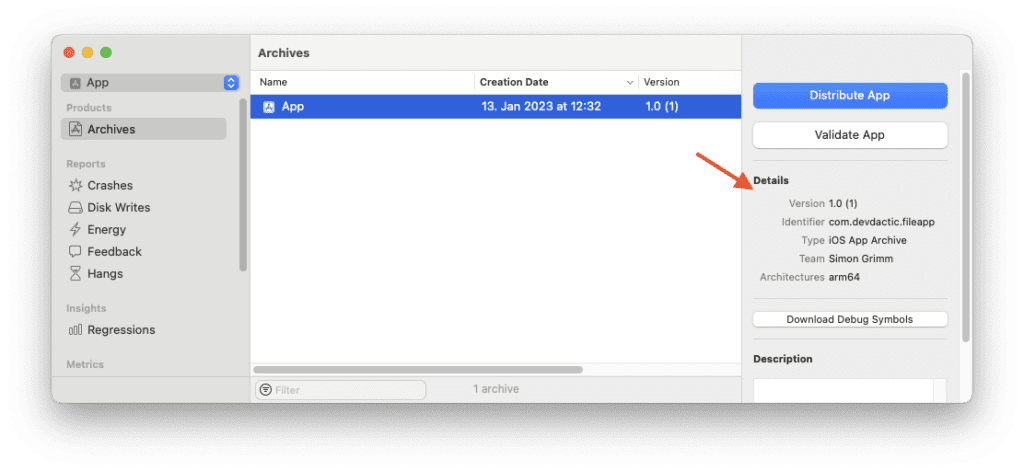
Xcode will now build the project. This may take a few minutes. Once it's finished, the Organizer window will automatically open, displaying your newly created archive.
4. Distributing the Archive to App Store Connect
The archive file itself is not the final product. It's a container that Xcode will now use to produce the signed .ipa file for upload. From the Organizer window, with your new archive selected, click the Distribute App button on the right.
This launches the distribution wizard. The process is straightforward, and for a standard submission, we will accept the defaults.
Building And Releasing Your Capacitor iOS App - Ionic Blog
The Ionic Blog provides an excellent, up-to-date guide on the Xcode distribution process. We will follow its steps to upload our archive.
Read through the section titled "iOS App Store Deployment". Pay close attention to the sequence of screens in the distribution wizard. We will be performing these exact steps.
Here is a summary of the steps you'll take in the wizard, as detailed in the reading:
- Method of Distribution: Choose App Store Connect. Click Next.
- Destination: Choose Upload. This will send the build directly to Apple's servers. Click Next.
- Distribution Options: This is a critical step.
- Xcode will prepare the app for App Store Connect. It will detect that the archive was built with a development certificate and state that it needs to be re-signed for App Store distribution.
- You will see a prompt to select a signing option. Ensure Automatically manage signing is selected. This allows Xcode to create and use the necessary App Store Distribution certificate and provisioning profile on your behalf.
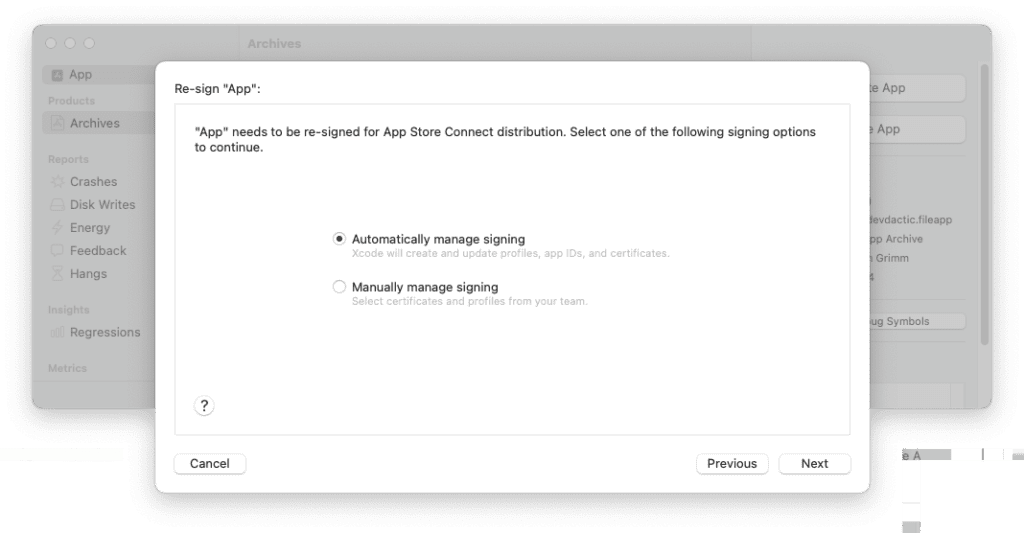
* Leave the other checkboxes (like including bitcode and symbols) at their default values. Click Next.
4. Review and Upload: Xcode will present a final summary of the app, its entitlements, and the certificate being used. Review the information and click Upload.
Xcode will now package and upload your app to App Store Connect. This can take several minutes depending on your app's size and your internet connection. Upon completion, you will see a "Successfully Uploaded" message.
Conclusion
Congratulations! You have successfully built, signed, and uploaded a release version of your iOS application. You've bridged the gap between your local development environment and Apple's global distribution platform.
Let's recap the key steps:
- We began by creating a final production build of our web assets and syncing them into the Xcode project.
- In Xcode, we set the build target to Any iOS Device (arm64) and verified our app's version and build numbers.
- Using the Product > Archive command, we created a distributable package of our application.
- From the Organizer window, we used the Distribute App wizard to Upload the archive to App Store Connect, letting Xcode automatically manage the re-signing process with a distribution certificate.
The binary package for your iOS app is now sitting on Apple's servers, waiting to be associated with a store listing. In our next lesson, we will focus on creating that listing by preparing the required store assets, such as screenshots, descriptions, and privacy information, in App Store Connect.
Can't find a good explanation? Sign up and we'll make it for you
Sign up